
OpenText RightFax 20.2
Connector for Microsoft Exchange
Administrator Guide

Edition
OpenText RightFax 20.2 Connector for Microsoft Exchange
April 22, 2020
Copyright © 2020 Open Text. All Rights Reserved. Trademarks owned by Open Text.
One or more patents may cover this product. For more information, please visit, https://www.opentext.com/patents.
Open Text Corporation
275 Frank Tompa Drive
Waterloo, Ontario, Canada
N2L 0A1
(519) 888-7111
http://www.opentext.com
Copyright Statement
Portions of this product Copyright © 2002-2006 Glyph & Cog, LLC. Portions Copyright © 2001 artofcode LLC.
This software is based in part on the work of the Independent JPEG Group. This software is based in part on the work of the Freetype Team.
Portions Copyright © 1998 Soft Horizons. Portions Copyright ©2001 URW++. All Rights Reserved. Includes Adobe® PDF Library technology. Adobe,
Acrobat and the Acrobat logo are trademarks of Adobe Systems Incorporated.
Disclaimer
No Warranties and Limitation of Liability. Every effort has been made to ensure the accuracy of the features and techniques presented in this publication.
However, Open Text Corporation and its affiliates accept no responsibility and offer no warranty whether expressed or implied, for the accuracy of this
publication.
OpenText RightFax 20.2 2 Connector for Microsoft Exchange Administrator Guide
Contents
Chapter 1: Configuring the RightFax Microsoft Exchange
Gateway 5
Overview 5
Supported versions 5
Licensing and activation 6
Adding and configuring the RightFax Microsoft Exchange
Gateway service 6
Running the RightFax Microsoft Exchange Gateway service
remotely 9
Troubleshooting the RightFaxMicrosoft Exchange Gateway 11
Resolving error messages 13
Chapter 2: Installing and configuring the RightFax
Connector 14
Architectural overview 14
Installing the RightFax Connector for Exchange 15
Configuring the RightFax Connector on the Microsoft
Exchange Server 16
Configuring multiple source transport servers 19
Synchronizing users from Active Directory to RightFax 19
Troubleshooting the RightFax Connector for Exchange 20
Chapter 3: Installing and configuring the EWS Connector 21
Adding and configuring the RightFax EWS Connector 21
Creating a transport rule manually 22
Chapter 4: Configuring STMP fax addressing for the
Outlook add-in 24
Chapter 5: Using Outlook to send and receive faxes 25
Installing the RightFax Outlook add-ins 25
Configuring the RightFax Outlook add-ins 26
Sending faxes using the RightFax Outlook add-in 26
Selecting a recipient and sending a fax from the Contacts list or
Global Address List 29
Sending faxes via certified delivery 30
Manually addressing Outlook messages to fax destinations 30
Receiving incoming faxes via email 31
Email notification of received faxes 33
Including the Fax ID in the email notification 35
Appendix A: File formats that convert to fax format 36
Preventing RightFax from converting specific types of files 37
Appendix B: Email-compatible embedded codes 38
OpenText RightFax 3 Connector for Microsoft Exchange Administrator Guide
*ATDATE 38
*ATTIME 39
*BILLINFO1 39
*BILLINFO2 39
*CHANNEL 39
*CONVERSION_BIAS 40
*COVER 40
*DELETE 40
*DELETEALL 40
*FCSFILE 40
*FROMFAXNUM 40
*FROMGENFAXNUM 41
*FROMGENPHONE 41
*FROMPHONE 41
*IGNORE 41
*LIBDOC 41
*LIBDOC2 41
*NOCOVER 42
*PREVIEW 42
*PRIORITY 42
*RETRYCOUNT 42
*RETRYINTERVAL 42
*SAVE 42
*SMARTRESUME 42
OpenText RightFax 20.2 4 Connector for Microsoft Exchange Administrator Guide

Chapter 1: Configuring the RightFaxMicrosoft Exchange Gateway
Chapter 1: Configuring the RightFax Microsoft Exchange Gateway
Overview
The Connector for Microsoft Exchange consists of software
components that are installed on the RightFax server and the Exchange
server. For Exchange 2010 SP2 or later, you can use the Exchange
Web Services option that does not require installing software on the
Exchange server.
With Microsoft Exchange and the RightFax add-in for Exchange,
Cached Exchange Mode must be enabled. If you wish to avoid enabling
Cached Exchange Mode, you can use SMTP fax addressing.
Following is a brief description of each component.
The RightFax Microsoft Exchange Gateway is a configurable
RightFax service that functions as a communication link between
RightFax and Exchange. You must enable one or more gateways on a
RightFax server. The gateway is installed on the RightFax server.
The RightFax Connector for Exchange is an Exchange service that
handles all communication between the Exchange and RightFax
servers. The connector service is installed on the Exchange server.
As an alternative to the RightFax Connector for Exchange, the
RightFax Exchange Web Services (EWS) Connector is a RightFax
service that handles all communications between Exchange or
Exchange Online and the RightFax server. The EWS Connector is
installed on the RightFax server. (Works with Exchange 2010 SP2 or
later and Exchange Online.)
The RightFax Outlook add-ins allow Microsoft Outlook users to
create and send faxes from a RightFax add-in for Outlook. The add-in
includes a fax viewer.
When you install one of the RightFax add-ins, the RightFax Send a Fax
button is added to the Outlook toolbar so users can easily create and
address new faxes.
With Microsoft Exchange and the RightFax add-in for Exchange,
Cached Exchange Mode must be enabled. If you wish to avoid enabling
Cached Exchange Mode, you can use the RightFax add-in for SMTP
fax addressing and the RightFax SMTP email gateway.
The RightFax Synchronization Module allows RightFax
administrators to create and synchronize users from Active Directory
domains, groups, and organizational units. An Exchange-specific profile
is included with the synchronization module and maps Active Directory
and Exchange user attributes to RightFax user attributes. For more
information, see the RightFax Administrator Guide.
Supported versions
Connector for Microsoft Exchange supports the following versions of
Microsoft Exchange on Windows Server 2012 or later, depending on
which connector option you choose.
With the RightFax Connector installed on the Exchange server (version
2010 or later):
OpenText RightFax 5 Connector for Microsoft Exchange Administrator Guide

Chapter 1: Configuring the RightFaxMicrosoft Exchange Gateway
l Microsoft Exchange 2019
l Microsoft Exchange 2016
l Microsoft Exchange 2013
l Microsoft Exchange 2010
With the RightFax EWS Connector installed on the RightFax server:
l Microsoft Exchange 2019
l Microsoft Exchange 2016
l Microsoft Exchange 2013
l Microsoft Exchange 2010 SP2 or later
You can also use Exchange Online with Office 365 instead of a locally
installed Exchange server.
Licensing and activation
The Connector for Microsoft Exchange is included in the RightFax
setup program but must be installed and activated before you can use it.
To activate the Connector for Microsoft Exchange, license a RightFax
server type that includes this module, or license this module separately.
For information on installing and activating new components, see the
RightFax Installation Guide.
Adding and configuring the RightFax
Microsoft Exchange Gateway service
To add and configure the Gateway
1. Log on to the RightFax server as an Administrator.
2. In Windows Control Panel, double-click RightFax Email
Gateway.
3. To add a gateway, in the Email Configuration window, click
Add Gateway.
4. In the Email Gateway Selection window, in the list of
gateways, click Microsoft Exchange, and then click Select.
Tip You can install multiple email gateways. Each gateway is
listed in the tree in the left pane, and must be separately
configured to work with your Exchange server and your
network environment. To view its configuration options, click a
gateway in the list.
5. Click MSEXCH to view the configuration options for the
RightFax Microsoft Exchange Gateway service.
6. Configure the gateway service using the options described in the
next section. When finished, click OK.
Configuring the options on the General tab
On the Email Configuration window, click the General tab.
OpenText RightFax 20.2 6 Connector for Microsoft Exchange Administrator Guide

Chapter 1: Configuring the RightFaxMicrosoft Exchange Gateway
Location of mail files
Depending on whether you are using the RightFax Connector installed
on the Exchange server or the RightFax EWS Connector, enter one of
the following in the Location of mail files box:
l For the RightFax Connector, enter the UNC path to the message
transfer directory located on your Exchange server.
The message transfer directory is a Windows folder created when
the RightFax Connector for Exchange is installed on the Exchange
server. After installing the RightFax Connector, share the message
transfer directory and grant the email gateway service account (see
Selecting a service account on page9), share access and the
security permission of “modify.” You can specify any folder on the
Exchange server, but the default location \\<Exchange
Server>\RFaxGate is recommended.
l For the EWS Connector, enter c:\RFaxGate.
FROM message
Enter a descriptive name that will appear in the From field of all inbound
documents sent to Exchange from the Fax Server.
With the RightFax EWS Connector, this field is not used.
Default form
Select Advanced form if users should be able to specify fax
addressing and sending options using the RightFax Outlook add-in.
Select None to require users to enter fax adresses manually.
Remote E-mail gateway service
Allows the email gateway processes to execute on a remote computer
rather than on the local computer. It also prevents the email gateway
service from being started by the RightFax server, so select this box if
you intend to run the gateway remotely. For more information on running
the gateway remotely see Running the RightFax Microsoft Exchange
Gateway service remotely on page9.
Disable outbound faxing
Prevents Outlook users from sending mail messages to fax addresses.
When you select this option, the Connector for Microsoft Exchange will
only route received faxes and notifications to Outlook users.
Send through DEFAULT user when email sender is unknown
If the Outlook sender does not have a RightFax account, this option
specifies that the RightFax “Default” user ID will be used to send the
fax. The cover sheet will include the sender’s email address.
If this option is not selected, faxes sent from Outlook that have no
matching RightFax user ID will not be sent.
Process outbound email for this server only
This option is only for use in organizations that use multiple RightFax
Exchange Gateways. In a multiple gateway environment, each
gateway can process faxes.
If enabled, this option will restrict all other gateways from processing
faxes sent from Outlook using the RightFax Outlook add-in. Disabling
this option allows all RightFax Exchange Gateways within your
organization to process RightFax email. For more information, see
Configuring processing timeouts with multiple gateways on page12.
Event Log level
Select at which level to log information in the Application Event Log
under the service name “RightFax Email Gateway Module.”
l None No information.
l Terse Critical errors only.
l Normal Errors and major events only.
l Verbose All significant events. Use temporarily to track and resolve
problems.
OpenText RightFax 20.2 7 Connector for Microsoft Exchange Administrator Guide
Chapter 1: Configuring the RightFaxMicrosoft Exchange Gateway
Caution Leaving the verbose log level for long periods of time can
fill up the Event Log and may prevent new events from being
logged.
Note If you have a problem that can be duplicated, set the LogLevel
for all RightFax server applications temporarily to Verbose and go
through the steps to duplicate the problem.
Frequency
Sets the interval, in seconds, between checks to the Exchange server
and the Fax Server for work to do (such as received faxes to route or
email to convert to faxes). Decreasing this value is not recommended.
It increases the load on the fax server.
Top margin of message header
Enter the number of lines to add to the top margin of mail messages
when converting to fax format. Adding a few lines to the top margin
prevents some plain paper fax machines from cutting off the top of the
message.
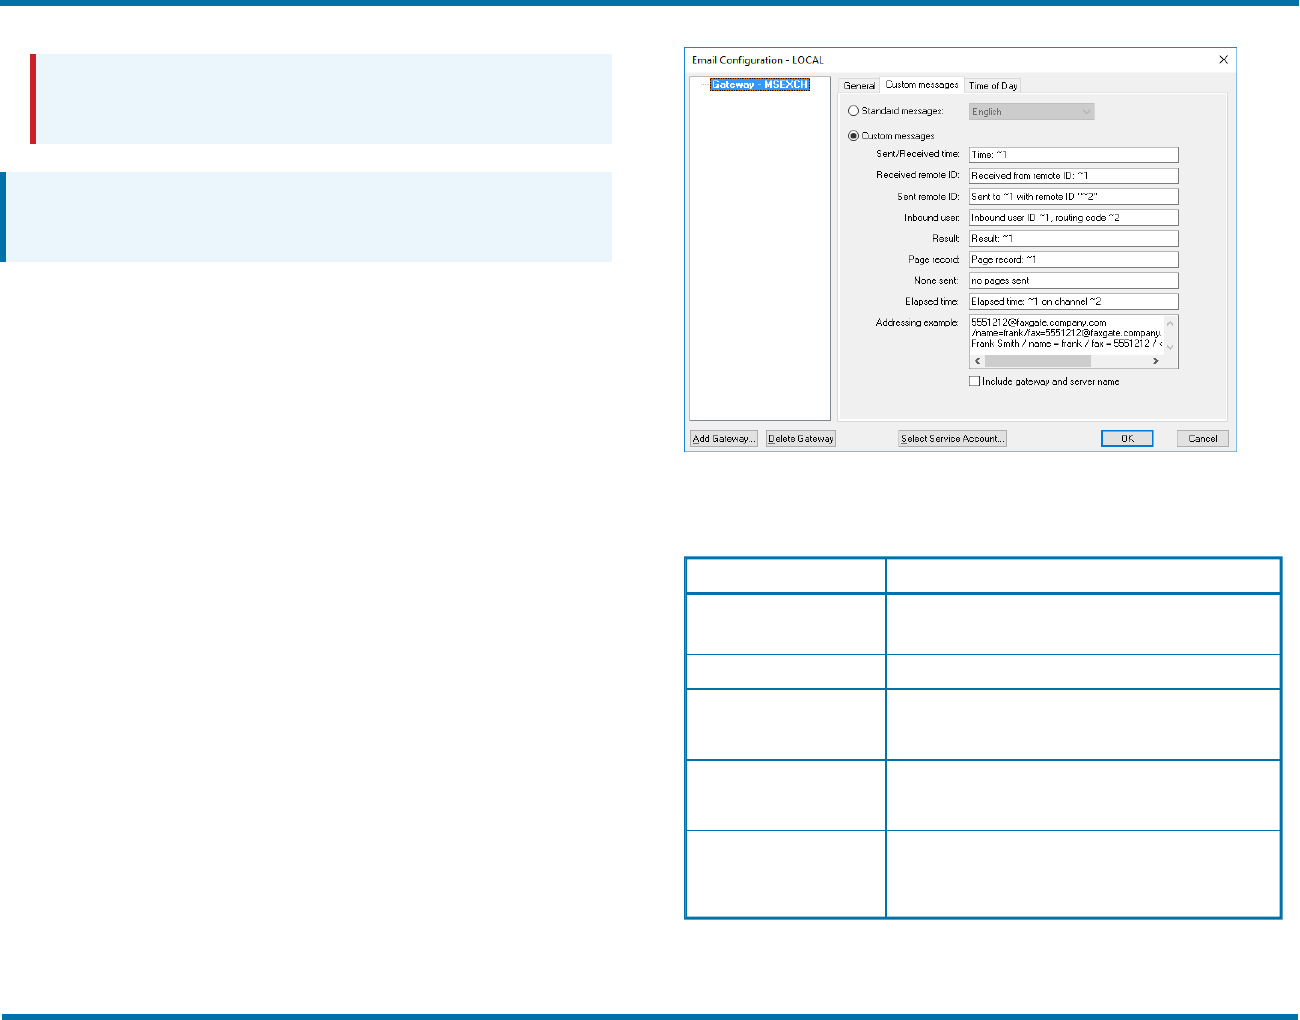
Configuring the options on the Custom Messages tab
When a fax is received as an email attachment and when an email
notification about the status of a fax is received, the received mail
message includes one or more customizable messages providing
information about the status of the fax. To customize the text of these
messages, click the Custom Messages tab.
Each message lets you combine text with one or more variables. Each
message has its own available variables, described in the following
table.
Notification message Variables
Sent/Received time ~1 = Date (in Windowslocale format) and time
(HH:MM)
Received remote ID ~1 = Remote ID
Sent remote ID ~1 = The destination faxnumber
~2 = The destination remote ID
Inbound user ~1 = The RightFax user ID of the faxrecipient
~2 = The faxrecipient'srouting code
Result ~1 = The result code and any accompanying text as
reported by the fax board (These codesand messages
differ depending on your faxboard type)
OpenText RightFax 20.2 8 Connector for Microsoft Exchange Administrator Guide
Chapter 1: Configuring the RightFaxMicrosoft Exchange Gateway
Notification message Variables
Page record ~1 = The range of page numbers successfullysent or
received
None sent None.
Elapsed time ~1 = The totalfaxprocessing time the fax board showed
(MM:SS)
~2 = The faxchannelused to send or receive the fax.
Include gatewayand
server name
Select this check boxto include the identityof the
RightFax server and gatewaythat processed the email.
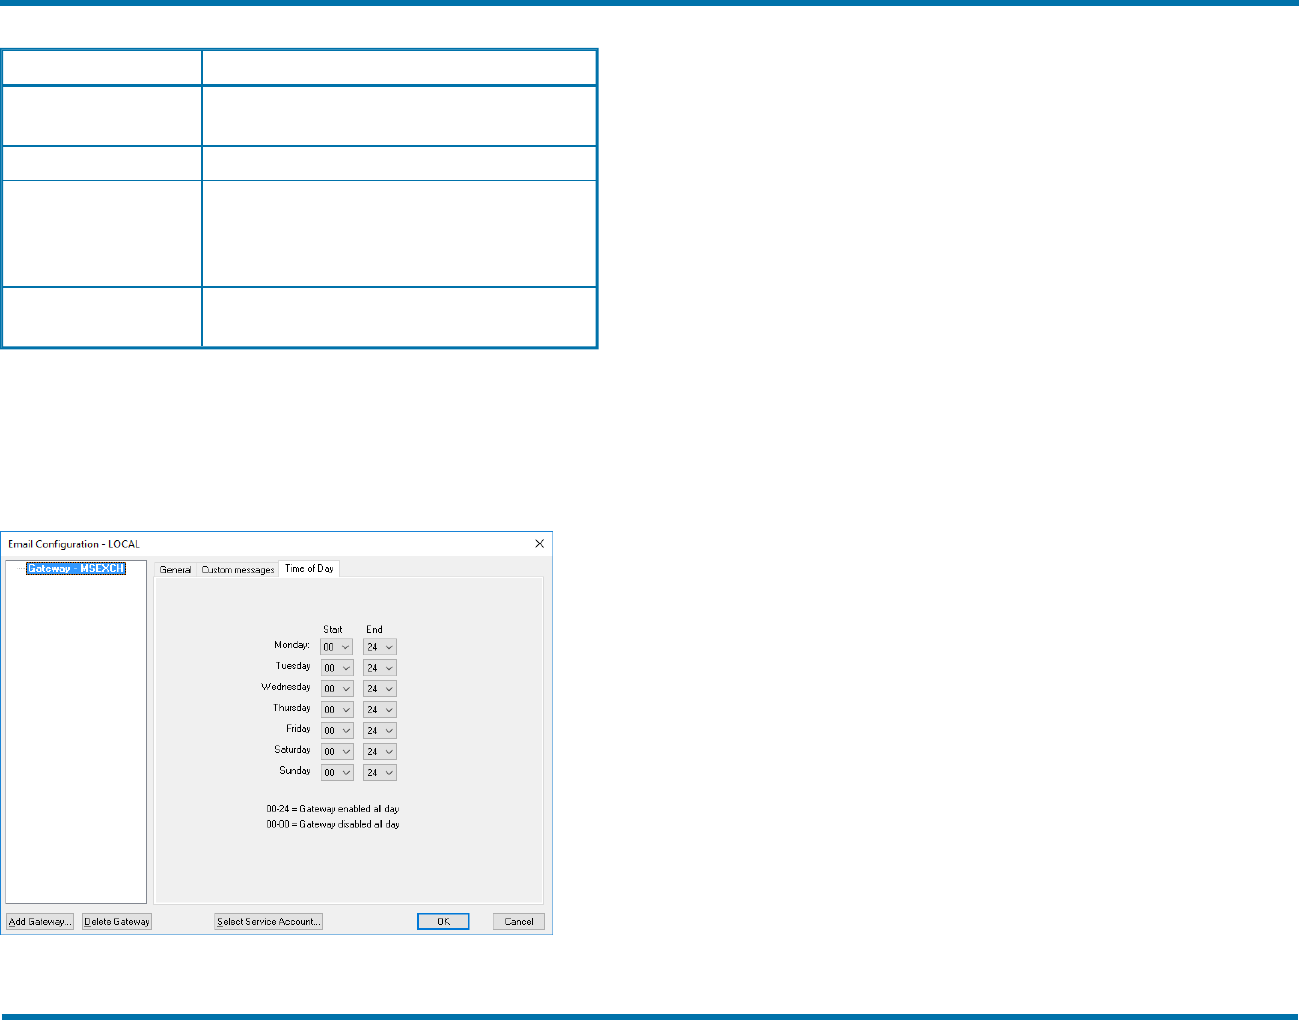
Configuring the options on the Time of Day tab
On the Email Configuration window, click the Time of Day tab.
You can set the time when the gateway will send and receive faxes.
Select the start and end time for each day that the gateway should send
and receive faxes.
Selecting a service account
Add a service account to run the gateway service. This account must
be a domain user that belongs to the local admins group on the
RightFax server. Adding an account without these requirements may
prevent the gateway from starting, or from accessing the message
transfer directory if you are using the RightFax Connector on the
Exchange server.
If you are using the EWS connector, the service account must have
"modify" permission on the location of mail files that you specified on
the General tab.
To change the gateway service account
1. In Windows Control Panel, double-click RightFax Email
Gateway.
2. In the Email Configuration window, click Select Service
Account.
3. In the RightFax Service Account Editor window, next to the
Gateways Service Account box, click Modify.
4. Select This account, and in the box, type the service account
information using the format of: Domain\User Account or Local
Computer\User Account.
5. Enter the password for the selected user account in both the
Password box and the Confirm Password box.
6. Click OK to apply the new service account.
Running the RightFax Microsoft Exchange
Gateway service remotely
By default, the RightFax Microsoft Exchange Gateway service runs on
the RightFax server. You can run the Exchange gateway service on a
different machine under these conditions:
OpenText RightFax 20.2 9 Connector for Microsoft Exchange Administrator Guide

Chapter 1: Configuring the RightFaxMicrosoft Exchange Gateway
l You want to decrease the workload on the fax server.
l You anticipate a high volume of gateway traffic and do not want the
added workload to interfere with the routine operation of the fax
server.
To run the RightFax Microsoft Exchange Gateway service
remotely
1. On the RightFax server, on the Start menu click RightFax, and
then click Enterprise Fax Manager.
2. In the left pane, expand the server, and then click Services.
3. In the list of services in the right pane, double-click RightFax
Email Gateway Module.
4. To add a new gateway:
a. Click Add Gateway. Select Microsoft Exchange and
click Select.
b. Select the new gateway in the pane on the left and select
the Remote Email gateway service check box.
c. In the Location of mail files box, enter the UNC path of
the RightFax\Gateway folder (for example, \\Exchange
Server\C$\Program Files\RightFax\RFaxGate).
d. Click Select Service Account. Next to the Gateways
Service Account box, click Modify. Make a note of the
domain and user account used by your gateways. For
security purposes, the password for the user account is
not shown, but have the user name and password on
hand for later steps.
e. Click Cancel to close the Service Account dialog box,
and click OK to save and close the Email Configuration
dialog box.
5. Add the gateway user account you noted above to the
Administrators group on both the RightFax server and the remote
email gateway computer.
6. Log on to the remote email gateway computer using the email
gateway service account user name and password.
7. Map a drive to the administrative share for the drive where the
RightFax server is installed (for example, \\RFSERVER\C$).
8. Open a command prompt and change to the RightFax\Bin folder
on the drive you mapped and enter the following command:
addsrv RFEMAIL#“RightFax Remote Gateway#
Module”“\\RFSERVER\C$\Program
Files\RightFax\Gateway\EXCHGateway.exe”
Where # is the number of the email gateway you added on the
RightFax server, and RFSERVER\C$ is the name of the
administrative share on the RightFax server. When complete,
the message Create Service Success appears.
Close the command prompt window.
9. On the Start menu, click Windows Administrative Tools, and
then click Services.
10. In the list of services, double-click RightFax Remote
Gateway# Module, where # is the email gateway number. The
Properties dialog box opens.
11. Under Startup Type, click Automatic.
12. Under Log on as, select This account, and then click the
browse button to open a dialog box listing available user
accounts.
13. Open a list of user IDs on the email gateway service account
domain, and double-click the email gateway service account
user ID you noted earlier. Click OK to return to the Services
dialog box.
14. In the Password and Confirm Password boxes, enter the
OpenText RightFax 20.2 10 Connector for Microsoft Exchange Administrator Guide

Chapter 1: Configuring the RightFaxMicrosoft Exchange Gateway
password for the selected service account. Click OK, and then
click Close.
15. Open the registry editor and navigate to
HKEY_LOCAL_MACHINE\System\CurrentControlSet
\Services\GATEWAY#
Where # is the number of the email gateway.
16. On the Edit menu, click New, and select String Value. Type
AppParameters and press Enter to name the new registry key.
17. Double-click the new AppParameters key to open the Edit
String dialog box. In the String box, enter:
-fRFSERVER -sgateway# -
L\\RFSERVER\C$\Progra~1\RightFax
Where RFSERVER is the name of the RightFax server, # is the
Email Gateway number, and
\\RFSERVER\C$\Progra~1\RightFax
is the UNC path to the RightFax folder on the RightFax server.
(The short name format is required.)
Note Multiple email gateways are sequentially numbered,
beginning with the second gateway listed in the Email
Gateway Configuration. If you are configuring the first email
gateway shown in the Email Gateway Configuration to run on a
remote server, the number sign (#) shown in the syntax above
is NOT required. This is also true if your fax server is
configured for a single email gateway.
18. In the registry editor, navigate to HKEY_CLASSES_ROOT and
add a new key called RightFax.
19. Under the RightFax key, add a new key called Server.
20. Add a new string value to the Server key called Path. In the Data
value box enter the UNC path to the RightFax\Sharedfiles folder
on the RightFax server (for example, \\RFSERVER\C$\Program
Files\RightFax\Shared files).
21. Close the registry editor.
22. Run the Services program from Windows Administrative Tools.
23. Select the “RightFax Remote Gateway# Module” service. If the
service is running, click Stop. When the service is stopped,
click Start. The fax server will now begin using the remote email
gateway service.
Troubleshooting the RightFax
Microsoft Exchange Gateway
If you experience problems with your RightFax Microsoft Exchange
Gateway service, first check for errors in the Application log of the
Windows Event Viewer.
The information saved to the Event log is determined by the LogLevel
setting in the RightFax Email Gateway configuration program (see
Event Log level in Configuring the options on the General tab on
page6). With the log level set to Terse, only critical errors are recorded.
Log levels Normal and Verbose record more information to help track
down problems.
To open the Event Viewer
1. On the Start menu, click Windows Administrative Tools, and
then click Event Viewer.
2. Under Windows Logs, click Application.
3. To find email gateway-related problems, in the Source column
find entries labeled RightFax Email Gateway Module.
4. To view a description of an error, double-click the entry.
To run the gateway in the Command Prompt window
Running the RightFax Microsoft Exchange Gateway service in the
Command Prompt window also gives a detailed account of what is
OpenText RightFax 20.2 11 Connector for Microsoft Exchange Administrator Guide

Chapter 1: Configuring the RightFaxMicrosoft Exchange Gateway
happening with the gateway.
1. Open Enterprise Fax Manager.
2. In the list of RightFax services, right-click RightFax E-mail
Gateway and choose Debug. The Command Prompt window
opens.
To output debug information to the event log or a text file
1. Stop the RightFax Email Gateway Module service.
2. Open The Command Prompt window.
3. Change to the RightFax\Gateway folder on the RightFax server
and then do one of the following:
l To output to the event log, type:
exchgateway -d -1 -sgateway# -L
l To output to a text file, type:
exchgateway -d -1 -sgateway# -O -file.txt
Where # is the number of the email gateway. This number is
zero-based, so your first email gateway is referred to as
“gateway,” your second email gateway is referred to as
“gateway1,” and so on.
Example
exchgateway -d -1 -sgateway -O -file.txt
To confirm the gateway number, open the Windows registry and
check the Gateway keys under HKEY_LOCAL_
MACHINE\SOFTWARE\RightFax\Gateways (64-bit: HKEY_
LOCAL_MACHINE\Software\Wow6432Node\
RightFax\Gateway).
To increase the buffer size of the Command Prompt window
When running the email gateway in the Command Prompt window,
set the window properties to allow you to scroll backwards some
distance.
1. Click the Command Prompt icon in the top left of the Command
Prompt window.
2. Click Properties to open the Command Prompt Properties
dialog box.
3. Click the Layout tab, and set Screen Buffer Size height to
2000.
4. To stop debug and view your output, press Ctrl + C on your
keyboard. Open the output file located in the \RightFax\Gateway
folder.
Configuring processing timeouts with multiple
gateways
When multiple RightFax gateways are in use, you can restrict a
gateway to process faxes for a single RightFax server.
When this option is enabled, other gateways will ignore the message in
the drop directory until the specified gateway picks it up, or when a
specified timeout elapses, whichever comes first. After the timeout,
any gateway can process the fax. This process delays faxes up to 20
minutes.
To set the gateway processing timeout period
1. On the RightFax server, run the Windows Registry Editor and
browse to the subkey:
HKLM\Software\RightFax\Gateway\Gateway
2. Set the PulseFileTimeout value to 0.
3. Create a new DWORD entry called ProcessingTimeout.
4. Enter the time (in minutes) to wait before allowing any gateway
to process faxes.
OpenText RightFax 20.2 12 Connector for Microsoft Exchange Administrator Guide

Chapter 1: Configuring the RightFaxMicrosoft Exchange Gateway
To always allow any gateway to process faxes, set this value to
zero .
5. Save and close the Windows Registry Editor.
Resolving error messages
Error 53
This Windows networking error often indicates that the UNC name
specified for the Location of Mail Files in the gateway configuration is
invalid or unavailable.
If the specified path is correct and valid, you may be using an account
to start the RightFax Email Gateway Module service that does not have
access rights to that folder.
Error 85 The local device is already in use
This Windows networking error indicates that the drive to which
RightFax is trying to connect the UNC name for the Location of Mail
Files or API Files is already assigned.
Faxes are going out, but no email notifications are being sent
Normally, users who send faxes via mail do not have a RightFax
account and the faxes are routed through the RightFax Default fax
mailbox.
When a fax goes out, RightFax tries to notify the user of the fax status.
Since the fax went through the Default fax mailbox, RightFax tried to
notify the network user Default, not the sender.
Cannot access inbound/outbound folder
The folder entered in the Location of In/Out Directories box in the
RightFax Connector dialog box is invalid. The path specified may not
exist, may not use proper UNC naming conventions, may be
misspelled, or the user account specified for the RightFax Connector
Service on the Exchange server may not have administrative access to
the specified folder.
Error resolving destination mailbox: MailBoxName
An incoming fax from the Fax Server could not be converted correctly.
This is usually because the user’s Routing Info box in Enterprise Fax
Manager does not match a user email address. Make sure the user's
routing information matches the user’s Exchange Distinguished Name.
OpenText RightFax 20.2 13 Connector for Microsoft Exchange Administrator Guide
Chapter 2: Installing and configuring the RightFaxConnector
Chapter 2: Installing and configuring the RightFax Connector
This chapter applies to the RightFax Connector installed on the
RightFax server. If you want to use the RightFax EWS Connector
instead, see Installing and configuring the EWS Connector on page21.
Architectural overview
After installing and configuring the RightFax Microsoft Exchange
Gateway on the RightFax server, install and configure the RightFax
Connector for Exchange on the Exchange Server.
The Connector is a Windows service that runs on Exchange Hub
Transport servers using a Windows service account (the local system).
The connector service is one file (RFExchConn.exe) that directs
RightFax messaging through Exchange. The connector is configured
using RightFax Exchange Connector in the Control Panel.
About the RFaxGate folder
The connector installation creates a folder on Exchange servers called
RFaxGate that contains two subfolders (IN and OUT). Both subfolders
contain the heartbeat file, pulse.txt.
The default location of the RFaxGate folder is \Program Files\RightFax.
The RFaxGate folder and subfolders IN and OUTare used by both the
connector and the Exchange Email Gateway (on the RightFax server)
to process outbound and inbound faxes.
l The connector writes the pulse.txt file to the RFaxGate\IN folder,
and to ensure the gateway is running, verifies that the pulse.txt file
has been updated in the \RFaxGate\OUT folder.
l The Exchange Email Gateway Module writes the pulse.txt file to the
\RFaxGate\OUT folder, and to ensure the connector service is
running, verifies that the pulse.txt file in the RFaxGate\IN folder has
been updated within the specified time interval (45 seconds by
default).
Outbound faxing workflow
Outbound faxing process from a Microsoft Outlook client
1. A user addresses a fax using a format that is recognizable by the
connector (see Manually addressing Outlook messages to fax
destinations on page30).
l The subject of the email is converted to the notes field on the
fax cover page, and the body of the email is the first page of
the fax.
l Any attachments are converted and shown as additional fax
pages.
2. The connector processes the fax and creates temporary files
(listed below) that are placed in the \RFaxGate\OUT folder.
OpenText RightFax 14 Connector for Microsoft Exchange Administrator Guide

Chapter 2: Installing and configuring the RightFaxConnector
l HXXXXXXX.tmp includes fax header information.
l MXXXXXXX.tmp includes the message body and the first
page of the fax.
l AXXXXXXX.tmp includes attachments that are converted to
additional fax pages.
3. The Exchange Email Gateway module on the RightFax server
scans for and processes new messages in the \RFaxGate\OUT
folder.
4. The gateway module notifies the RightFax Server module of a
new outbound fax document and prepares the document for
faxing.
Inbound faxing workflow
Inbound faxing process with Exchange
1. A fax is received into RightFax and matched to a recipient in the
RightFax database.
2. If the user record in the database is associated with a routing
type of Exchange, the system creates three temporary files:
l HXXXXXXX.tmp includes fax header information.
l MXXXXXXX.tmp includes the message body and the first
page of the fax.
l AXXXXXXX.tmp includes attachments that are converted to
additional fax pages.
3. The *.tmp files are moved by the Exchange Gateway into the
\RFaxGate\IN folder on the Exchange server.
4. The connector then passes the files to Exchange for processing.
Installing the RightFax Connector for
Exchange
To ensure that your RightFax Connector for Exchange installation goes
smoothly and to avoid unnecessary delays, it is important to perform
each step in the installation completely and correctly before proceeding
to the next step.
To install the RightFax Connector
1. Log on to the computer using a Windows Administrator account
that is a member of the Exchange Organization Management
group. This role is required because the Connector is installed as
a Foreign Connector to Exchange.
2. Run Setup.exe. The RightFax Product Suite Setup wizard
opens.
3. The connector requires Microsoft .NET Framework 4.7.2. If this
software is not installed on your system, Setup prompts you to
install it.
l To install, click OK.
l To cancel Setup and install .NET Framework 4.7.2 yourself,
click Cancel.
4. Review the welcome screen and click Next.
5. Carefully read and accept the license agreement and click Next.
6. Select the RightFax Exchange Connector Setup component
and click Next.
7. The Preview Requirements step lists third-party software
required by the Exchange Connector and also lists the status of
setup operations. Required software has a status of Not
Installed. To continue, click Next.
8. To apply your settings and install required third-party software,
OpenText RightFax 20.2 15 Connector for Microsoft Exchange Administrator Guide

Chapter 2: Installing and configuring the RightFaxConnector
click Apply. This may take several minutes. When finished,
click Next.
9. To install RightFax software, click Next, and then click Apply.
This may take several minutes.
10. When prompted, enter a Windows account to run the connector
service, and then click OK.
The account you choose must:
l Have access to the domain.
l Be a member of the Organization Management group.
l Have the right to log on as service on the local computer.
11. In the RightFax Exchange Connector Configuration window,
click the button next to the NDR Mailbox field.
12. In the pop-up window, enter a valid Exchange mailbox that will
be used by the connector to deliver errant email, and then click
OK.
Note Entering an invalid account will halt the connector
installation.
13. To complete the Exchange Connector installation, click Next,
and then click Close.
14. To enable the RightFax Gateway to communicate with the
connector, share the \Program Files\RightFax\RFaxGate folder.
Set the share access permissions to include the Windows
service account used to run the Exchange Email Gateway on the
RightFax server. This account must have Change access to the
share and the security permission of Modify.
Configuring the RightFax server to work with the
connector
After installing the connector software on the Exchange server,
configure the Exchange Gateway on the RightFax server.
To configure the Exchange gateway
1. Log on to the RightFax server as an administrator.
2. In Windows Control Panel, double-click RightFax Email
Gateway.
3. On the General tab, in the Location of mail files box, enter the
location of the message transfer directory you specified during
the connector installation.
If you accepted the default folder location during the connector
installation on the Exchange server, this is the
\ExchServer\Program Files\RightFax\RFaxGate folder.
Configuring the RightFax Connector on the
Microsoft Exchange Server
After the connector is installed, you can customize the connector
configuration settings using the RightFax Exchange Connector control
panel program.
To configure the RightFax Connector for Microsoft Exchange
1. In Windows Control Panel on the Exchange server, right-click
RightFax Exchange Connector, and then click Run as.
2. In the RightFax Exchange Connector configuration window,
configure each of the following:
l General options on the next page.
OpenText RightFax 20.2 16 Connector for Microsoft Exchange Administrator Guide

Chapter 2: Installing and configuring the RightFaxConnector
l Address space information on the next page.
l Logging messages on the next page.
General options
Exchange Install Directory
The folder where Exchange is installed.
Gateway Directory
The Gateway Directory stores the mail messages that are en route to
the RightFax server and fax image files that are en route to the
Exchange server. You must specify a Gateway Directory for each
RightFax server that the RightFax Connector for Exchange will
communicate with. The Gateway Directory must be a local folder on the
Exchange server, and must be specified as a local file path (for
example, C:\Program Files\RightFax\RFaxGate).
Drop Directory
Each foreign connector installed on an Exchange server that does not
transmit messages via SMTP must use a Drop directory for outbound
messaging. Messages sent to the address space specified in the
RightFax Exchange Connector configuration (RFAX by default) are
placed into the connector's Drop directory where they are processed by
the connector and passed to the Gateway Directory. The default
location of the connector's Drop directory is on the Exchange server at
\Program Files\Microsoft\Exchange Server\RightFax Exchange
Connector.
Pickup Directory
Inbound messages taken from the \Gateway\In folder are processed by
the connector and placed into the Exchange Server Pickup directory.
The default location of the Pickup directory is on the Exchange server at
\Program Files\Microsoft\Exchange Server\Transport Roles\Pickup.
Caution The pickup directory is an Exchange folder used by all
foreign connectors. It should not be deleted, modified, or moved.
NDR Mailbox
Select an Exchange mailbox that will receive undeliverable fax
messages. This field is required by the connector, and must be
populated with a valid Exchange mailbox.
Source Transport Servers
Specifies Exchange Transport servers to route faxes to and from the
RightFax Exchange Connector. Click the browse button to select from
available Transport Servers.
If you specify multiple transport servers, configure the directories to
allow the servers to share the files. See Configuring multiple source
transport servers on page19.
Message size
Click No limit to accept and forward messages of all sizes to the fax
server. Click Maximum (KB) to specify the maximum file size of
messages that the Exchange server will pass to the fax server. Enter
the maximum file size in kilobytes. Messages that exceed this file size
will not be forwarded to the fax server.
Caution By default, the Exchange Transport service is configured
with a 10MB message size limit. If your organization sends or
receives faxes that are greater than 10MB, set the Maximum receive
size or Maximum send size limit on the Exchange Transport service
settings to a value greater than the largest sent or received document.
Messages greater than the message size limit will generate an NDR
message and will not be processed. Inbound faxes will be lost if their
total size exceeds message (receive) size limits, and the recipient
RightFax user is configured (in RightFax) with the option to Delete
After Routing. For information on configuring Exchange message
size limits, see Microsoft documentation.
OpenText RightFax 20.2 17 Connector for Microsoft Exchange Administrator Guide

Chapter 2: Installing and configuring the RightFaxConnector
Address space information
Add, edit, or remove an address space
This is a list of the Exchange address spaces that will be routed to the
fax server. All messages within the address spaces specified here will
be routed to the fax server. By default, messages with the RFAX and
FAX address spaces will be routed by the connector.
An asterisk indicates that all address formats will be accepted for this
address type. Address spaces other than "FAX" must use the RFAX:
format on address spaces other than “FAX.” For more information about
addressing formats, see Manually addressing Outlook messages to fax
destinations on page30.
A cost value (1–100) for messages with this address type is relevant
when using two or more Fax Servers. Exchange routes messages to
the RightFax server with the lowest cost value.
Connector scope
l Select Entire Organization to enable the connector for all
Exchange servers on your network.
l Select AD Site to enable the connector for a specific routing group.
Logging messages
The Logging tab allows RightFax administrators to control the types of
messages that will be logged by the connector. Each of these
messages can be customized using categories and a corresponding
logging level. By default all output is written to the Windows Event
Viewer Application Log.
Logging Categories
l ExchConnInbound logs inbound (fax-to-email) processes.
l ExchConnManager logs connector manager events that are
associated with in- and outbound sub-processes.
l ExchConnOutbound logs outbound (email-to-fax) processes.
l RightFax Tools logs events associated with the connector
configuration control panel.
Logging Output
Select the level of information that will be logged in the Application
Event Log under the service name “RightFax Exchange Connector.”
l Off does not record information to the Event Log.
l Error records only critical errors.
l Info records informational events (such as normal starting and
stopping of the connector), warnings, and errors.
l Verbose records all events and is most useful for tracking and
resolving problems. If you leave this option set to Verbose for long
periods of time, the Event Log can become full quickly, missing new
event logs.
l Warning records only critical errors and warnings.
Changing the Connector Service Account
The RightFax Exchange Connector runs as a local service
(RFExchConn.exe) on Exchange servers. The Windows local system
account is used to run the connector service by default, but can be
changed if necessary. All account types require read access to the
Drop directory, read and write access to Pickup directory and Gateway
directory, and must have permission to logon as a service.
To change the connector service account
1. To change the service account, click Service Account. The
Service Account dialog box opens.
2. Select This account.
3. Type the service account information using the format:
OpenText RightFax 20.2 18 Connector for Microsoft Exchange Administrator Guide

Chapter 2: Installing and configuring the RightFaxConnector
Domain\User account or Local Computer\User account.
4. Enter the password for the selected user account in both the
Password and Confirm Password boxes.
5. Click OK to apply the new service account.
Configuring multiple source transport servers
For high availability or load balancing, you can specify more than one
Exchange Transport Server on the General tab in the RightFax
Exchange Connector control panel.
To share a drop directory among the transports:
l Create a shared folder
l Configure the path to the shared folder
Creating a shared folder
1. Create the drop directory folder (in the following examples,
C:\DROP\RFDROP).
2. Set the sharing properties for the folder to grant Everyone full
control, change, and read permissions.
3. Set the security properties for the folder to grant NETWORK
SERVICE full permissions.
Configuring the path to the shared folder
Use the Exchange Management Shell program to configure the
TransportServer and the RightFax Foreign Connector with the path to
the shared drop directory you created.
To configure the path to the shared folder
1. From the command prompt, run the Exchange Management
Shell program.
2. Set the transport path with the following command:
Set-TranportServer <HubTranportName> -
RootDropDirectoryPath <Path or UNC Path>
Default values for the transport path:
l For Exchange 2010,
C:\ProgramFiles\Microsoft\ExchangeServer\V14
l For Exchange 2013, C:\Program Files\Microsoft\Exchange
Server\V15
Example: Set-TranportServer <EXCH2010> -
RootDropDirectoryPath <\\exch2010\DROP>
3. Set the foreign connector drop directory with the following
command:
Set-ForeignConnector
“ForeignConnectorName” -DropDirectory
“DropDirectoryName”
Example: Set-ForeignConnector “RightFax Exchange
Connector EXCH2010” -DropDirectory “RFDROP”
4. Restart the RightFax Exchange Connector and send a test
email.
Synchronizing users from Active Directory to
RightFax
All user synchronization between the RightFax server and Exchange
environments is managed by the RightFax Sync Module.
XML-based transform files (for synchronizing user information with
RightFax) are available for Exchange environments.
For information on user synchronization, refer to the RightFax
Administrator Guide.
OpenText RightFax 20.2 19 Connector for Microsoft Exchange Administrator Guide

Chapter 2: Installing and configuring the RightFaxConnector
Troubleshooting the RightFax Connector for
Exchange
If you experience problems with your RightFax Connector for
Exchange, first check for errors in the Application log of the Windows
Event Viewer.
The information saved to the event log is determined by the log level
setting in the RightFax Connector configuration program. With the log
level set to terse, only critical errors are recorded. Log levels normal and
verbose record more information that help identify problems.
To check for errors in the Application log of the Event Viewer
1. On the Start menu, click Windows Administrative Tools, and
then click Event Viewer.
2. Under Windows Logs, click Application.
3. To find connector-related problems, in the Source column, find
entries labeled RightFax Exchange Connector.
4. To view a description of an error, double-click the entry.
OpenText RightFax 20.2 20 Connector for Microsoft Exchange Administrator Guide

Chapter 3: Installing and configuring the EWS Connector
Chapter 3: Installing and configuring the EWS Connector
Instead of installing the RightFax Connector on the Exchange server
(see Installing and configuring the RightFax Connector on page14), you
can install the RightFax Exchange Web Services (EWS) Connector on
the RightFax server.
The EWS connector requires that you set up transport rules on the
Exchange server. With Exchange Server 2013 or later you can have the
connector create the transport rule for you, or you can create it yourself.
Adding and configuring the RightFax EWS
Connector
Before you configure the EWS Connector
1. When installing the RightFax and Exchange servers, make sure
that the domain of the RightFax server can access Active
Directory listings on the Exchange server domain.
2. Add and configure a RightFax Microsoft Exchange Gateway
service. See Adding and configuring the RightFax Microsoft
Exchange Gateway service on page6.
3. On the Exchange server or Exchange Online, create a dedicated
Exchange mailbox to which the transport rule will redirect fax
emails for processing by the RightFax EWS Connector.
4. On the C: drive, create a folder called RFaxGate that contains
two folders called IN and OUT. The gateway service account
must have "modify" permission on the RFaxGate folder. (See
Selecting a service account on page9.)
5. For Exchange Server 2013 and later, to enable the connector to
automatically create the transport rule, enable Basic
authentication for the PowerShell virtual directory in IIS on the
Exchange server. For information, see Microsoft documentation.
6. Microsoft Graph and OAuth 2.0 provide authentication for Office
365 and Exchange Online (Basic authentication is not
supported). Select the authentication flow that is appropriate for
your system.
To add and configure the EWS Connector
1. Log on to the RightFax server as an Administrator.
2. In Windows Control Panel, double-click RightFax EWS
Connector. The RightFax EWS Connector window opens.
3. Under Mailbox, enter following information for the dedicated fax
mailbox you created previously:
l In the Exchange Server box, enter the name of the
Exchange server.
l In the Mailbox Email Address and the Mailbox Password
boxes, enter the email address and password.
4. In the NDR Mailbox box, enter an Exchange mailbox that
handles undeliverable (Non-Delivery Report) emails.
OpenText RightFax 21 Connector for Microsoft Exchange Administrator Guide
Chapter 3: Installing and configuring the EWS Connector
5. In the Event LogLevel box, select at which level to log
information in the Application Event Log under the service name
“RightFax EWS Connector.”
l None No information.
l Terse Critical errors only.
l Normal Errors and major events only.
l Verbose All significant events. Use temporarily to track and
resolve problems.
Caution Leaving the verbose log level for long periods of
time can fill up the Event Log and may prevent new events
from being logged.
6. If you use Exchange on Office 365 instead of a local Exchange
server, select the Office 365 check box.
7. If you use Exchange Online, select the Use OAuth check box
and see To configure OAuth for Exchange Online below.
8. If you are using Exchange Server 2013 or later and want the
connector to create the required transport rule for you, select the
Automatically Create Transport Rule check box and enter the
Exchange Administrator credentials.
l In the Message Size section, select No Limit to accept and
forward messages of any size. To specify a size limit, select
Maximum, enter a value in the text box, and select KB, MB,
or GB from the list.
l The default values are listed in the Address Space section.
You can add, edit, or delete address spaces. For more
information, see Address space information on page18.
9. To create the transport rule manually (required for Exchange
2010 SP2), clear the Automatically Create Transport Rule
check box. For instructions, see Creating a transport rule
manually below.
10. Click Service Account. In the Service Account Details dialog
box, enter the domain user name and password for the EWS
Connector. This account must have read and write access to the
folders you created in Before you configure the EWS Connector
on the previous page.
To configure OAuth for Exchange Online
Refer to Azure Active Directory admin center and Microsoft
documentation for detailed information about authentication with OAuth.
1. Click Get Token, and the Get Token dialog box opens.
2. Select Interactive, Certificate, or Client Secret authentication
flow.
3. Depending on the authentication flow you selected, enter the
following information. Copy the information from Active
Directory admin center in Azure.
l Application (client) ID
l Directory (tenant) ID
l Client secret
l Certificate path and certificate password
4. Click Get Token, and then click OK.
Creating a transport rule manually
You must manually create the transport rule for Exchange Server 2010
SP2. With Exchange Server 2013 or later you can have the connector
create the transport rule for you, or create it yourself.
Manually creating a transport rule in Exchange Server is a two-step
process in the Exchange Management Shell program, in which you
create the foreign connector and then the transport rule.
To create a foreign connector
If faxes will be sent from Office 365, do not create a foreign connector.
OpenText RightFax 20.2 22 Connector for Microsoft Exchange Administrator Guide

Chapter 3: Installing and configuring the EWS Connector
1. From the command prompt, run the Exchange Management
Shell program.
2. Enter the following command:
New-ForeignConnector -name
"RightFaxConnector" -AddressSpaces
("RFAX:*;1","FAX:*;1")
To create a transport rule
1. From the command prompt, run the Exchange Management
Shell program.
2. To redirect faxes from RightFax addresses RFAXand FAX to a
dedicated RightFax mailbox account, enter the following
command, including the RightFax Mailbox domain and
username:
New-TransportRule -Name "RightFaxRule" -
RecipientAddressMatchesPatterns @("RFAX-
\w*","FAX-\w*") -RedirectMessageTo
"<domain\RFmailbox username>"
Example To redirect messages to the opentext\xadmin account, enter:
New-TransportRule -Name "RightFaxRule" -
RecipientAddressMatchesPatterns @("RFAX-
\w*","FAX-\w*") -RedirectMessageTo
"opentext\xadmin>"
Note You can also create a transport rule through the Exchange
Control Panel for Exchange 2010 SP2 or SP3 or through the
Exchange Admin Center for Exchange 2013 or later. For information,
see your Microsoft documentation.
OpenText RightFax 20.2 23 Connector for Microsoft Exchange Administrator Guide

Chapter 4: Configuring STMP fax addressing for the Outlook add-in
Chapter 4: Configuring STMP fax addressing for the Outlook add-in
With Microsoft Exchange and the RightFax Outlook add-in, Cached
Exchange Mode must be enabled. This can cause slow response times
for users in Outlook. If you wish to avoid enabling Cached Exchange
Mode, complete the following steps.
1. Do not install the RightFax Microsoft Exchange Gateway and
RightFax connectors. Instead, configure the SMTP email
gateway. See the RightFax Administrator Guide.
2. Install the RightFax Outlook add-in. See Using Outlook to send
and receive faxes on page25.
OpenText RightFax 24 Connector for Microsoft Exchange Administrator Guide
Chapter 5: Using Outlook to send and receive faxes
Chapter 5: Using Outlook to send and receive faxes
The Connector for Microsoft Exchange supports these versions of
Microsoft Outlook:
l Outlook 2010
l Outlook 2013
l Outlook 2016
Caution If Outlook is connected to Office 365, Cached Exchange
Mode must be disabled, or manually addressed faxes cannot be
delivered.
Sending an Outlook mail message to a fax number is similar to sending
email, except the message must be specially addressed.
Text entered in the Subject field in an Outlook mail message will appear
in the Notes section of the cover sheet.
Text entered in the body of the email will appear as the body of the fax.
Attached files will be converted to fax images and added to the fax (see
File formats that convert to fax format on page36). Unsupported file
attachments cannot be converted and will be ignored.
Important UTF-8 encoding (unicode) is required for the Euro symbol
and some other special characters to appear properly in RightFax
documents created in Microsoft Outlook. To support documents with
these characters, configure Microsoft Outlook for UTF-8 encoding.
See the documentation for Microsoft Outlook for information.
Installing the RightFax Outlook add-ins
The RightFax Outlook add-ins simplify the process of sending and
receiving faxes with Outlook. With the RightFax Outlook add-ins, users
can:
l Look up and enter billing information.
l Send a cover sheet.
l Specify conversion options for PowerPoint, Excel, and Visio
documents.
l Elect to preview a fax before sending, request a call back, and use
smart-resume.
l Specify the resolution of the fax image.
l Select defaults for conversion options, cover sheets, and other
sending information.
The RightFax Outlook add-in is installed on each Outlook client
computer as a component of the RightFax client installation (described
in the RightFax Installation Guide).
OpenText RightFax 25 Connector for Microsoft Exchange Administrator Guide

Chapter 5: Using Outlook to send and receive faxes
If you choose not to install one of the add-ins on each individual client
workstation, Outlook users can still send faxes via RightFax using one
of two custom addressing formats. For more information on these fax
addressing formats, see Manually addressing Outlook messages to fax
destinations on page30.
Configuring the RightFax Outlook add-ins
Configure the Outlook add-ins individually on each Outlook client
computer.
Note If the Outlook files are installed to a non-standard location, a
prompt will appear the first time each client software runs. Users must
click OK to install the required files.
To configure RightFax Server
1. In Microsoft Outlook, on the File menu, click RightFax. The
RightFax options appear.
2. Click RightFax Server Options.
3. In the RightFax Server box, enter the name of the RightFax
Server and specify whether the server requires NT
Authentication.
4. Enter a valid UserID for the specified RightFax server.
5. Enter the Password for the specified RightFax UserID.
6. In the Namespace box, select the namespace. The default is
RFAX.
7. Click OK.
Creating internet mail fax addresses
If you use the Outlook client with the SMTP email gateway instead of
the RightFax Microsoft Exchange Module, Outlook must create SMTP-
compatible fax addresses instead of Exchange-formatted addresses.
When this option is enabled, you must also enter the Internet mail
address of the RightFax SMTP email gateway.
Because this feature uses IETF addressing convention, the "Use IETF
Fax Addressing" option must be selected in the Email Configuration
dialog box when configuring the SMTP email gateway. See the
RightFax Administrator Guide.
To create an internet mail fax address
1. On the client computer in Outlook, on the File menu, click
RightFax.
2. Click SMTP Conversion Options, and the SMTP Conversion
dialog box opens.
3. Click SMTP Fax Addressing.
4. Select the Create internet mail fax addresses check box.
5. In the Fax Gateway Mailbox box, enter the SMTP-compatible
fax address. You have the following options:
l Enter the email server name. For example, if you enter the
address exch2019.tools.local, the fax address will be
advfax=1234/pn=John/o=OpenText/@exch2019.to
ols.local.
l Enter the email address of a mailbox. For example, if you
enter the email address
[email protected]l, then the fax
address will be advfax=1234/pn=John/o=OpenText/
6. Click OK.
Sending faxes using the RightFax Outlook
add-in
There are several ways to use the RightFax Outlook add-ins to send a
fax.
OpenText RightFax 20.2 26 Connector for Microsoft Exchange Administrator Guide

Chapter 5: Using Outlook to send and receive faxes
To send a fax
1. On the tool bar, click Send a Fax and in the To box, add the
recipients. To select and send faxes directly from the Contacts
list or the Global Address list, see Selecting a recipient and
sending a fax from the Contacts list or Global Address List on
page29
With the RightFax Outlook add-in and SMTP fax addressing,
faxes cannot be sent to email addresses.
2. The RightFax Outlook add-in appears with the selected contacts
(if any) in fax addressing format on the To address line.
l The fax number for each Outlook Contact is taken from the
RightFax Business Fax field.
l If the Business Fax field is empty, the Home Fax field is
used.
l If the Home Fax field is empty, the Other Fax field is used.
If available, the contact’s company, city, state, billing
information, and voice number are included in the fax address on
the cover sheet.
3. To enter a recipient for the fax, on the Fax Addressing tab,
enter a recipient’s name and the destination fax number, and
click the To button. Repeat this step for each recipient of the fax.
4. Enter any of the optional information you want for the fax. See
Adding cover sheets below, Sending options on the next page,
and Advanced options on page29.
5. When complete, click Send.
Adding cover sheets
The same cover sheet and cover sheet settings will be used for all
recipients listed on the Fax Addressing tab.
To add a cover sheet to the fax
1. Click the Cover Sheet tab.
OpenText RightFax 20.2 27 Connector for Microsoft Exchange Administrator Guide
Chapter 5: Using Outlook to send and receive faxes
2. Select the Use cover sheet check box.
3. In the list, select a cover sheet.
4. To convert the cover sheet using fine resolution (200×200 DPI) ,
select the Fine mode check box. This is recommended only for
high quality printed documents and optical character recognition
(OCR).
5. Enter any of the optional From information.
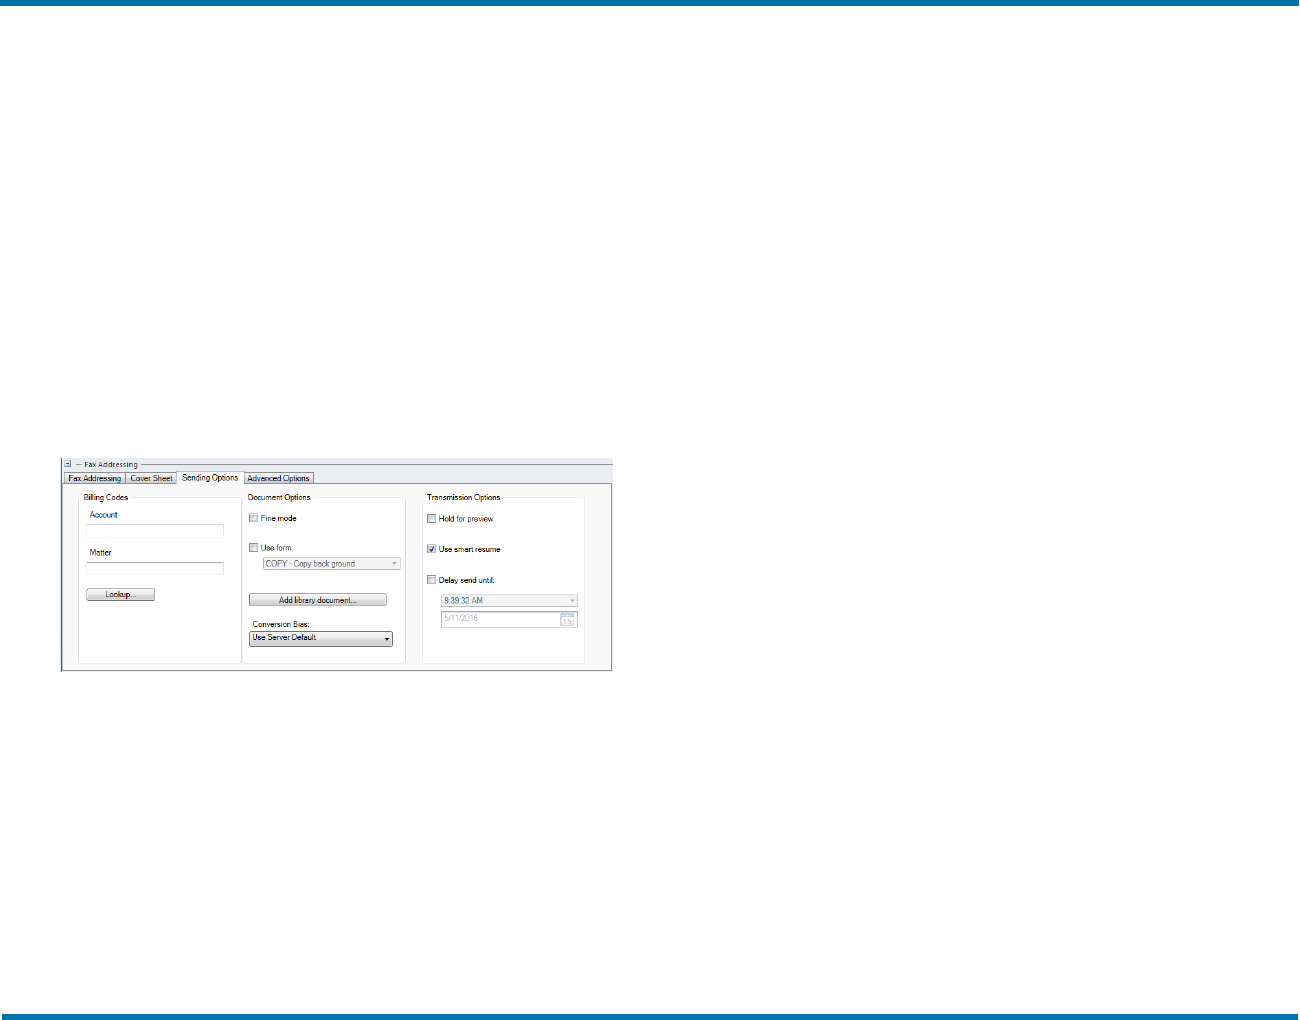
Sending options
These settings are all optional and apply to all recipients listed on the
Fax Addressing tab.
To set send options
1. Click the Sending Options tab.
2. Under Billing Codes,enter any billing codes to be stored with
the fax transmission record. Unless custom field names have
been defined, billing code 1 appears as Account and billing code
2 as Matter.
3. To change the resolution of the fax body, select the Fine mode
check box. While this improves legibility, it also increases file
size and transmission time.
4. To add an overlay form to the fax, select the Use Form check
box, and then select the form in the list below. For information
about creating overlay forms, see the RightFax Administrator
Guide.
5. To add library documents to your fax, click Add library
document. A list of available documents appears. You can:
l Highlight a document name and click the paper clip icon to
show the name in the lower region of the dialog box and add
the document to the fax.
l Click the up or down arrow keys to change the order of
selected documents.
l Highlight a document name in the lower region of the dialog
box and click the Delete (X) button to remove the document
from the fax. (This does not remove the document from the
library, only from the current fax.)
6. The Conversion Bias setting determines whether the
conversion of attachments is optimized for images, text, both, or
not at all. To use the setting selected by your administrator,
select Use Server Default. If the resulting quality does not meet
your needs, you can try to improve it by respectively selecting
Optimize for Images, Optimize for Text, High Contrast
(optimize for both images and text), or None (do not optimize).
You can use the Hold for Preview option to check the quality of
the conversion.
7. Select the Hold for preview check box to prevent the fax from
transmitting immediately when you click Send. The held fax will
be released for transmission after you have previewed it.
8. If transmission is interrupted, RightFax will attempt to resend the
entire fax.
Click Use smart resume to resend only the pages of the fax
that were not sent successfully in the first transmission.
9. To sent the fax at a later time, select the Delay send until
check box, and then enter a future time and date.
OpenText RightFax 20.2 28 Connector for Microsoft Exchange Administrator Guide
Chapter 5: Using Outlook to send and receive faxes
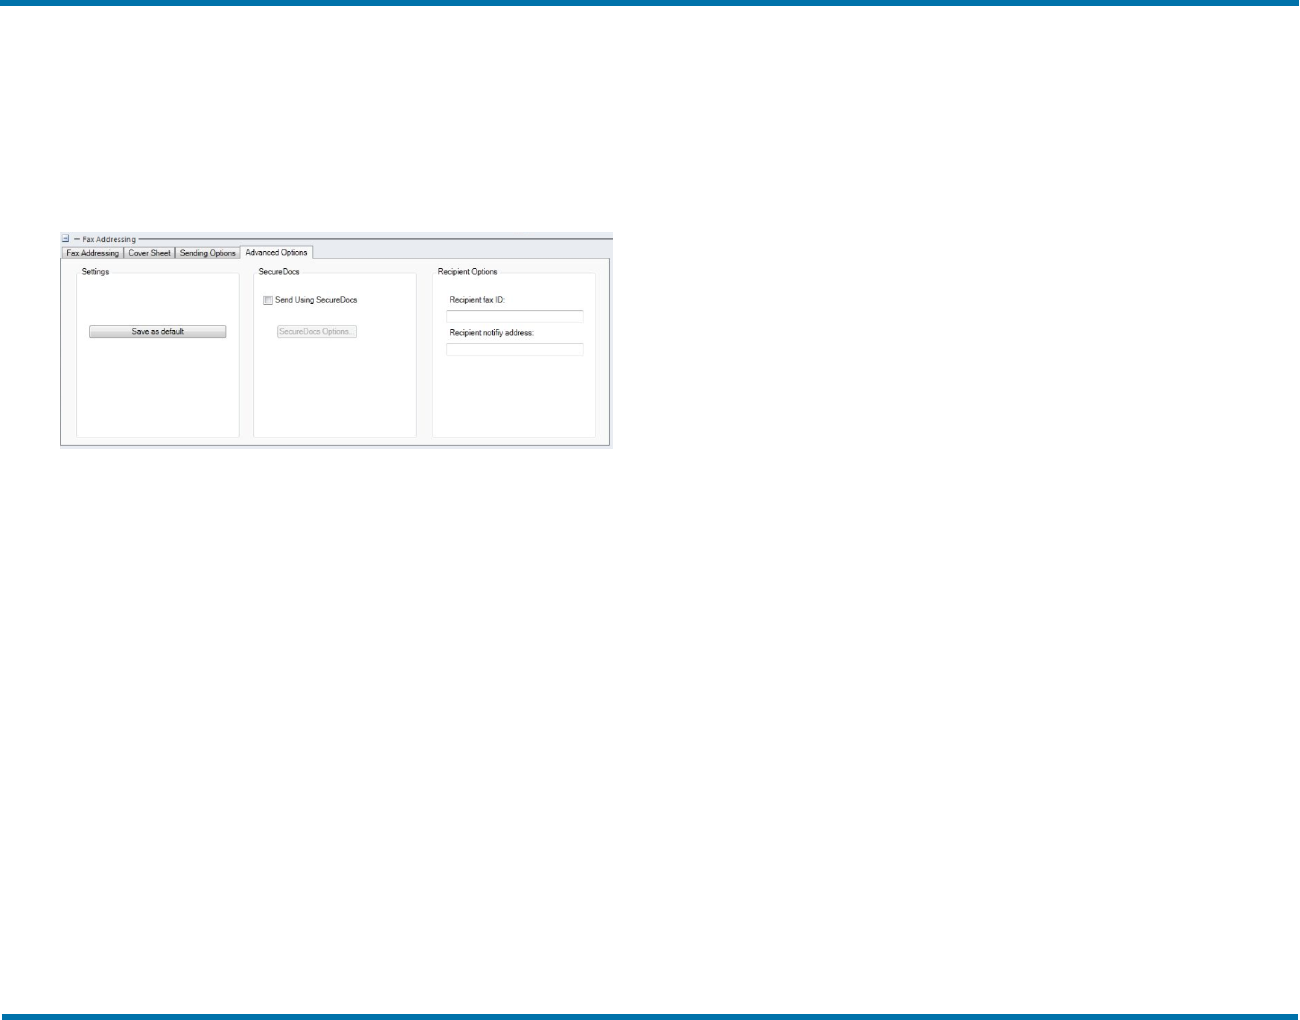
Advanced options
The advanced options are optional and apply to all recipients listed on
the Fax Addressing tab.
To set advanced options
1. Click the Advanced Options tab.
2. Click Save as default to store all the settings you’ve entered for
use in future fax transmissions.
3. To send the fax as encrypted Adobe® Acrobat® portable
document format (PDF) files using SecureDocs, select the
Send Using SecureDocs check box and complete the required
fields to specify passwords and functionality. For more
information, see the RightFax SecureDocs Module
Administrator Guide. This option is not available in the RightFax
Outlook add-in with SMTP fax addressing.
4. To restrict sending to only one fax machine, in the Recipient fax
ID box, enter the CSID of the receiving machine.
If the ID does not match, the fax is not sent. Leave blank to allow
sending to any fax machine.
This option is not available in the RightFax Outlook Outlook add-
in with SMTP fax addressing.
5. To send a text notification about this fax to the recipient’s phone,
enter their SMS number in the Recipient notify address field.
This option is not available in the RightFax Outlook Outlook add-
in with SMTP fax addressing.
Troubleshooting
If Outlook loses the connection with the RightFax server, you may see
the error message "There are no name pipes instances" with an Outlook
message that add-ins (extensions) were not loaded.
To restore the add-ins
1. On each affected client, open Outlook.
2. On the File ribbon, click Options.
3. Click Add-ins.
4. In the Manage list, click COMaddins, and then click Go.
5. To re-enable an add-in, select the check box next to it, and then
click OK.
Selecting a recipient and sending a fax from
the Contacts list or Global Address List
To select a recipient from the Outlook Contacts to send a fax
1. In the navigation options area, click People. Contacts that have
a Business Fax or Home Fax appear in the list.
2. Right-click a contact and on the shortcut menu, click Send a fax
to this contact. The addressing information appears in the To
box in RFAX: addressing format. For more information, see
Using the RFAX: addressing format on page31.
3. To view the addressing information in Exchange format before
sending, click Check Names.
OpenText RightFax 20.2 29 Connector for Microsoft Exchange Administrator Guide

Chapter 5: Using Outlook to send and receive faxes
To select a recipient from the Global Address List
1. In the toolbar, click Address Book.
2. In the list of entries, right-click the contact and on the shortcut
menu, click Properties.
3. On the General tab, click Actions.
4. Click ... (View more options for interacting with this person), and
then click Send a fax to this contact. The addressing
information appears in the To box in RFAX: addressing format.
For more information, see Using the RFAX: addressing format
on the next page.
5. To view the addressing information in Exchange format before
the sending, click Check Names.
Sending faxes via certified delivery
When a document is sent using the optional SecureDocs module, it is
saved as a file on your organization’s Certified Delivery Web server.
The recipient is sent an email message with a link to the document. For
information, see the RightFax SecureDocs Module Administrator
Guide.
To send a document with SecureDocs, the user must specify an email
address instead of a fax number for the recipient.
This option is not available in the RightFax Outlook add-in with SMTP
fax addressing.
To address the fax using the RightFax Outlook add-in
1. On the Fax Addressing tab, enter the recipient’s name in the
Name box. Click email address in the list, and enter the
recipient’s email address in the box.
2. Click the Advanced Options tab.
3. In the SecureDocs area, click Send Using SecureDocs. The
email address will be converted to the proper format for sending
via SecureDocs.
4. To specify additional SecureDocs settings, such as PDF
passwords, click SecureDocs Options.
For more information about these options, see the RightFax
SecureDocs Module Administrator Guide.
To address the fax not using the RightFax Outlook add-in
l In the To or Cc boxes, enter the recipient’s name and email address,
using the following format (the square brackets are part of the entry):
[RFAX:Name@/SMTP=EmailAddress/SD]
Name is the recipient’s display name and EmailAddress is the
destination email address.
Note SecureDocs does not support blind copies (BCC).
Example An entry of
[RFAX:Jane Doe@/SMTP=JaneDoe@Company.com/SD] sends a
fax via certified delivery to JaneDoe@Company.com.
Manually addressing Outlook messages to fax
destinations
Instead of using the RightFax Outlook add-ins, users can:
l Type the fax information in the To box using one of two supported
addressing formats.
l The FAX: addressing format allows entry of the recipient's name
and fax number only. See Using the FAX: addressing format on
the next page
l The RFAX: addressing format allows entry of additional
parameters, such as the recipient's billing codes. See Using the
RFAX: addressing format on the next page.
OpenText RightFax 20.2 30 Connector for Microsoft Exchange Administrator Guide
Chapter 5: Using Outlook to send and receive faxes
l Have the addressing information filled in automatically from a
contact in their Contacts list. The contact must include a Business
Fax or Home Fax entry. See Selecting a recipient and sending a fax
from the Contacts list or Global Address List on page29.
Using the FAX: addressing format
When you use the Fax: addressing format, you can only specify the
recipient's name and fax number. To include additional parameters, use
the RFAX: addressing format. See Using the RFAX: addressing format
below.
Only the FAX address space can use this format. You can restrict the
user’s access to this addressing type in the Connector for Microsoft
Exchange (see Address space information on page18).
To use the FAX: addressing format
l In the To box, enter the destination name and fax number using the
following format (the square brackets are part of the entry):
[FAX:Name@FaxNumber]
Example An entry of [FAX:Jane Doe@555-1212] sends a fax to
Jane Doe at fax number 555-1212.
Using the RFAX: addressing format
When you use the RFAX: addressing format, you can enter other
parameters in addition to the recipient's name and fax number.
Custom address spaces use this addressing format. You can restrict
the user's access to this addressing type in the Connector for Microsoft
Exchange. See Address space information on page18.
To use the RFAX: addressing format
1. In the To box, enter the destination name and fax number using
the following format (the square brackets are part of the entry):
[RFAX:Name@/FN=FaxNumber]
Example An entry of [RFAX:Jane Doe@/FN=555-1212] sends
a fax to Jane Doe at fax number 555-1212.
2. To include additional addressing parameters, enter them in any
order after the @ symbol in the address.
Example An entry of [RFAX:Jane Doe@/FN=555-
1212/VN=555-4567/CI=Tucson, AZ/CO=Acme
Inc./AN=1111/MN=2222] sends a fax to Jane Doe at fax number
555-1212, with voice number 555-4567, in Tucson AZ, with
billing codes 1111 and 2222.
Outlook supports the following fax destination parameters:
Parameter Definition Example
/AN= Billing code 1 /AN=1111
/CI= Recipient city/state /CI=Tucson, AZ
/CO= Recipient companyname /CO=Acme, Inc.
/FN= Destination faxnumber /FN=555-1212
/MN= Billing code 2 /MN=2222
/SMS Send to an SMS number
instead of a faxnumber
(replaces the /FN
parameter)
/SMS=555-1212
/VN= Recipient voice number /VN=555-4567
Receiving incoming faxes via email
The Connector for Microsoft Exchange lets RightFax users receive
faxes as email message attachments instead of (or in addition to)
receiving them in one of their RightFax client mailboxes.
This option is not available with SMTP fax addressing.
OpenText RightFax 20.2 31 Connector for Microsoft Exchange Administrator Guide

Chapter 5: Using Outlook to send and receive faxes
To configure a user to receive faxes in email
1. In Enterprise Fax Manager, double-click the user to open the
User Edit window, and then click Routing.
2. In the Routing Type box, select Microsoft Exchange.
3. In the File Format list, select the format in which documents will
be delivered to the user’s email.
l TIFF or TIFF (Enhanced): When TIFF (Enhanced) is
selected, only the enhanced copy of the TIFF will be
delivered by email.
l GIF: Graphics Interchange Format.
l PDF or PDF(Searchable): Searchable PDF requires the
optional Searchable PDF module. If this module is activated,
searchable PDF files will be sent regardless of which PDF
option is selected.
4. For more information about inbound routing file formats, see the
RightFax Administrator Guide.
5. In the Routing Info box, enter the Outlook user’s Display
Name, Alias, Distinguished Name, or SMTP address.
To prevent possible duplication, the Distinguished Name is
recommended.
Tip When synchronizing users from Active Directory, the
routing info field is automatically populated with the SMTP
address.
6. If you installed the RightFax Outlook add-in for Exchange, in the
Received Fax Routing Form box, select whether the email
message window should show the RightFax add-in for
Exchange (Advanced Outlook Form), not show the add-in
(None), or use the default set in the email gateway configuration
in EFM (System Default).
7. Select the Delete After Routing check box only if you want to
delete the fax from the user’s RightFax mailbox after it is routed
to Exchange.
If RightFax cannot route a fax to the destination email mailbox, it
will leave the fax in the user’s RightFax mailbox regardless of
how this option is set.
Breaking up large faxes
Some Exchange servers define a maximum file size for inbound
messages.
OpenText RightFax 20.2 32 Connector for Microsoft Exchange Administrator Guide
Chapter 5: Using Outlook to send and receive faxes
By default, if a fax image attached to an inbound mail message exceeds
this maximum file size, an error is logged and the message is not sent.
To bypass this limit, RightFax can be configured to automatically break
fax images into multiple files and send them as separate mail
messages.
This option is not available with SMTP fax addressing.
To configure RightFax to break faxes into multiple files
1. Add a new DWORD Windows registry entry “MaxMessageSize”
under HKEY_LOCAL_MACHINE
\Software\RightFax\Gateway\Gateway# (64-bit: HKEY_
LOCAL_MACHINE\Software\Wow6432Node\
RightFax\Gateway).
2. Set the value of this key to the maximum file size in Kb.
Any faxes that exceed this size will automatically be divided into
multiple faxes and multiple mail messages.
Decreasing document load time
If opening faxes or other RightFax documents takes longer than
expected, you can enable an option that prevents Outlook clients from
contacting the RightFax server when opening a new fax.
This option is not available with SMTP fax addressing.
To decrease document load time
1. Log on to the Outlook client workstation using an account that is
a member of the local administrators group.
2. Open the Windows registry and create the following subkey:
HKEY_CURRENT_USER\software\rightfax
client\OutlookExtension\
3. Create a new DWORD value called ContactFaxServer and set
the value to 0.
4. Close the Windows registry.
Email notification of received faxes
The Connector for Microsoft Exchange can be used for notification of
received faxes regardless of whether the gateway is configured to send
and receive faxes.
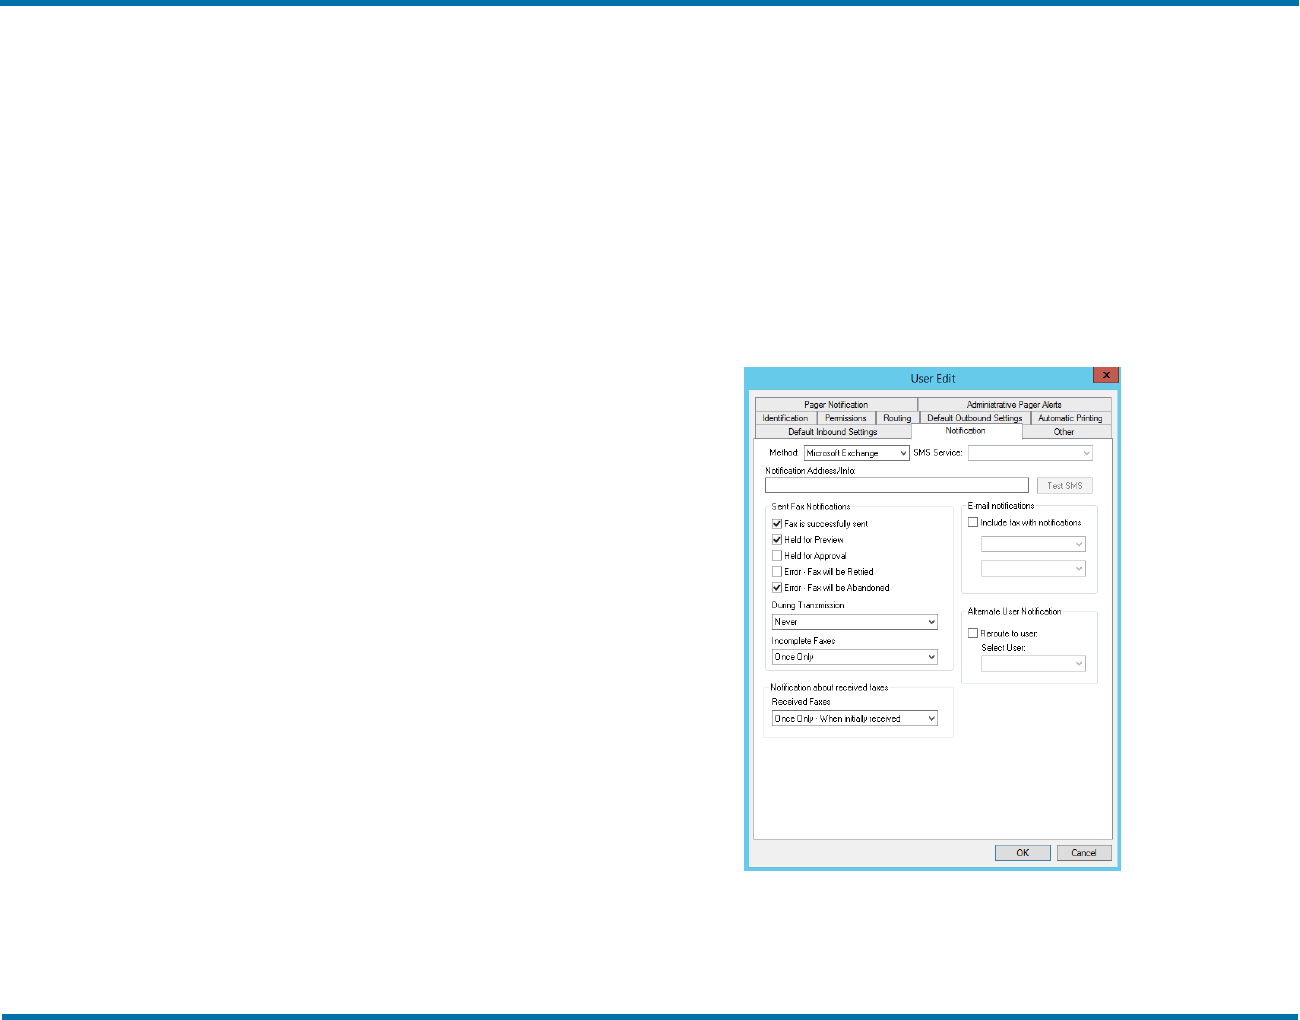
To configure a user to receive fax notification in email
1. In Enterprise Fax Manager, double-click the user to open the
User Edit dialog box, and click the Notification tab.
2. In the Notification Method list, click Microsoft Exchange.
3. In the Notification Address/Info box, enter the Outlook user’s
OpenText RightFax 20.2 33 Connector for Microsoft Exchange Administrator Guide

Chapter 5: Using Outlook to send and receive faxes
Display Name or Alias.
4. Click OK to save the new notification settings.
Group notification
The notification method can be configured for an entire RightFax group
by editing the group ID properties in Enterprise Fax Manager and setting
the group Notification Type to Microsoft Exchange.
Customizing the subject lines of Exchange user
notifications
The subject line of each user notification message in Exchange can be
customized by adding a Windows registry setting to the RightFax
server.
For each message to customize, add a new string registry entry under
HKEY_LOCAL_MACHINE\Software \RightFax\Gateway\Gateway#
(64-bit: HKEY_LOCAL_MACHINE\Software\Wow6432Node\
RightFax\Gateway).
Custom Exchange subject line registry settings
The following table lists each registry entry, the type of notification the
message applies to, and its default text value. For some values you can
include variables as part of the string. In each case the variable and its
definition is listed.
Registry key Defines the
subject line of
Default value
ExchangeMsgs_0 Received Outlook
messagesthat
contain newly
received faxes
A new faxhasarrived from ~1 (Part ~2 of
~3).
~1 = CSID of originating fax machine
~2 = Part of the fax(if fax is broken into
multiple parts)
~3 = Total faxparts(if faxis broken into
multiple parts)
~4 = The number of the faxchannelthat
received the fax
~5 = The unique ID of the fax, assigned
bythe RightFax server
~6 = ANI information
~7 = Fax status
ExchangeMsgs_1 Notification that a
sent faxhad an
incorrect fax
address
Your faxhasnot been sent because the
addressing information was incorrect.
ExchangeMsgs_2 Notification that a
sent faxhad an
invalid fax address
Valid fax destination information isnot
found in your mail message. The
message hasbeen discarded.
ExchangeMsgs_3 Notification that a
sent faxhad an
invalid email
address
The gatewaywasunable to validate the
email address of the message sender.
The message hasbeen discarded.
ExchangeMsgs_4 Notification that a
sent faxwasnot
sent due to an error
during processing
An error occurred processing your
message. Please try again or contact
your system administrator. The message
hasbeen discarded.
OpenText RightFax 20.2 34 Connector for Microsoft Exchange Administrator Guide
Chapter 5: Using Outlook to send and receive faxes
Registry key Defines the
subject line of
Default value
ExchangeMsgs_5 Notification that a
sent faxwasnot
sent due to an error
during transmission
An error occurred sending your
message. Please try again or contact
your system administrator. The message
hasbeen discarded.
ExchangeMsgs_6 Notification that a
sent faxmarked for
preview isreadyto
view
Your faxto ~1 isreadyfor previewing.
~1 = Recipient’s name
ExchangeMsgs_7 Notification that a
sent faxhas not
been sent
Your faxhasnot been sent.
ExchangeMsgs_8 Notification that a
sent faxhad no
bodycontent
There isno message body.
Including the Fax ID in the email notification
The email notification of a received fax in Microsoft Outlook can include
the unique ID of the fax in the subject line of the email if you modify the
notification messages on the RightFax server.
To change the format of the unique ID, see the section on routing
inbound faxes in the RightFax Administrator Guide.
To configure email notification messages to include the fax ID
1. In Enterprise Fax Manager, select the name of the RightFax
server you want to modify.
2. Under Service Name, double-click RightFax Server Module.
The Server Configuration dialog box opens.
3. On the Custom Messages tab, modify the New Fax message.
Type a message that includes the ~5 variable, which is the
unique ID of the fax. The maximum length of a notification
message is 200 characters.
For example, enter the message A new fax has arrived. Fax
ID ~5.
OpenText RightFax 20.2 35 Connector for Microsoft Exchange Administrator Guide
AppendixA: File formatsthat convert to fax format
Appendix A: File formats that convert to fax format
The following table lists the types of documents that the RightFax
conversion engine can convert to fax format.
Important Conversion of PDF attachments and Postscript requires
the RightFax PDF module.
Application or
file format
Supported versions Common
Extension
AmiPro All versions .SAM
ANSI text (7 & 8 bit) Allversions .TXT
ASCII text (7 & 8 bit) All versions .TXT
Bitmap Windowsversions .BMP
Multi-page PCX Microsoft Fax .DCX
EPS If TIFF image is
embedded
.EPS
G3 All versions .G3
.BG3
GIF All versions .GIF
HTML Versionsthrough 4.0 .HTM
.HTML
Application or
file format
Supported versions Common
Extension
JPEG All versions .JPG
.JPEG
.EXIF
Lotus1-2-3 All versions .123
LotusWordpro All versions .LWP
Microsoft Excel Versions2000 - 2019 .XLS
.XLSX
.XLSM
Microsoft Outlook All versions .MSG
Microsoft PowerPoint Versions2000 - 2019 .PPT
.PPTX
.PPTM
Microsoft Rich Text Format All versions .RTF
Microsoft Visio 2000 - 2019 .VSD
Microsoft Word 2000 - 2019 .DOC
.DOCX
.DOCM
OpenText RightFax 36 Connector for Microsoft Exchange Administrator Guide
AppendixA: File formatsthat convert to fax format
Application or
file format
Supported versions Common
Extension
Microsoft WordPad Allversions .TXT
.WPC
Microsoft Works Versionsthrough 8.0 .WPS
Microsoft XML Paper
specification
All versions .XPS
MIME All versions .MHTML
PCX bitmap All versions .PCX
Portable Document Format All versions .PDF
Portable Network Graphic All versions .PNG
Post Script All versions .PS
.EPS
Text-based configuration files Varies by product .FTP
.FRM
.WPC
TIFF CCITT Group 3 & 4 All versions .TIFF
Unicode Text MSWord with encoding .UNI
.UTF8
.UTF8e
UUEncode No specific version .TXT
vCard Allversions .VCF
Visio All versions .VSD
XML All versions .XML
Preventing RightFax from converting specific
types of files
RightFax checks the file Whitelist.txt in RightFax/Config to determine
whether to convert an attachment to fax format. While by default this
file contains all supported file types, it may not contain every file
extension used by each file type. For example, files with the extension
JPEG do not convert with the default whitelist.txt file. To make sure
they do, add JPEG to the list, without modifying the entry for JPG.
Note The Whitelist.txt file does not control conversions handled
through PCL.
To prevent RightFax from converting a file type
l Open RightFax/Config/Whitelist.txt, and do one of the following:
l Delete the file type from the file.
l Convert the file type into a comment by preceding it with a
comma.
OpenText RightFax 20.2 37 Connector for Microsoft Exchange Administrator Guide
AppendixB: Email-compatible embedded codes
Appendix B: Email-compatible embedded codes
Embedded codes are special faxing instructions that you insert into fax-
bound email messages. You can use embedded codes to include fax
cover sheet information, attach library documents, specify a time to
send the fax, and more.
RightFax removes all embedded codes from the email message when it
converts it to fax form, so they do not appear in your final fax. If you
type an embedded code incorrectly, it will be ignored by RightFax and
will be included in your fax. Write embedded codes in upper or lower
case. Embedded codes work consistently regardless of the email
applications used to create documents.
Note the following when using embedded codes:
l Although you can use any font in the text of your email messages,
embedded codes must always use a native printer font. When the
file is converted to PCL5 format, only native printer fonts are stored
in the PCL file in their original text format. It is this text in the PCL
file that is replaced. All other font types are encoded as graphic
images.
When embedded codes use non-native printer fonts, the codes
themselves will appear in the file instead of the information or
instruction they represent. For best results, consider using only the
Courier native printer font
l Embedded codes can be placed anywhere in the email message
that you will be faxing. They cannot line wrap and any embedded
code statement that is so long that it wraps to a second line will be
ignored.
To add an embedded code to an email message
l Using a native printer font, type the code you want, along with any
required parameters, between angle brackets.
Example <LIBDOC2:PRICEGUIDE>
This embedded code tells RightFax to include the library document
“Priceguide” along with the text of the email:
The following section lists only embedded codes that are recognized by
the email gateways. RightFax supports several additional embedded
codes when faxes are generated from native applications. For a
complete list of embedded codes supported by RightFax, refer to the
RightFax Administrator Guide.
*ATDATE
Schedules to send the fax on a specific date.
By default the current time on the specified day is used as the send
time. For example, if a fax is sent to the queue at 3:30 p.m. and it
contains <ATDATE:+1> and no ATTIMEcode, it will be scheduled to
send at 3:30 p.m. the next day.
Format <ATDATE:date>
OpenText RightFax 38 Connector for Microsoft Exchange Administrator Guide
AppendixB: Email-compatible embedded codes
Maxfield length 10 characters
Example <ATDATE:+2>
<ATDATE:9-15-15>
To enter a date relative to the current date
l Enter +n, where n is the number of days after the current date. For
example, to schedule the fax to send a week after the current day,
enter +7.
To enter an absolute date
l Enter a specific date using one of the following formats:
MM/DD/YY, MM-DD-YY, or MM-DD-YYYY.
*ATTIME
Schedules to send the fax at a specific time.
The fax will become eligible for scheduling within 15 minutes of the
specified time. Specifying a time between the current time and midnight
will schedule the fax to send the same day. Specifying a time earlier
than the current time will schedule the fax the next day.
Format <ATTIME:time>
Maxfield length 9 characters
Example <ATTIME:+2>
<ATTIME:10:00p>
To enter a time relative to the current time
Do one of the following:
l Enter +n, where n is the number of hours after the current time.
l Enter +n.n, where the first n is either 0 or the number of hours, and
the n after the decimal point is a number 1-9 for the number of six
minute increments.
To enter an absolute time
l Enter the time as hhmm or hh:mm in either 12-hour or 24-hour
format. To indicate A.M and P.M for 12-hour format, append a or p
after the time.
*BILLINFO1
Assigns the first billing code to the fax.
Embedded billing codes must comply with any billing code verification
rules set up on the RightFax server.
Format <BILLINFO1:code>
Maxfield length 15 characters
Example <BILLINFO1:4444>
*BILLINFO2
Assigns the second billing code to the fax.
Embedded billing codes must comply with any billing code verification
rules set up on the RightFax server.
Format <BILLINFO2:code>
Maxfield length 15 characters
Example <BILLINFO2:5555>
*CHANNEL
Sends the fax on the specified channel of the fax board.
This can be useful if your organization sends priority faxes or fax
broadcasts on specific channels.
Format <CHANNEL:channel#>
Maxfield length N/A
OpenText RightFax 20.2 39 Connector for Microsoft Exchange Administrator Guide

AppendixB: Email-compatible embedded codes
Example <CHANNEL:3>
Listed in RightFaxDocTransport as Channel#2
To specify the fax channel number
l Increment the channel number found in RightFax DocTransport by
1. (A value of 0 would indicate that any available channel can be
used.)
*CONVERSION_BIAS
Overrides the default conversion bias set for the server.
Enter the word or just the number for the option:
l none or 1 to not optimize the conversion.
l images or 2 to optimize for graphical fidelity.
l text or 3 to optimize for legibility of text.
l highcontrast or 4 to optimize for both text and images.
Format <CONVERSION_BIAS:bias>
Maxfield length N/A
Examples <CONVERSION_BIAS:TEXT>
*COVER
Generates a RightFax cover sheet for the fax. If the user account
sending the fax is configured to automatically generate a cover sheet,
only one cover sheet will be generated.
The default cover sheet file will be used unless an FCSFILE embedded
code specifies a different cover sheet file.
Format <COVER>
Maxfield length N/A
Example <COVER>
*DELETE
Deletes the fax from the user’s mailbox after it has been successfully
sent, overriding the default RightFax auto-delete setting.
Format <DELETE>
Maxfield length N/A
Example <DELETE>
*DELETEALL
Deletes the fax from the user's mailbox after it has been sent or sending
has been attempted. It overrides the default RightFax auto-delete
setting.
Format <DELETEALL>
Maxfield length N/A
Example <DELETEALL>
*FCSFILE
Uses the specified file as the RightFax-generated cover sheet.
The cover sheet file must exist in the RightFax\FCS folder on the
RightFax server and must end with the extension .pcl. Do not specify a
directory path.
Format <FCSFILE:filename>
Maxfield length 12 characters
Example <FCSFILE:MYCOVER1.PCL>
*FROMFAXNUM
Displays the sender’s fax number on the RightFax-generated fax cover
sheet. The code will be ignored if RightFax does not generate a cover
sheet.
OpenText RightFax 20.2 40 Connector for Microsoft Exchange Administrator Guide
AppendixB: Email-compatible embedded codes
Format <FROMFAXNUM:faxnumber>
Maxfield length 31 characters
Example <FROMFAXNUM:(520)555-1234>
*FROMGENFAXNUM
Displays the company fax number on the RightFax-generated fax cover
sheet. If no cover sheet is generated by RightFax, this code will be
ignored.
Note The PCL Cover sheet code equivalent of this embedded code
is <GENERALFAXNUM>.
Format <FROMGENFAXNUM:faxnumber>
Maxfield length 31 characters
Example <FROMGENFAXNUM:(520)555-2345>
*FROMGENPHONE
Specifies the company voice number to be placed on the RightFax-
generated fax cover sheet. If no cover sheet is generated by RightFax,
this code will be ignored.
Note The PCL Cover sheet code equivalent for this embedded code
is <OPERATORNUM>.
Format <FROMGENPHONE:voicenumber>
Maxfield length 31 characters
Example <FROMGENPHONE:(520)555-3456>
*FROMPHONE
Specifies the sender’s voice number to be placed on the RightFax-
generated fax cover sheet. If no cover sheet is generated by RightFax,
this code will be ignored.
Format <FROMPHONE:voicenumber>
Maxfield length 31 characters
Example <FROMPHONE:(520)555-4567>
*IGNORE
Causes all subsequent embedded codes to be ignored.
Format <IGNORE>
Maxfield length N/A
Example <IGNORE>
*LIBDOC
Sends the specified RightFax library document instead of the
document. You can specify multiple library documents, each as a
separate LIBDOC code.
Important When used with email gateways, this embedded code
functions exactly the same as LIBDOC2.
Format <LIBDOC:documentID>
Maxfield length 21 characters
Example <LIBDOC:INFOPACK1>
*LIBDOC2
Sends the specified RightFax library document in addition to sending
the document. You can specify multiple library documents, each as a
separate LIBDOC2 code.
Format <LIBDOC2:documentID>
Maxfield length 21 characters
Example <LIBDOC2:INFOPACK1>
OpenText RightFax 20.2 41 Connector for Microsoft Exchange Administrator Guide
AppendixB: Email-compatible embedded codes
*NOCOVER
Turns off automatic RightFax cover sheet generation for the document.
Format <NOCOVER>
Maxfield length N/A
Example <NOCOVER>
*PREVIEW
Holds the fax for preview in the sender’s mailbox. It must be released in
FaxUtil or FaxUtil Web to send.
Format <PREVIEW>
Maxfield length N/A
Example <PREVIEW>
*PRIORITY
Sets the priority of the outgoing fax to low normal or high. If you specify
high priority and do not have the permission to do so, the fax will be sent
with normal priority.
You can enter the priority using the word or just the initial letter:
l HIGH or H
l NORMAL or N
l LOW or L
Format <PRIORITY:priority>
Maxfield length N/A
Examples <PRIORITY:HIGH>
*RETRYCOUNT
Specifies the number of times the fax will be retried in case of a non-
fatal error, such as a busy signal. A value of 0 means the fax server will
use the system defaults.
Format <RETRYCOUNT:#>
Maxfield length 2 digits
Example <RETRYCOUNT:3>
*RETRYINTERVAL
Specifies the minimum delay in minutes before a failed fax transmission
is rescheduled to send
Format <RETRYINTERVAL:#>
Maxfield length 2 digits
Example <RETRYINTERVAL:2>
*SAVE
Instructs RightFax to not delete the fax image from the user’s mailbox
after sending. This overrides any default auto-delete setting.
Format <SAVE>
Maxfield length N/A
Example <SAVE>
*SMARTRESUME
Enables the Smart Resume feature.
Format <SMARTRESUME>
Maxfield length N/A
Example <SMARTRESUME>
OpenText RightFax 20.2 42 Connector for Microsoft Exchange Administrator Guide
