
MULTIFUNCTIONAL DIGITAL SYSTEMS
Network Fax Guide

©2008, 2009 TOSHIBA TEC CORPORATION All rights reserved
Under the copyright laws, this manual cannot be reproduced in any form without prior written permission of TTEC. No patent liability
is assumed, however, with respect to the use of the information contained herein.
Preface 1
Preface
Thank you for purchasing TOSHIBA Multifunctional Digital Systems or Multifunctional Digital Color Systems. This manual
explains the instructions for N/W-Fax driver. Read this manual before using your Multifunctional Digital Systems or
Multifunctional Digital Color Systems. Keep this manual within easy reach, and use it to configure an environment that
makes best use of the e-STUDIO’s functions.
How to read this manual
Symbols in this manual
In this manual, some important items are described with the symbols shown below. Be sure to read these items before
using this equipment.
Other than the above, this manual also describes information that may be useful for the operation of this equipment with
the following signage:
Screens and Operation Procedures
y In this manual, the screens and the operation procedures in Windows are described for Windows Vista.
The details on the screens may differ depending on how the equipment is used, such as the status of the installed
options, the OS version and the applications.
y The illustration screens used in this manual are for paper in the A/B format. If you use paper in the LT format, the
display or the order of buttons in the illustrations may differ from that of your equipment.
Trademarks
y The official name of Windows 2000 is Microsoft Windows 2000 Operating System.
y The official name of Windows XP is Microsoft Windows XP Operating System.
y The official name of Windows Vista is Microsoft Windows Vista Operating System.
y The official name of Windows 7 is Microsoft Windows 7 Operating System.
y The official name of Windows Server 2003 is Microsoft Windows Server 2003 Operating System.
y The official name of Windows Server 2008 is Microsoft Windows Server 2008 Operating System.
y Microsoft, Windows, Windows NT, and the brand names and product names of other Microsoft products are
trademarks of Microsoft Corporation in the US and other countries.
y Apple, AppleTalk, Macintosh, Mac, Mac OS, Safari, and TrueType are trademarks of Apple Inc. in the US and other
countries.
y Adobe, Adobe Acrobat, Adobe Reader, Adobe Acrobat Reader, and PostScript are trademarks of Adobe Systems
Incorporated.
y Mozilla, Firefox and the Firefox logo are trademarks or registered trademarks of Mozilla Foundation in the U.S. and
other countries.
y IBM, AT and AIX are trademarks of International Business Machines Corporation.
y NOVELL, NetWare, and NDS are trademarks of Novell, Inc.
y TopAccess is a trademark of Toshiba Tec Corporation.
y Other company names and product names in this manual are the trademarks of their respective companies.
To use this function, the scanning function (Internet Fax) and printing function (Network Fax) are required.
The e-STUDIO455 Series and the e-STUDIO855 Series provide the scanning function and printing function as options. However,
these optional functions are already installed in some models.
Indicates a potentially hazardous situation which, if not avoided, could result in death, serious
injury, or serious damage, or fire in the equipment or surrounding objects.
Indicates a potentially hazardous situation which, if not avoided, may result in minor or moderate
injury, partial damage to the equipment or surrounding objects, or loss of data.
Indicates information to which you should pay attention when operating the equipment.
Describes handy information that is useful to know when operating the equipment.
Pages describing items related to what you are currently doing. See these pages as required.

CONTENTS 3
CONTENTS
Preface....................................................................................................................................... 1
Chapter 1 OVERVIEW
Features and Functions ........................................................................................................... 6
Chapter 2 SENDING A FAX
Basic Procedure ....................................................................................................................... 8
Specifying Recipients ............................................................................................................ 10
Entering recipients from the keyboard................................................................................. 10
Selecting recipients from the address book......................................................................... 11
Selecting recipients from the address book (Search option)............................................... 13
Removing recipients ............................................................................................................ 17
Chapter 3 SETTING OPTIONS
How To Setup.......................................................................................................................... 20
Setting Initial Values of N/W-Fax driver options .................................................................. 20
Setting print options for each print job................................................................................. 20
Setting up the N/W-Fax Driver Options ................................................................................ 21
Setting up the [Send] tab ..................................................................................................... 21
Setting up the [Cover Sheet] tab ......................................................................................... 22
Setting up the [Sender Information] tab............................................................................... 23
Displaying the Version Information...................................................................................... 24
Sending with Extended Fax Functionality ........................................................................... 25
Saving a fax as file .............................................................................................................. 25
Delayed transmission .......................................................................................................... 26
Sending with a cover sheet ................................................................................................. 27
Chapter 4 APPENDIX
Cover Sheet Samples.............................................................................................................32
Standard Cover Page .......................................................................................................... 32
Business Cover Page .......................................................................................................... 33
Professional Cover Page..................................................................................................... 34
INDEX ..................................................................................................................................................................... 35

4 CONTENTS


1 OVERVIEW
6 Features and Functions
Features and Functions
This equipment provides the network fax feature, which simplifies and facilitates your office facsimile needs that enables
you to send fax or Internet Fax digital documents directly from your desktop.
y Fax transmission using the N/W-Fax driver is available only when the optional Fax unit is installed.
y Please enable the SNMP setting on TopAccess to use the N/W-Fax functions. In addition, the N/W-Fax driver does
not work if the SNMP setting on TopAccess is disable when the optional Fax unit is installed.
The highly intuitive, network N/W-Fax driver software enables you to select the fax printer driver to electronically faxes or
Internet Faxes from your computer to one or more recipients. You can easily define fax job properties from the send list to
fax resolutions. The N/W-Fax driver is complimented with the AddressBook Viewer. The combination of applications
enables you to easily manage a selection of fax recipients and access to the address book.
The N/W-Fax driver enables you to set up send lists and send electronic documents from your PC to one or more
destinations. You send to the fax much the same way you would choose to print to a designated printer that makes using
the N/W-Fax driver quick and simple. You can select the fax properties. Fax properties are the attributes you can set to
define sender and recipient information for processing fax jobs such as dialing options, sender information, fax resolution
and page layout.
Other features include an easy to use fax scheduler that allows you to set up a date and time to transmit your fax. Cover
page options are also provided. You can include a customized cover page with your fax transmission that can include
sender and recipient fax information and a detailed message. You can easily maintain sender and contact information that
can be printed on the cover pages.
Faxing hard-copy documents must be performed from the touch panel display.
y The image quality of the originals that are sent by the N/W-Fax driver is different from the originals that are sent by
the general fax operation.
y If you specify the Email addresses as the recipients using N/W-Fax driver, the document will be sent as an Internet
Fax. The Internet Fax feature allows users to send originals, same as the fax features. However, the Internet Fax is
sent through the Internet, although the fax is sent through the public switched telephone line. In order to send the
Internet Fax, the remote device also must support the Internet Fax feature.
For more details about the Internet Fax, refer to the Scanning Guide.

2.SENDING A FAX
This chapter describes how to send a fax using a N/W-Fax driver.
Basic Procedure....................................................................................................................... 8
Specifying Recipients ............................................................................................................ 10
Entering recipients from the keyboard..................................................................................................................10
Selecting recipients from the address book..........................................................................................................11
Selecting recipients from the address book (Search option) ................................................................................13
Removing recipients.............................................................................................................................................17
2 SENDING A FAX
8 Basic Procedure
Basic Procedure
The basic procedure for sending a fax (Network Fax / Internet Fax) is as follows.
You can use standard functions or set optional functions as well as the basic ones described in this section. For these
operations, see the following section.
P.19 “SETTING OPTIONS”
1
Start the application software and prepare a document to be sent.
2
Select [Print] from the [File] menu in the application software.
The procedure for displaying the print dialog box may differ from the above depending on the application
software.
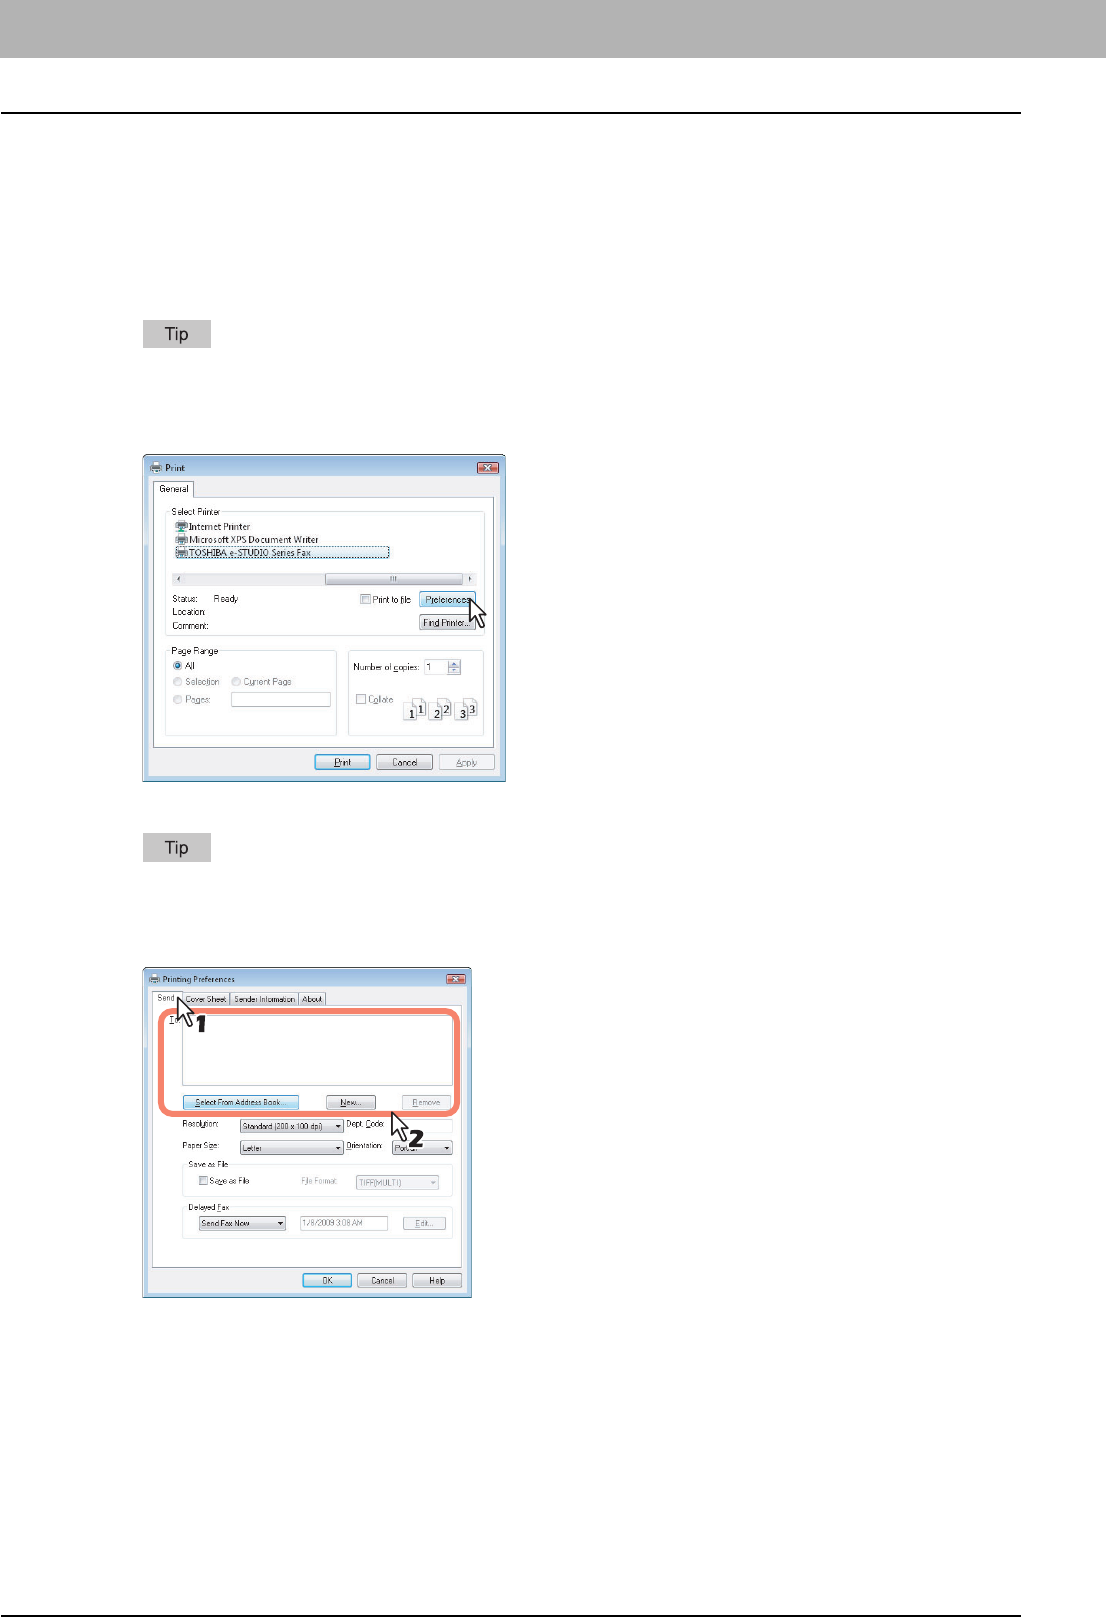
3
Select [TOSHIBA e-STUDIO Series Fax] for the printer and click [Preferences].
The dialog box of the N/W-Fax driver properties appears.
Note that the command name to open the driver properties may differ from [Preferences] depending on the
application software.
4
Click the [Send] tab and specify the recipients.
y To specify recipients, enter them with the keyboard or select them from the address book.
P.10 “Specifying Recipients”
y On the [Send] tab, you can set the resolution and paper size, etc. as well as specifying recipients.
P.21 “Setting up the [Send] tab”
y On the [Cover Sheet] and [Sender Information Properties] tab, the sender information for adding a fax cover
sheet can be set.
P.22 “Setting up the [Cover Sheet] tab”
P.23 “Setting up the [Sender Information] tab”
2.SENDING A FAX
Basic Procedure 9
2 SENDING A FAX
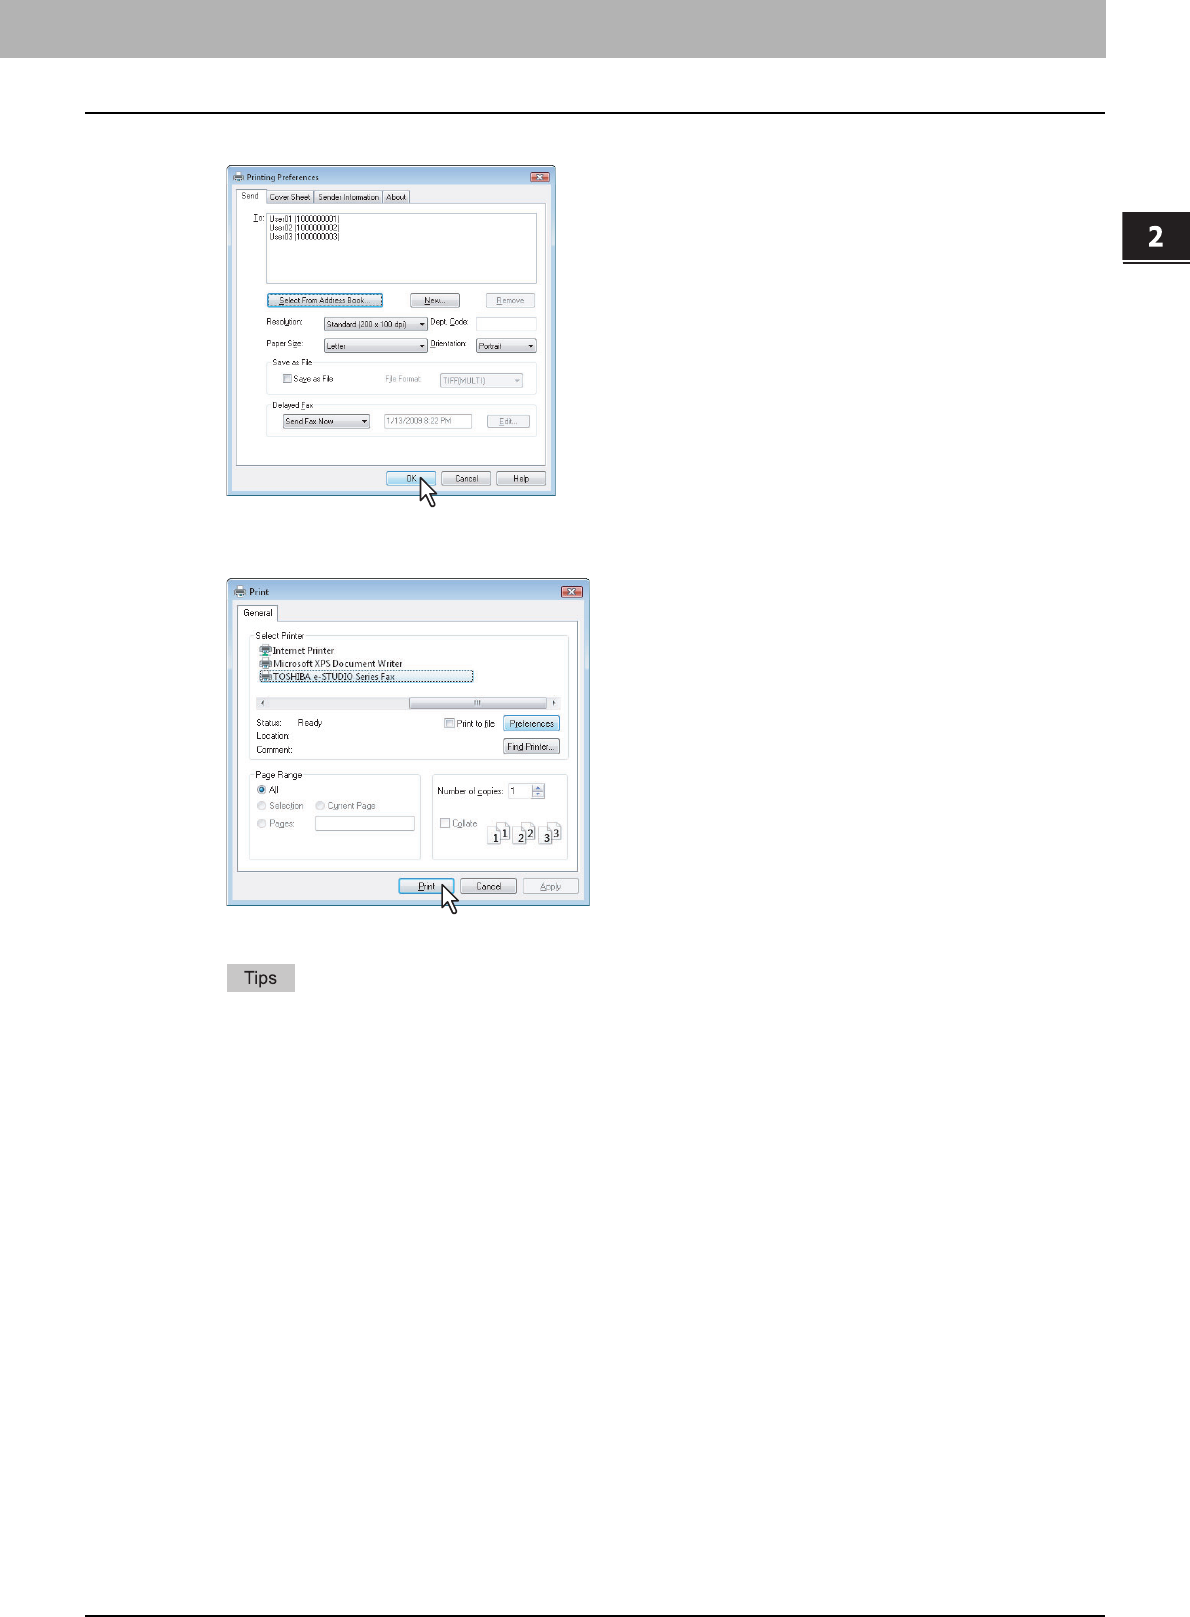
5
Click [OK].
The transmission settings are determined and the N/W-Fax driver properties dialog box is closed.
6
Click [Print] in the print dialog box on the application software.
A fax starts being sent.
y Note that the command name to print a document (send a fax) may differ from [Print] depending on the
application software.
y A waiting fax job can be checked or deleted through the managing jobs function in TopAccess. A sent fax
job can also be checked through the displaying job logs function in TopAccess. For details, refer to the
TopAccess Guide.
2 SENDING A FAX
10 Specifying Recipients
Specifying Recipients
Up to 400 recipients can be specified in a single operation. To send a Network Fax, specify the fax number. To send an
Internet Fax, specify the Email address.
P.10 “Entering recipients from the keyboard”
P.11 “Selecting recipients from the address book”
P.13 “Selecting recipients from the address book (Search option)”
P.17 “Removing recipients”
To use the address book, you need to register recipients in the address book of AddressBook Viewer in advance. For
details, refer to the Operator's Manual for AddressBook Viewer.
If more than one recipient is specified in a single transmission, and a cover sheet is set in the N/W-Fax driver or a
header page is set to be printed on the recipient's device, all the recipient information may be printed. If you want to
secure the recipient information, avoid sending a fax to multiple recipients at the same time.
Entering recipients from the keyboard
You can enter a recipient with the keyboard.
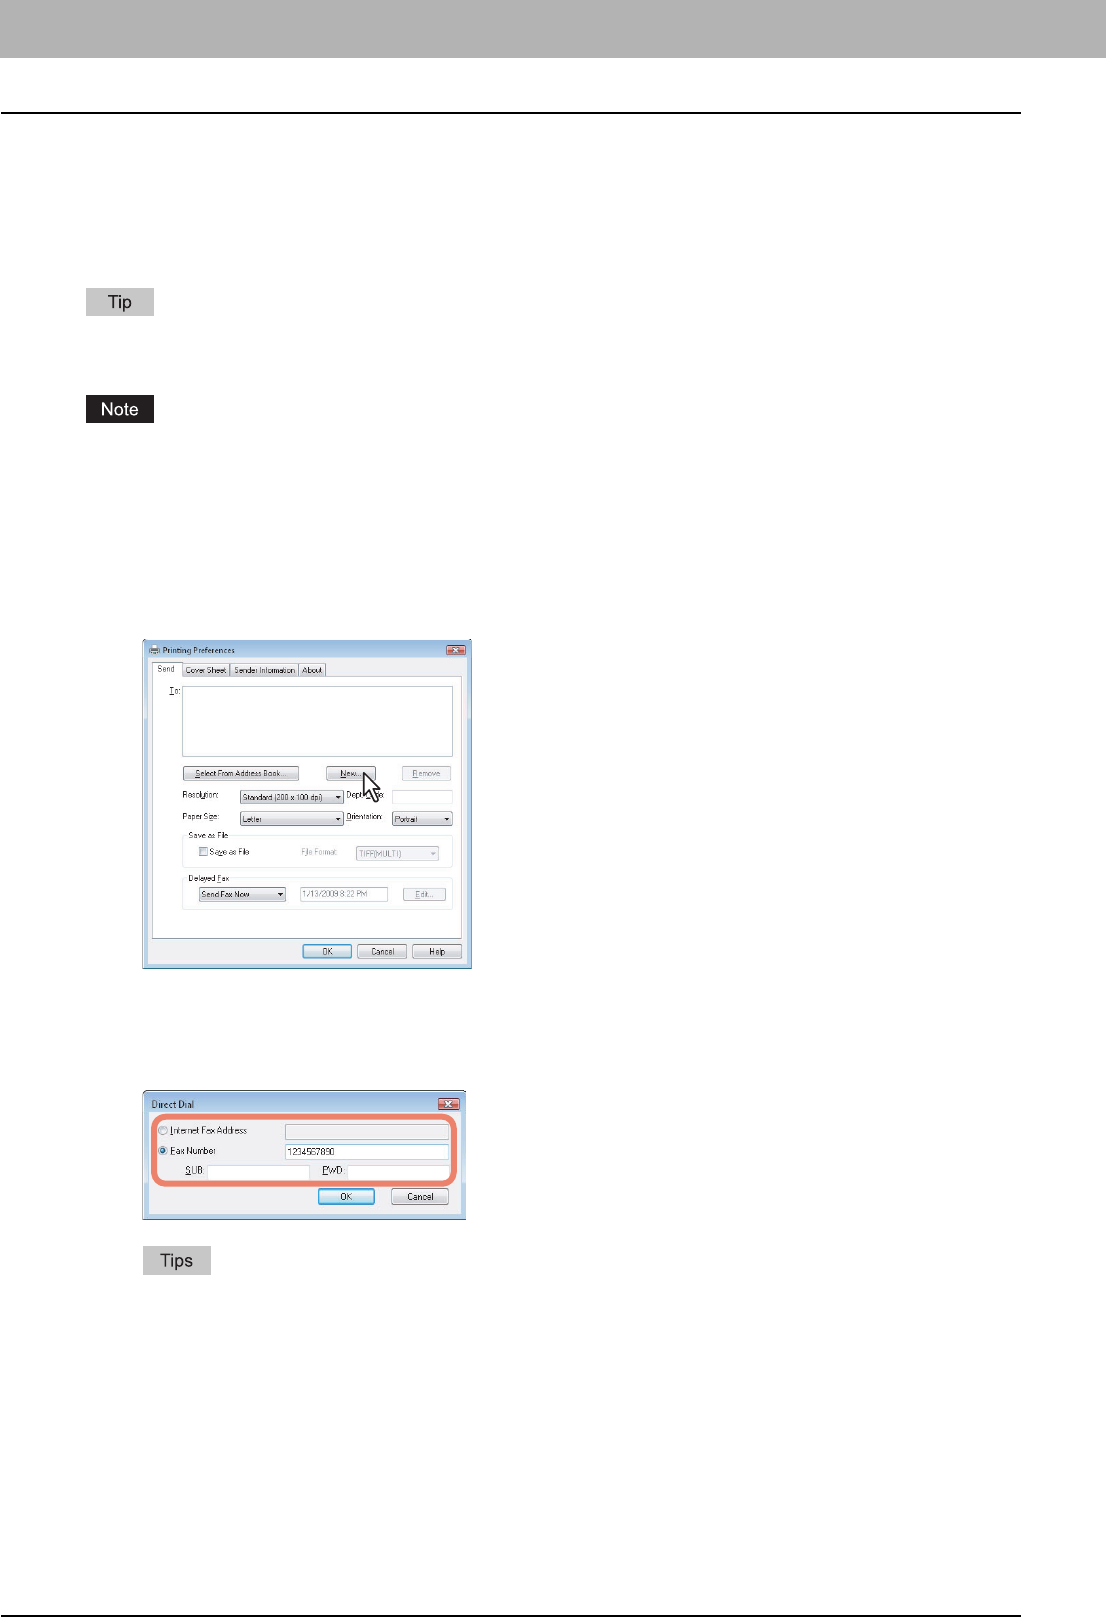
1
Click [New].
The [Direct Dial] dialog box appears.
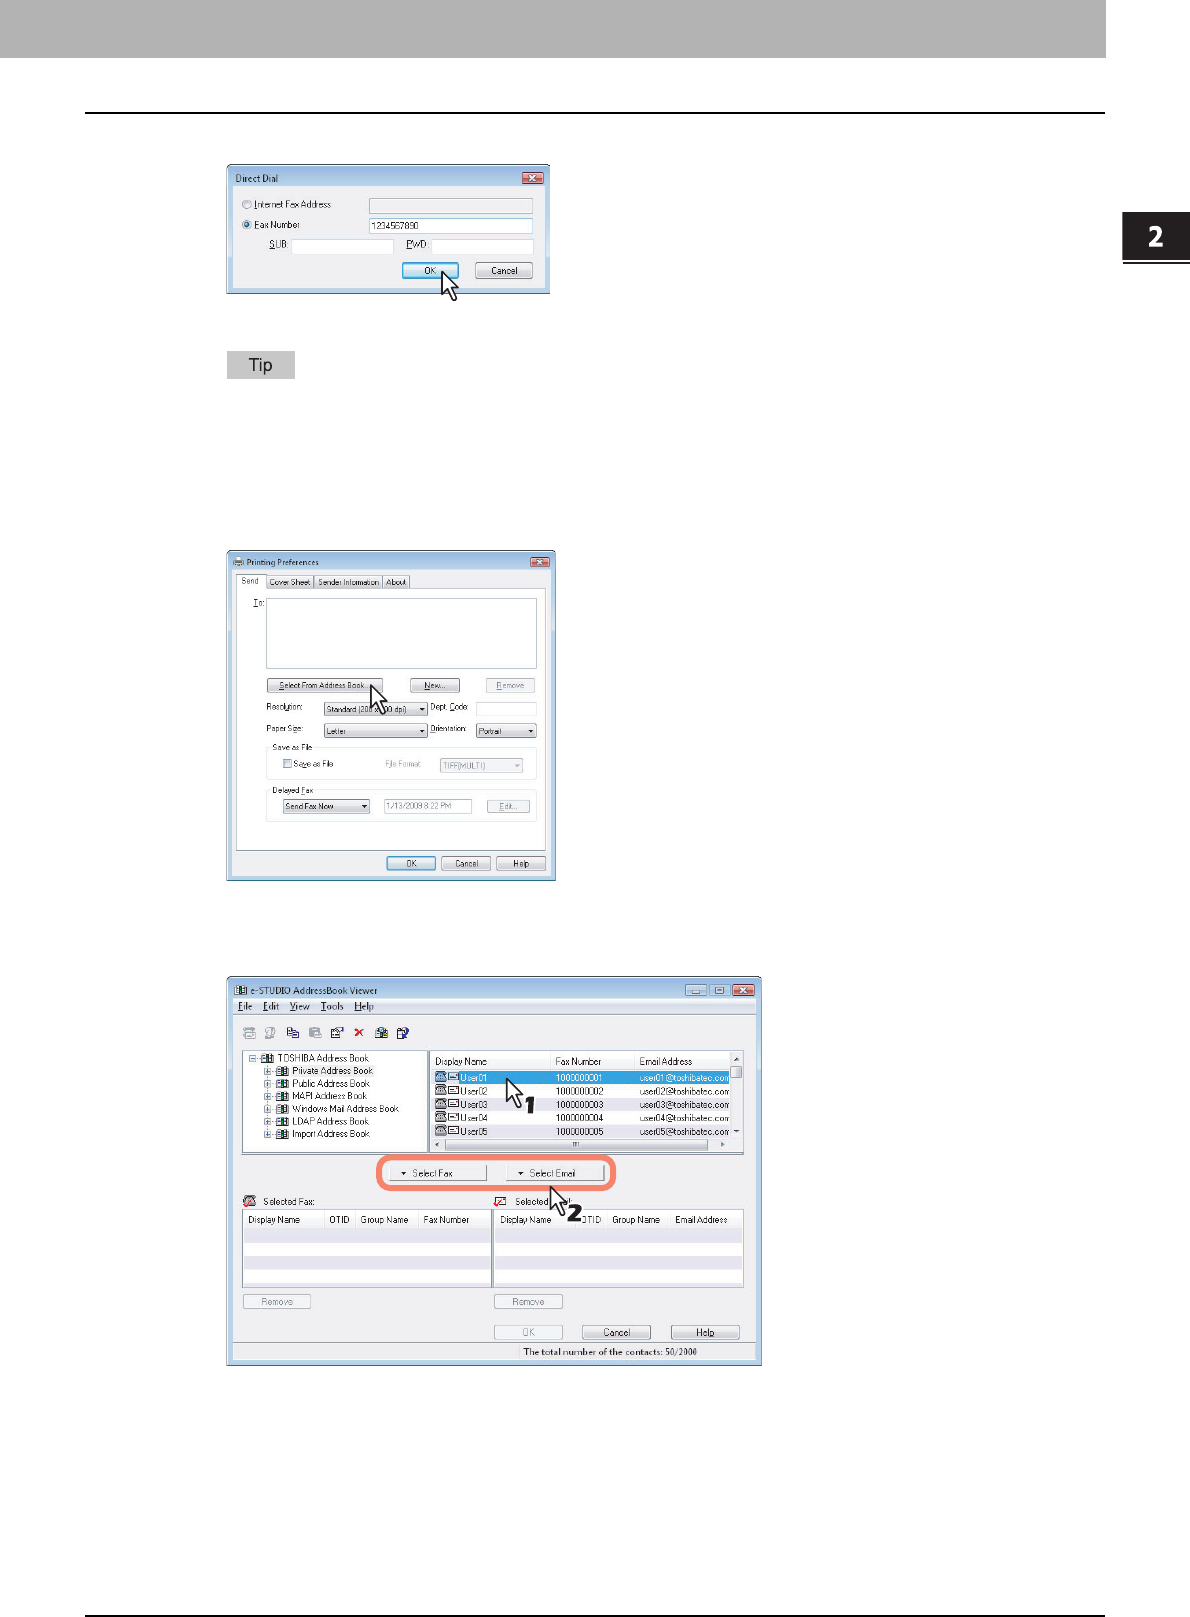
2
For the recipient of Network Fax, click [Fax Number] and enter the fax number in the
right-hand box. For one of an Internet Fax, click [Internet Fax Address] and enter the
Email address in the right-hand box.
y You can also enter up to 20 digits each in [SUB](sub address) and [PWD](password) when entering a fax
number. Entering them enables the document to be transferred from the recipient's device to that of the sub-
address, as the communication is in compliance with ITU-T standard. However, in order to use this function,
the recipient's device must be a model in compliance with the ITU-T standard.
y Use “ - ” (hyphen) if you send a Network Fax with pauses (approx. 3 seconds) inserted in the fax number.
2.SENDING A FAX
Specifying Recipients 11
2 SENDING A FAX
3
Click [OK].
The recipients selected for “To” are listed.
When the fax transmission is completed, the recipients are automatically removed from the “To” list.
Selecting recipients from the address book
Select a recipient from the address book in the AddressBook Viewer.
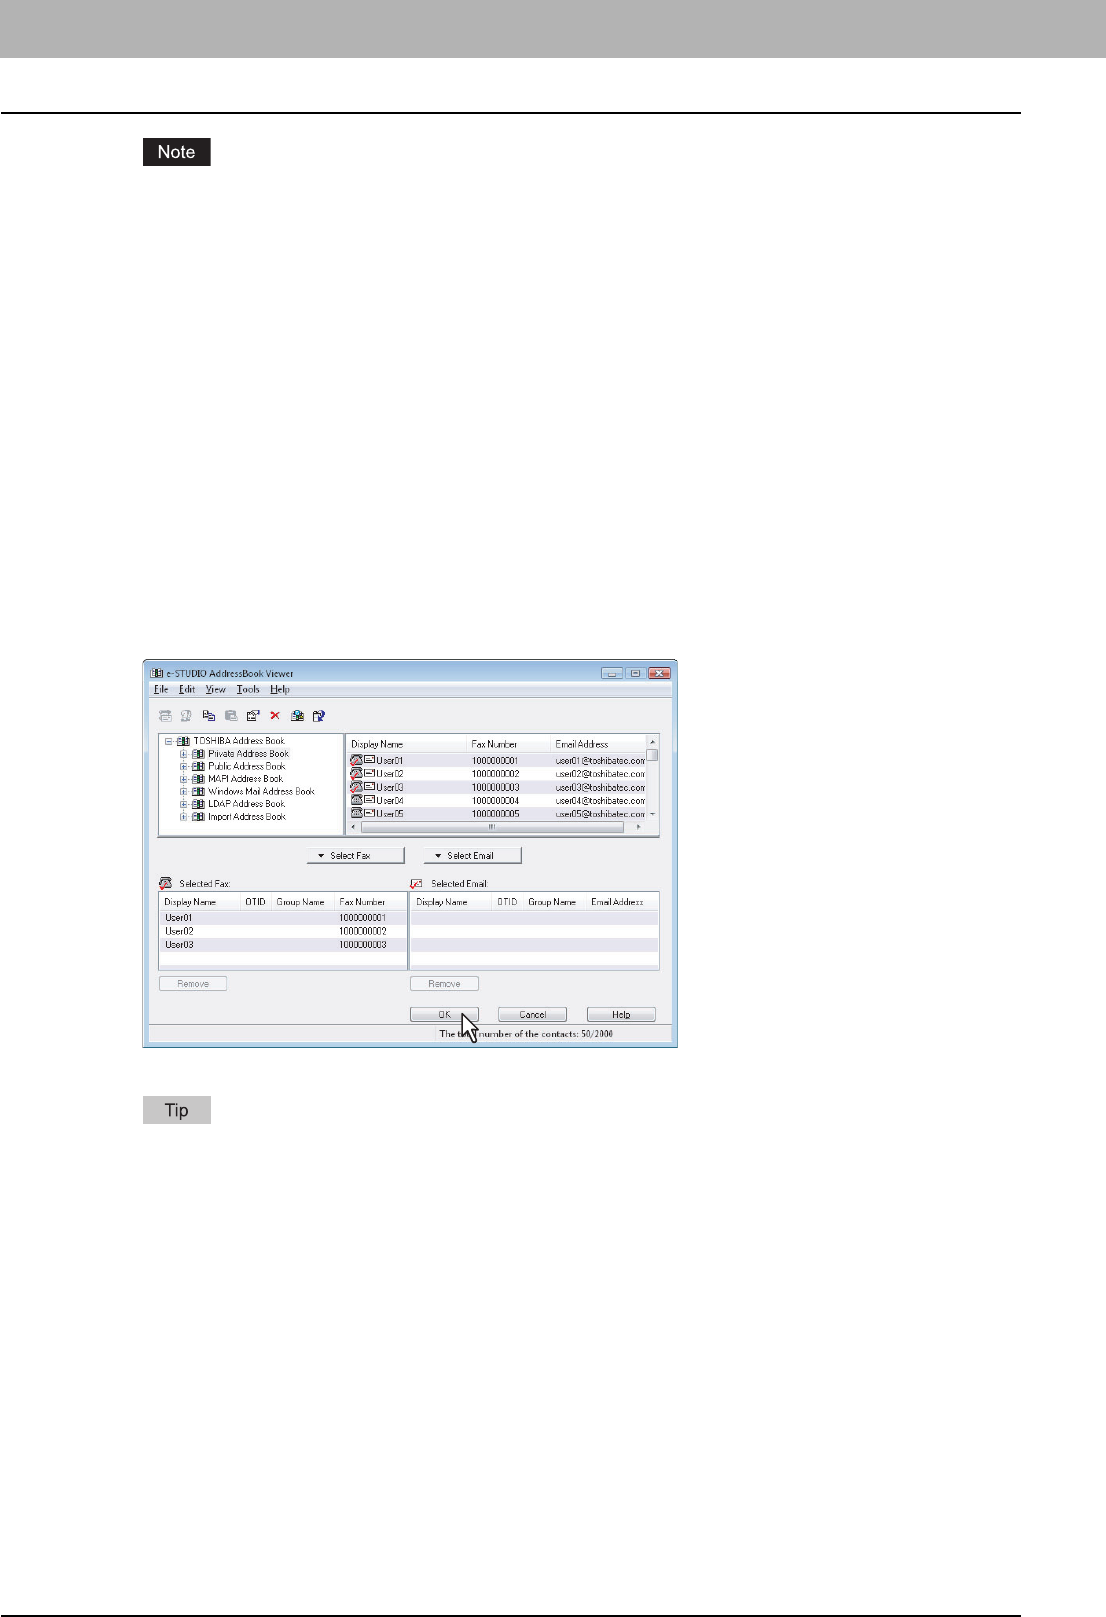
1
Click [Select From Address Book].
The AddressBook Viewer runs.
2
When selecting a fax number after selecting a contact from the contact list, click [Select
Fax] and when selecting an Email address, click [Select Email].
The selected recipients are listed in the “Selected Fax” or “Selected Email”.
2 SENDING A FAX
12 Specifying Recipients
A contact, for which only a fax number is registered, cannot be displayed in the “Selected Email” and a contact,
for which only an Email address is registered, cannot be displayed in the “Selected Fax”.
You can select a recipient by the following operations:
Selecting a contact by dragging and dropping
Drag a contact in the contact list and drop it to the “Selected Fax” or “Selected Email”.
Selecting a contact by double-clicking on it
Double-click on a contact in the contact list. To change the setting of the recipient to be selected upon double-
clicking, select [Default Configuration], [Type Selection] in the [View] menu and then one of [Fax], [Email] and
[Both].
Selecting a contact from a shortcut menu
Right-click on the contact in the contact list, select [Select] from the shortcut menu and then either [Fax Number]
and [Email].
Removing a recipient
Select a recipient in the “Selected Fax” or “Selected Email” and click the corresponding [Remove] (Left: fax
number, Right: Email address).
3
Click [OK].
The AddressBook Viewer is closed and the recipients selected for “To” are listed.
When the fax transmission is completed, the recipients are automatically removed from the “To” list.
2.SENDING A FAX
Specifying Recipients 13
2 SENDING A FAX
Selecting recipients from the address book (Search option)
You can find and select a recipient from the address book in the AddressBook Viewer.
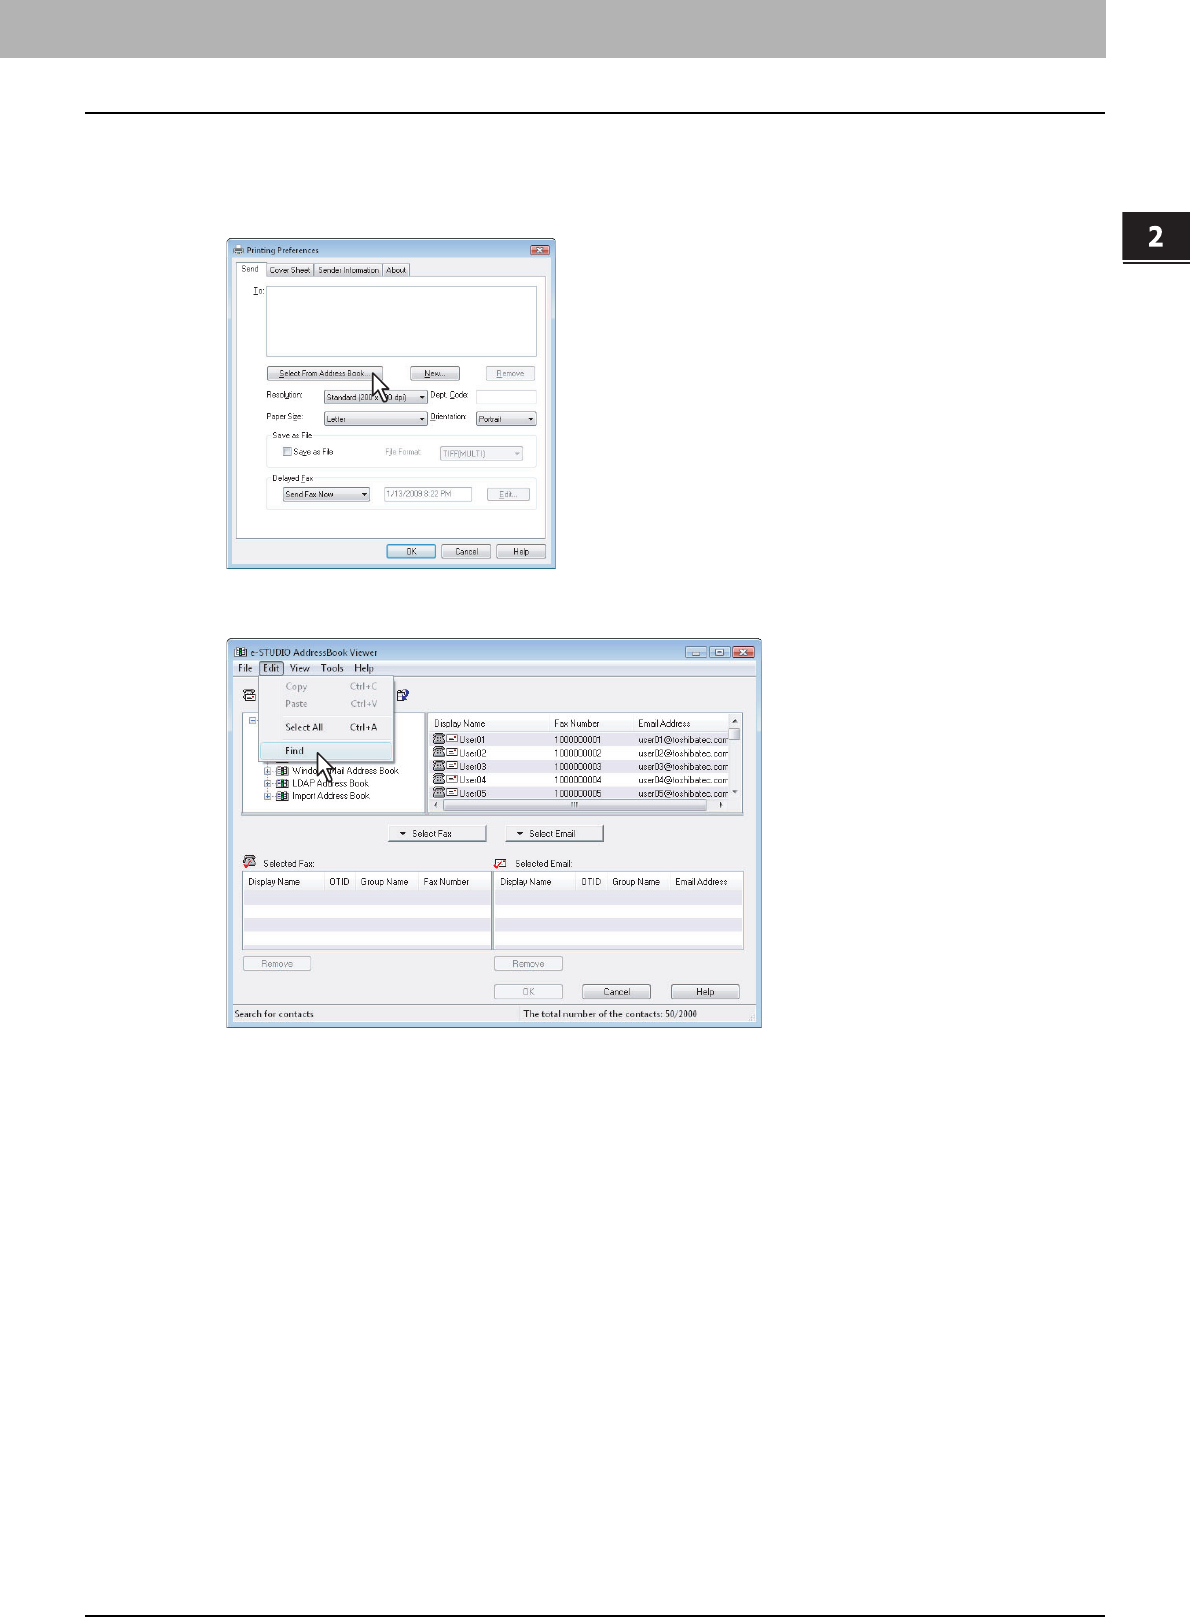
1
Click [Select From Address Book].
The AddressBook Viewer runs.
2
Select [Find] from the [Edit] menu.
The [Find Contact] dialog box appears.
2 SENDING A FAX
14 Specifying Recipients
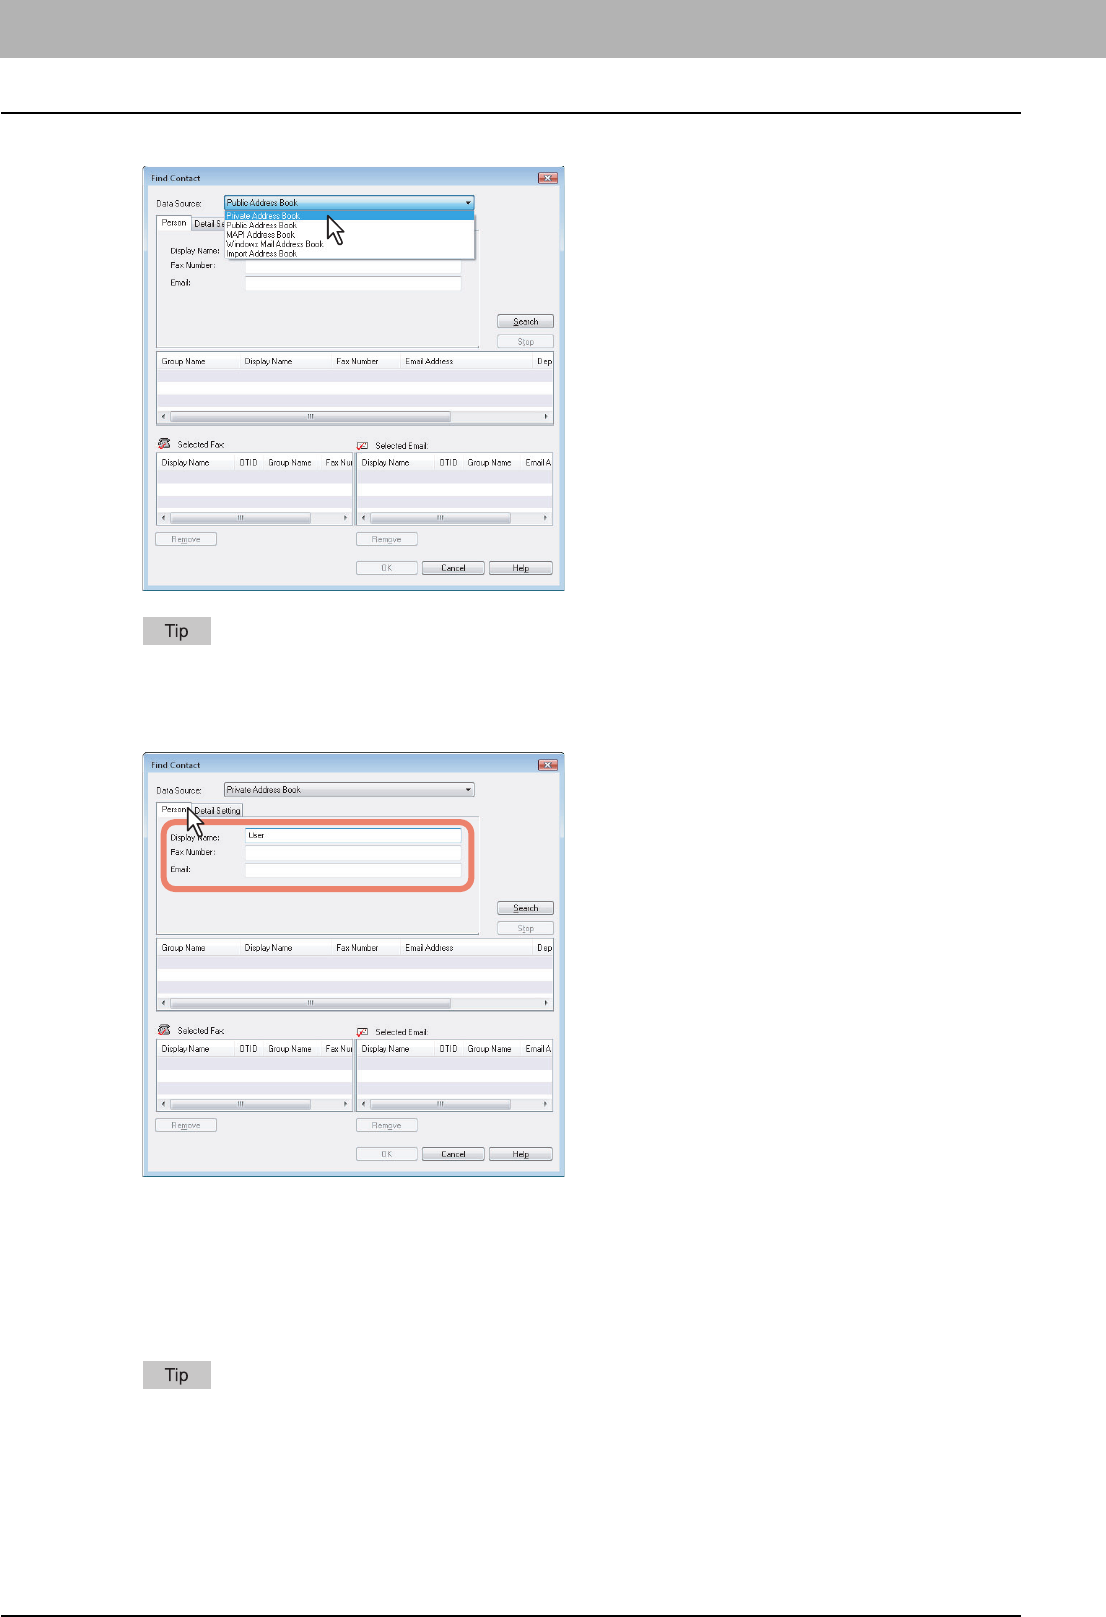
3
Select a registered directory service in [Data Source].
To change the setting of the default address book in the [Data Source] box, select [View] - [Default
Configuration] - [Data Source] and then choose an address book.
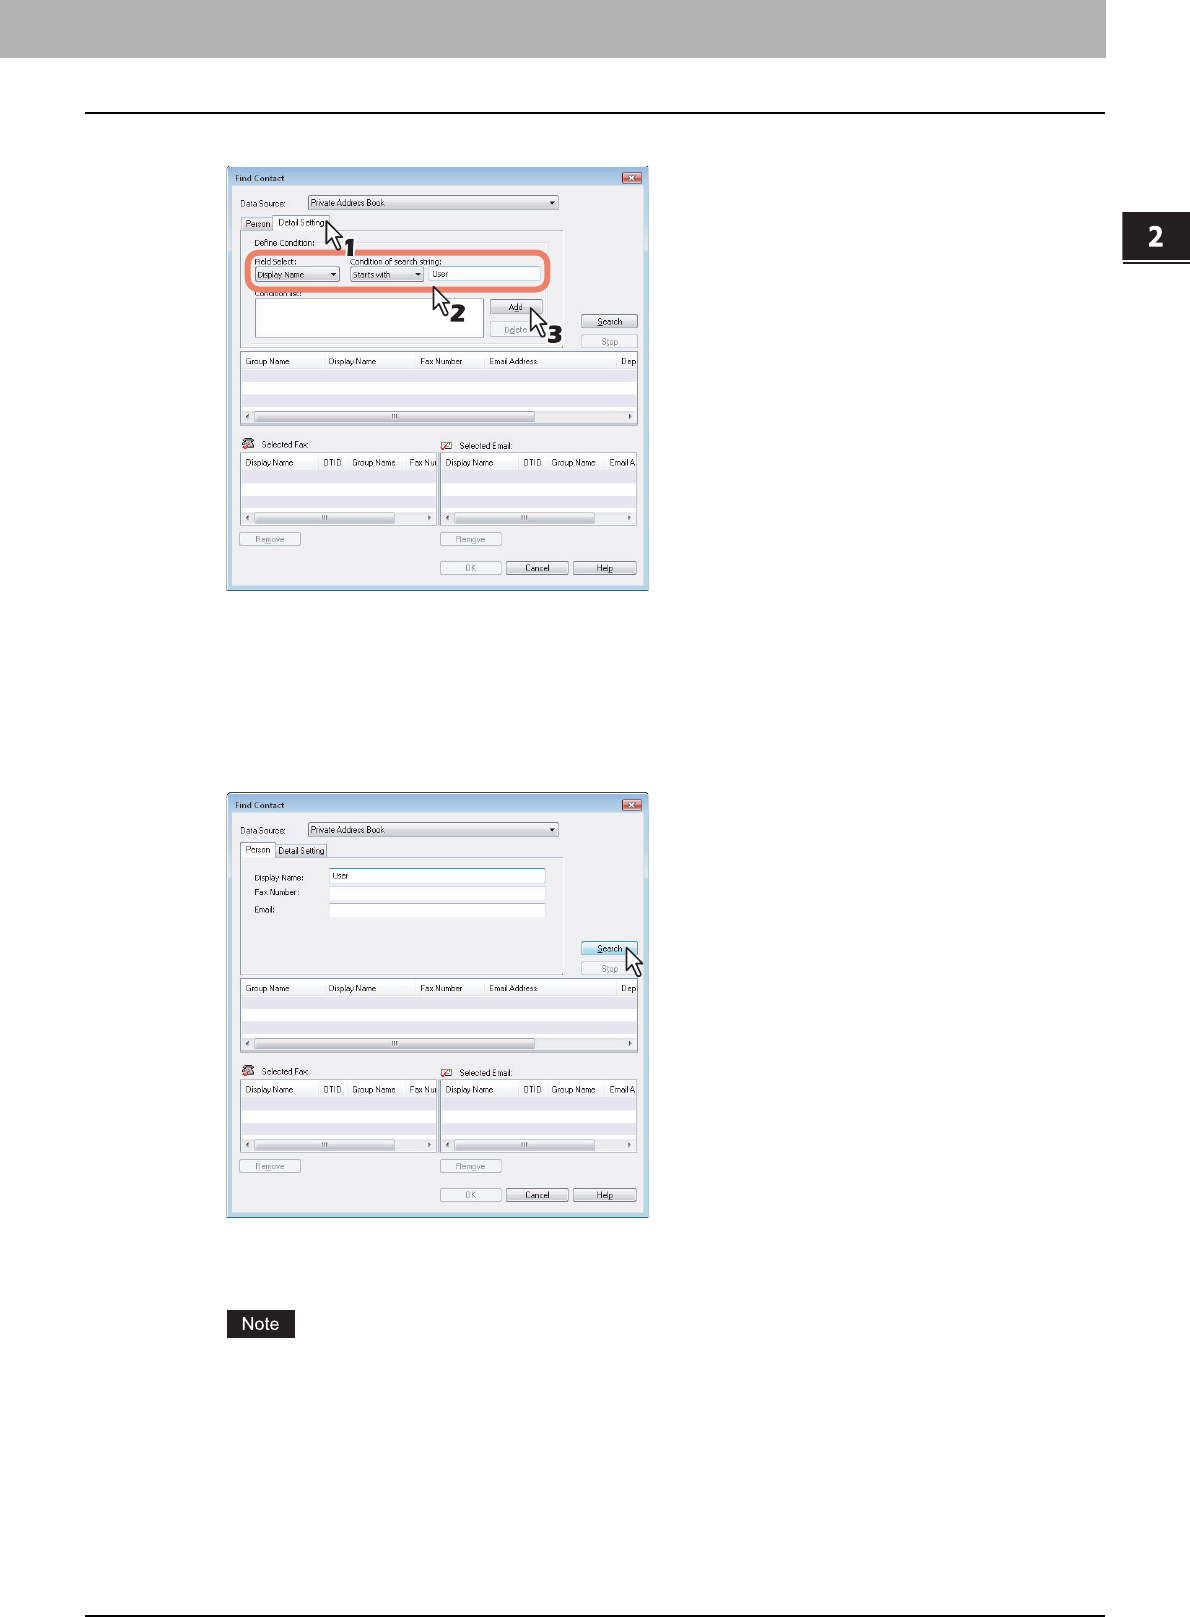
4
Display the [Person] tab and enter search strings in the following boxes.
Display Name — To search display names, enter a search string here.
Fax Number — To search fax numbers, enter the numbers here.
Email — To search Email address, enter a search string here.
If you perform searching in the above conditions, proceed to step 6. If you want to set more detailed search
conditions, proceed to step 5 and set the [Detail Setting] tab. Note that even if you enter the search conditions in
both the [Person] and [Detail Setting] tabs, you cannot perform searching in these combined conditions.
In the [Person] tab, you do not have to fill in all the boxes and the string does not need to completely
correspond to the target of the search. Entering one or more characters in one or more boxes causes a search
to be made for contacts which correspond to the particular conditions.
2.SENDING A FAX
Specifying Recipients 15
2 SENDING A FAX
5
Display the [Detail Setting] tab, set the search condition, and then click [Add].
Field Select — Select an item to be searched.
Condition of search string — Select a condition in the left-hand box, and then enter a search string in the right-
hand box.
y The search condition is displayed in the “Condition list”.
y To set more than one search condition, repeat this operation as many times as needed.
y To delete the search conditions, select one and click [Delete].
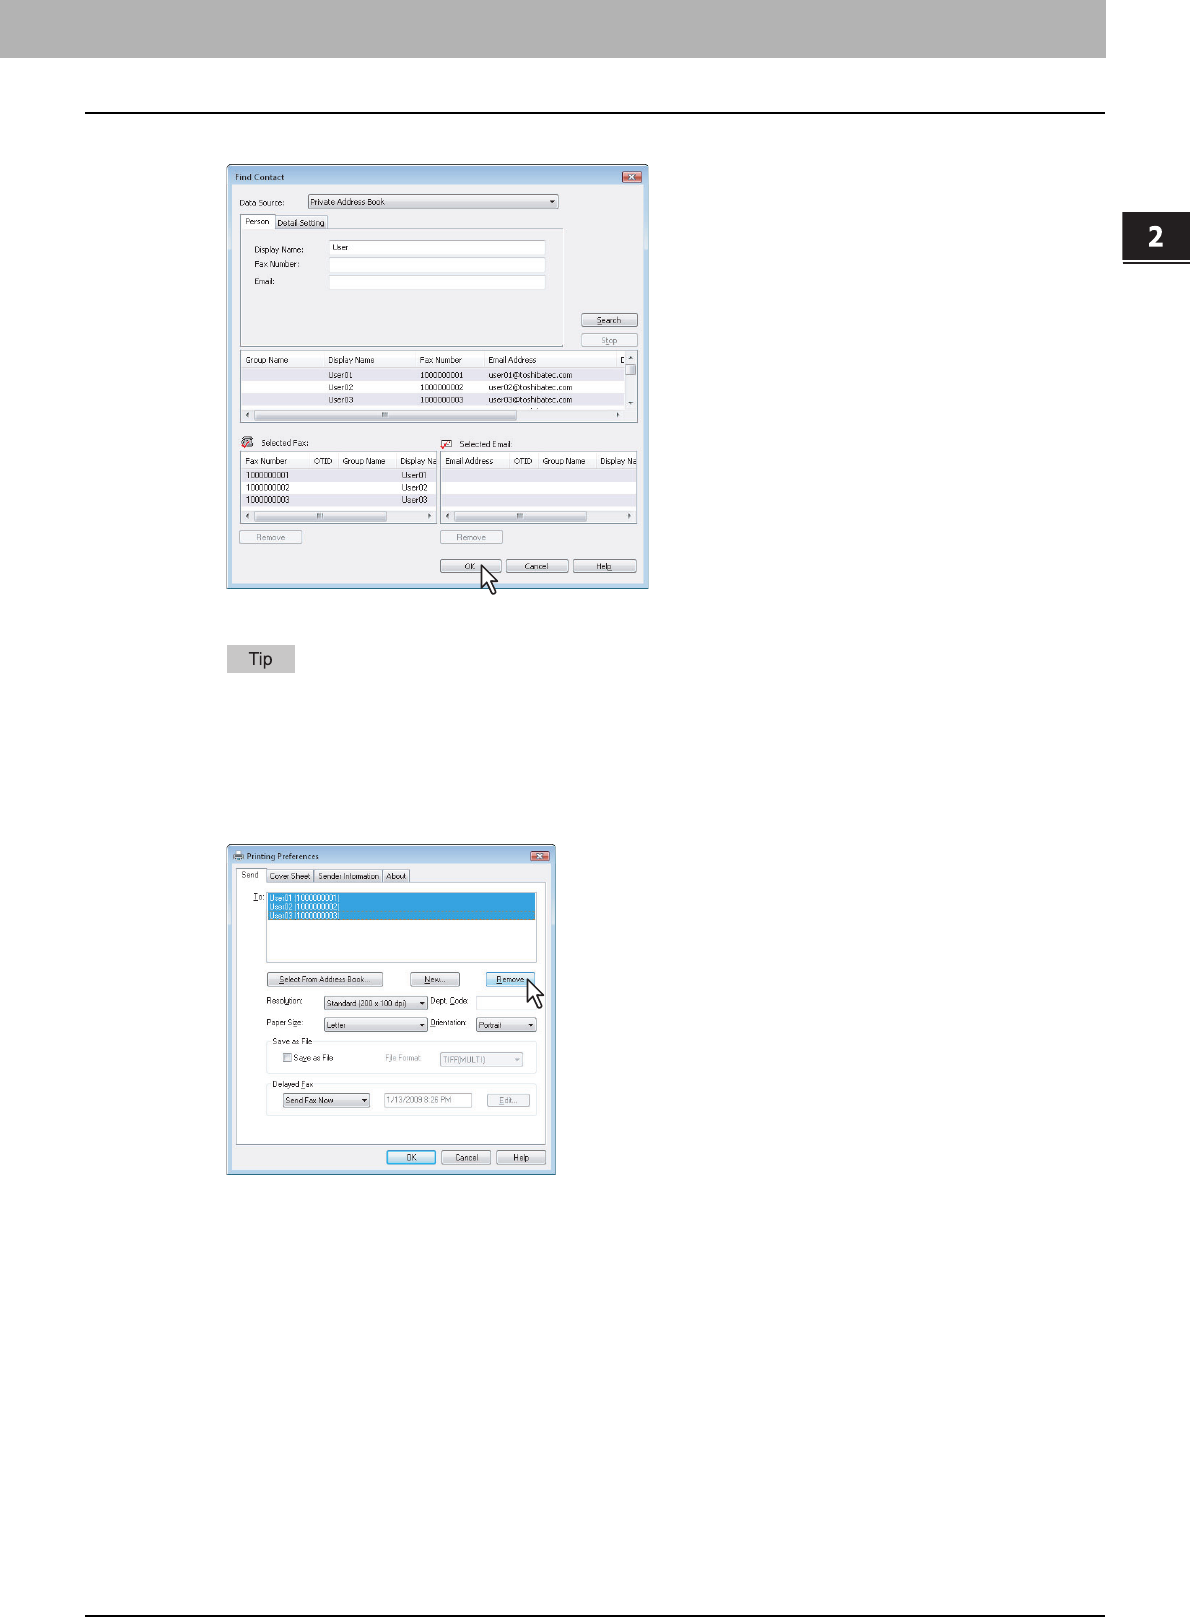
6
Click [Search].
y It starts searching contacts in the selected address book. When the search is complete, the contacts matching
the search conditions are listed.
y To stop searching, click [Stop].
Even if you enter the search conditions in both the [Person] and [Detail Setting] tabs, only the search condition
in the tab currently displayed is used. You cannot perform searching in the combined conditions on both tabs.

2 SENDING A FAX
16 Specifying Recipients
7
Drag and drop the contacts to “Selected Fax” or “Selected Email” from the list of the
search results.
The selected recipients are listed in “Selected Fax” or “Selected Email”.
A contact, for which only a fax number is registered, cannot be displayed in the “Selected Email” and a contact,
for which only an Email address is registered, cannot be displayed in the “Selected Fax”.
You can select a recipient by the following operations:
Selecting a contact by double-clicking on it
Double-click on a contact in the list of the search results. To change the setting of the recipient to be selected upon
double-clicking, select [Default Configuration], [Type Selection] in the [View] menu and then one of [Fax], [Email]
and [Both].
Selecting a contact from a shortcut menu
Right-click on the contact in the list of the search results, select [Select] from the shortcut menu and then either
[Fax Number] or [Email].
Removing a recipient
Select a recipient in the “Selected Fax” or “Selected Email” and click the corresponding [Remove] (Left: fax
number, Right: Email address).
2.SENDING A FAX
Specifying Recipients 17
2 SENDING A FAX
8
Click [OK].
The AddressBook Viewer is closed and the recipients selected for “To” are displayed on the list.
When the fax transmission is completed, the recipients are automatically removed from the “To” list.
Removing recipients
You can remove a recipient from the “To” list in the N/W-Fax driver properties.
1
Select a recipient and click [Remove].
The selected recipient is removed.

3.SETTING OPTIONS
This chapter describes how to set up options for N/W-Fax driver.
How To Setup.......................................................................................................................... 20
Setting Initial Values of N/W-Fax driver options ...................................................................................................20
Setting print options for each print job..................................................................................................................20
Setting up the N/W-Fax Driver Options ................................................................................ 21
Setting up the [Send] tab......................................................................................................................................21
Setting up the [Cover Sheet] tab ..........................................................................................................................22
Setting up the [Sender Information] tab................................................................................................................23
Displaying the Version Information.......................................................................................................................24
Sending with Extended Fax Functionality ........................................................................... 25
Saving a fax as file ...............................................................................................................................................25
Delayed transmission ...........................................................................................................................................26
Sending with a cover sheet ..................................................................................................................................27

3 SETTING OPTIONS
20 How To Setup
How To Setup
There are two ways to set the N/W-Fax driver options: One is to set the initial values of the options and the other is to set
each option for each individual job.
P.20 “Setting Initial Values of N/W-Fax driver options”
P.20 “Setting print options for each print job”
Setting Initial Values of N/W-Fax driver options
Setting the N/W-Fax options by displaying the N/W-Fax driver properties from the Printers folder on the Windows [Start]
menu will establish the initial values of the options.
1
Click the start button, [Control Panel] and select [Printers].
When using Windows 2000/XP/Server 2003, click [Start] and select [Printers and Faxes].
When using Windows 7, click [Start] and select [Devices and Printers].
2
Select the N/W-Fax driver, click the [File] menu and select [Printing Preferences].
Setting print options for each print job
Setting the N/W-Fax driver options by displaying the printer properties from the Print dialog box within an application will
establish the values for the current N/W-Fax job. The N/W-Fax driver option settings specific to each N/W-Fax job are set
using this method.
1
Click the [File] menu and select [Print] on an application.
2
Select [TOSHIBA e-STUDIO Series Fax] and click [Properties] or [Preferences].
3 SETTING OPTIONS
Setting up the N/W-Fax Driver Options 21
Setting up the N/W-Fax Driver Options
N/W-Fax driver options are the attributes to define the way a fax job is transmitted. For example, you can specify the
recipients, resolution, and paper size.
P.21 “Setting up the [Send] tab”
P.22 “Setting up the [Cover Sheet] tab”
P.23 “Setting up the [Sender Information] tab”
P.24 “Displaying the Version Information”
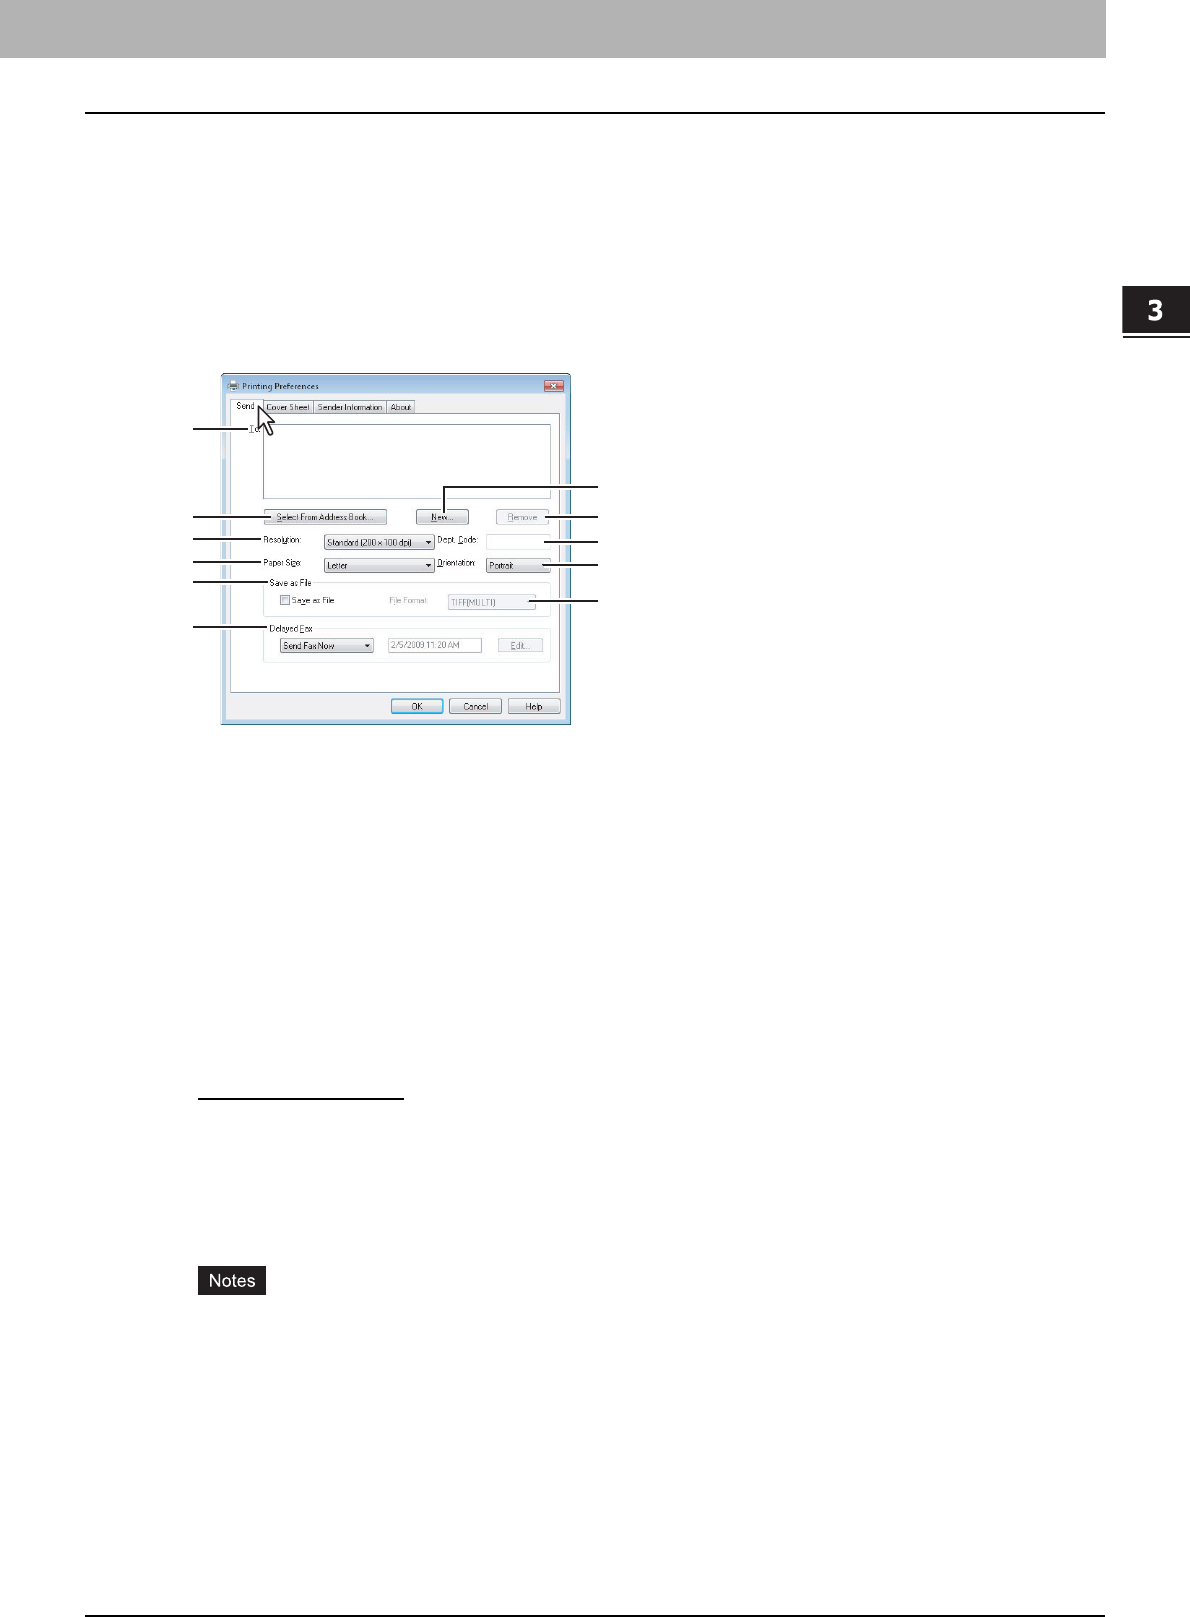
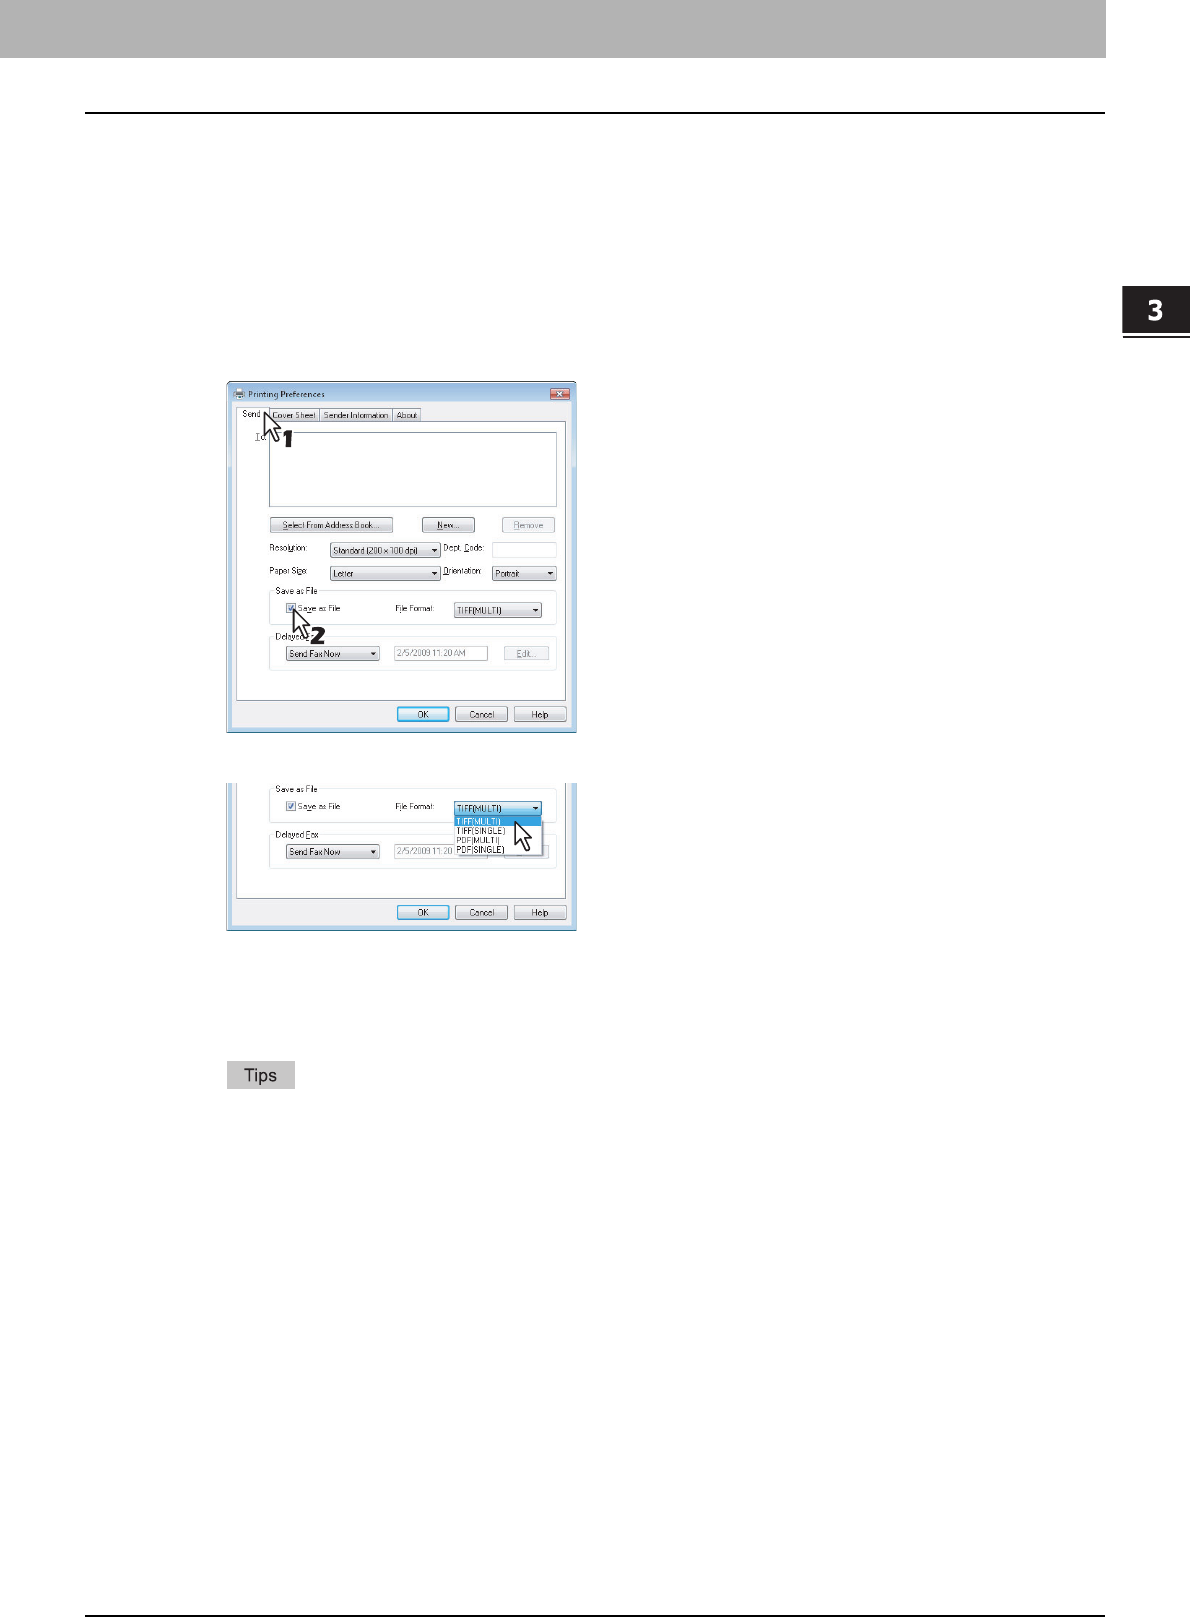
Setting up the [Send] tab
In the [Send] tab, you can specify the recipients and how the fax will be sent.
1) To
This displays the specified recipients list.
P.10 “Specifying Recipients”
2) [Select From Address Book]
Click to launch the AddressBook Viewer. You can select recipients from the address book.
P.11 “Selecting recipients from the address book”
3) [New]
Click to add new recipient by entering manually. The [Direct Dial] dialog box appears.
P.10 “Entering recipients from the keyboard”
4) [Remove]
Select a recipient in the [To] list and click this to remove the recipient from the list.
P.17 “Removing recipients”
5) Resolution
Select the resolution for the fax.
- Standard (200 x 100 dpi)
— Select this to send a document in Standard mode (200 x 100 dpi).
- Fine (200 x 200 dpi) — Select this to send a document in Fine mode (200 x 200 dpi).
- Super Fine (200 x 400 dpi) — Select this to send a document in Super Fine mode (200 x 400 dpi).
- Ultra Fine (400 x 400 dpi) — Select this to send a document in Ultra Fine mode (400 x 400 dpi).
6) Dept. Code
Enter 5-digit department code if required. When the department code is enabled on this equipment, you must enter the
department code to send a fax.
y If you do not enter the department code when the department code is enabled on the equipment and the
Department Code Enforcement is set to ON in TopAccess, the job will be stored in the Invalid job list without
transmitting the job. You can release or delete the job that is stored in the Invalid job list from the [JOB STATUS]
button on the touch panel. For instructions on how to release or delete the job in the Invalid job list, refer to
Printing Guide.
y If you do not enter the department code when the department code is enabled on the equipment and the
Department Code Enforcement is set to PRINT in TopAccess, the job will be sent.
y If you do not enter the department code when the department code is enabled on the equipment and the
Department Code Enforcement is set to DELETE in TopAccess, the job will be deleted automatically.
7) Paper Size
Select the paper size of your document.
3
4
6
8
10
1
2
5
7
9
11
3 SETTING OPTIONS
22 Setting up the N/W-Fax Driver Options
8) Orientation
Select the orientation of your document.
9) Save as File
Select this to save up to 10 GB documents in the “FILE_SHARE” folder in the equipment as well as send the document
as a fax and Internet Fax.
P.25 “Saving a fax as file”
When the cover sheet is set, the cover sheet and the original will be stored in the “FILE_SHARE” folder.
10) File Format
Select the file format of the document that will be saved. This option can be selected only when the [Save as File]
check box is selected.
11) Delayed Fax
Select whether sending a document now or later.
- Send Fax Now
— Select this to send a document immediately.
- Send Fax Later — Select this to send a document on a specified date and time. When this is selected, click [Edit]
to display the [Scheduled Time] dialog box and specify date and time the job will be transmitted. The job sent to this
equipment will be stored in the Fax queue until the specified date and time.
P.26 “Delayed transmission”
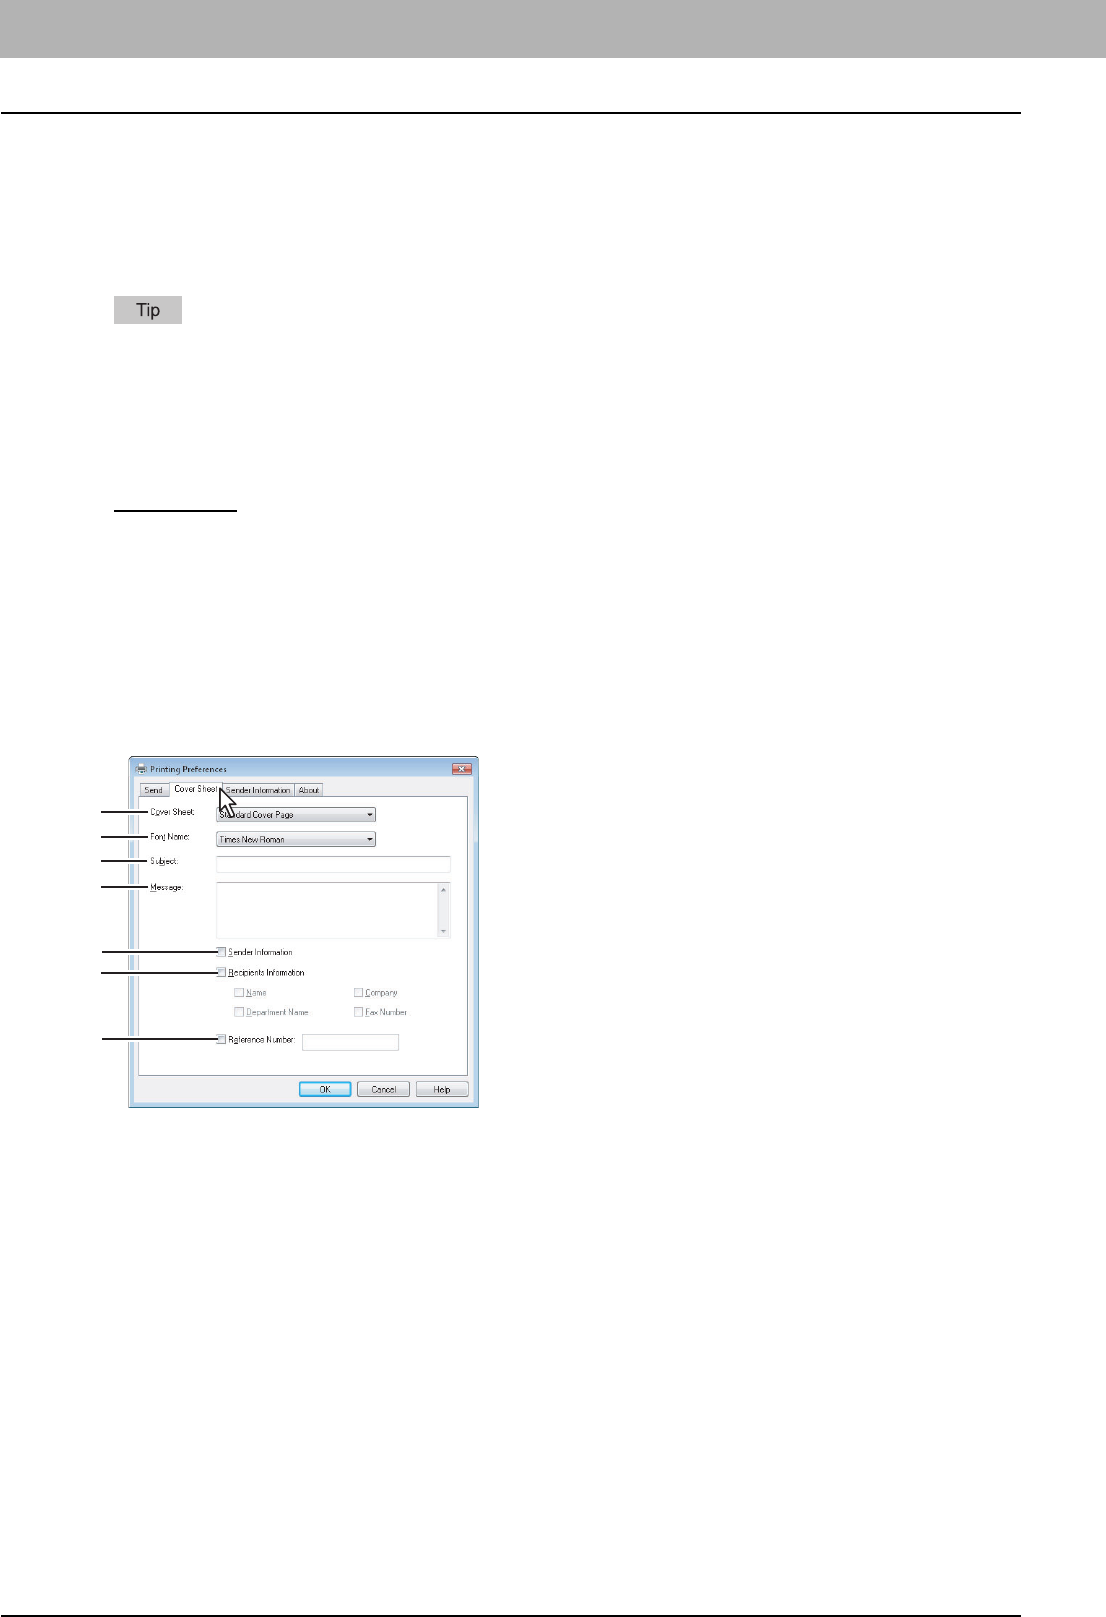
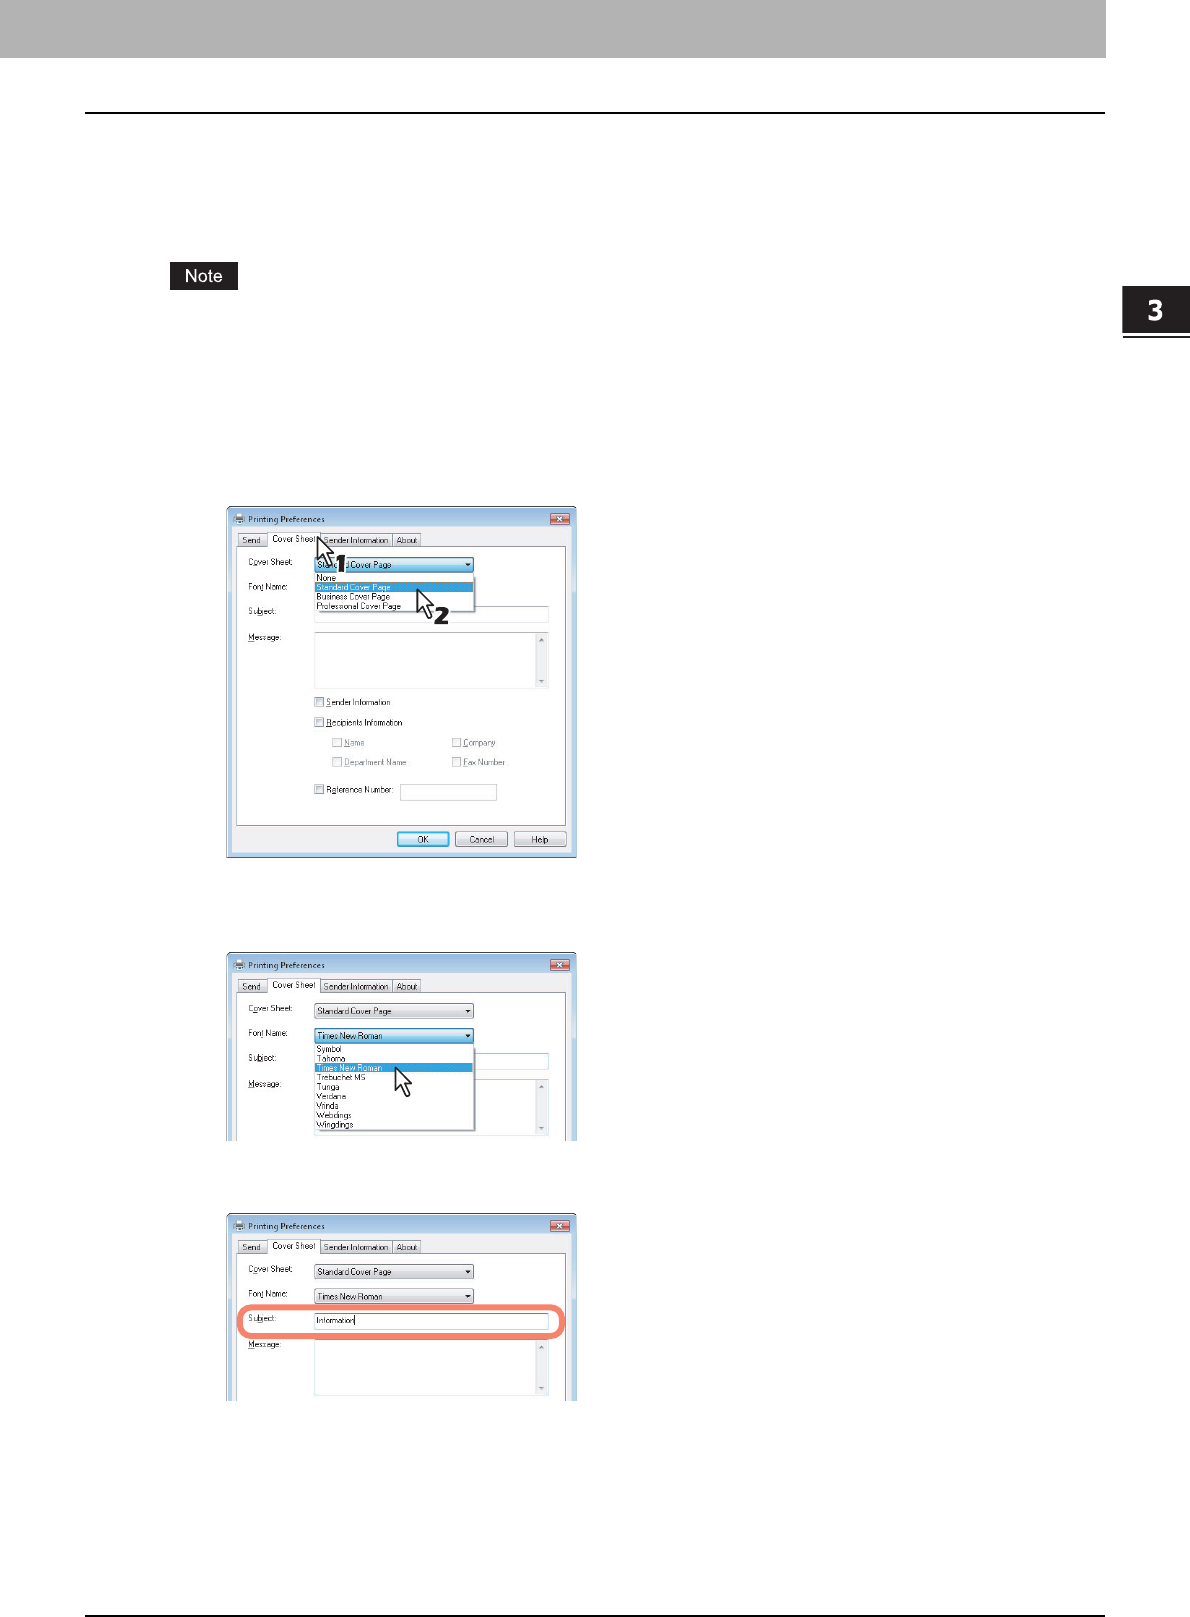
Setting up the [Cover Sheet] tab
In the [Cover Sheet] tab, you can specify the fax cover sheet to be sent. If you enable the cover sheet, the cover sheet is
attached in the first page of the document and sent to the recipients.
P.27 “Sending with a cover sheet”
1) Cover Sheet
Select the cover sheet type from [Standard Cover Page], [Business Cover Page], and [Professional Cover Page]. For
cover sheet samples, see the Appendix at the end of this guide.
P.32 “Cover Sheet Samples”
2) Font Name
Select the font to be used for the cover sheet.
3) Subject
Enter the subject to be displayed on the cover sheet. You can enter up to 40 characters.
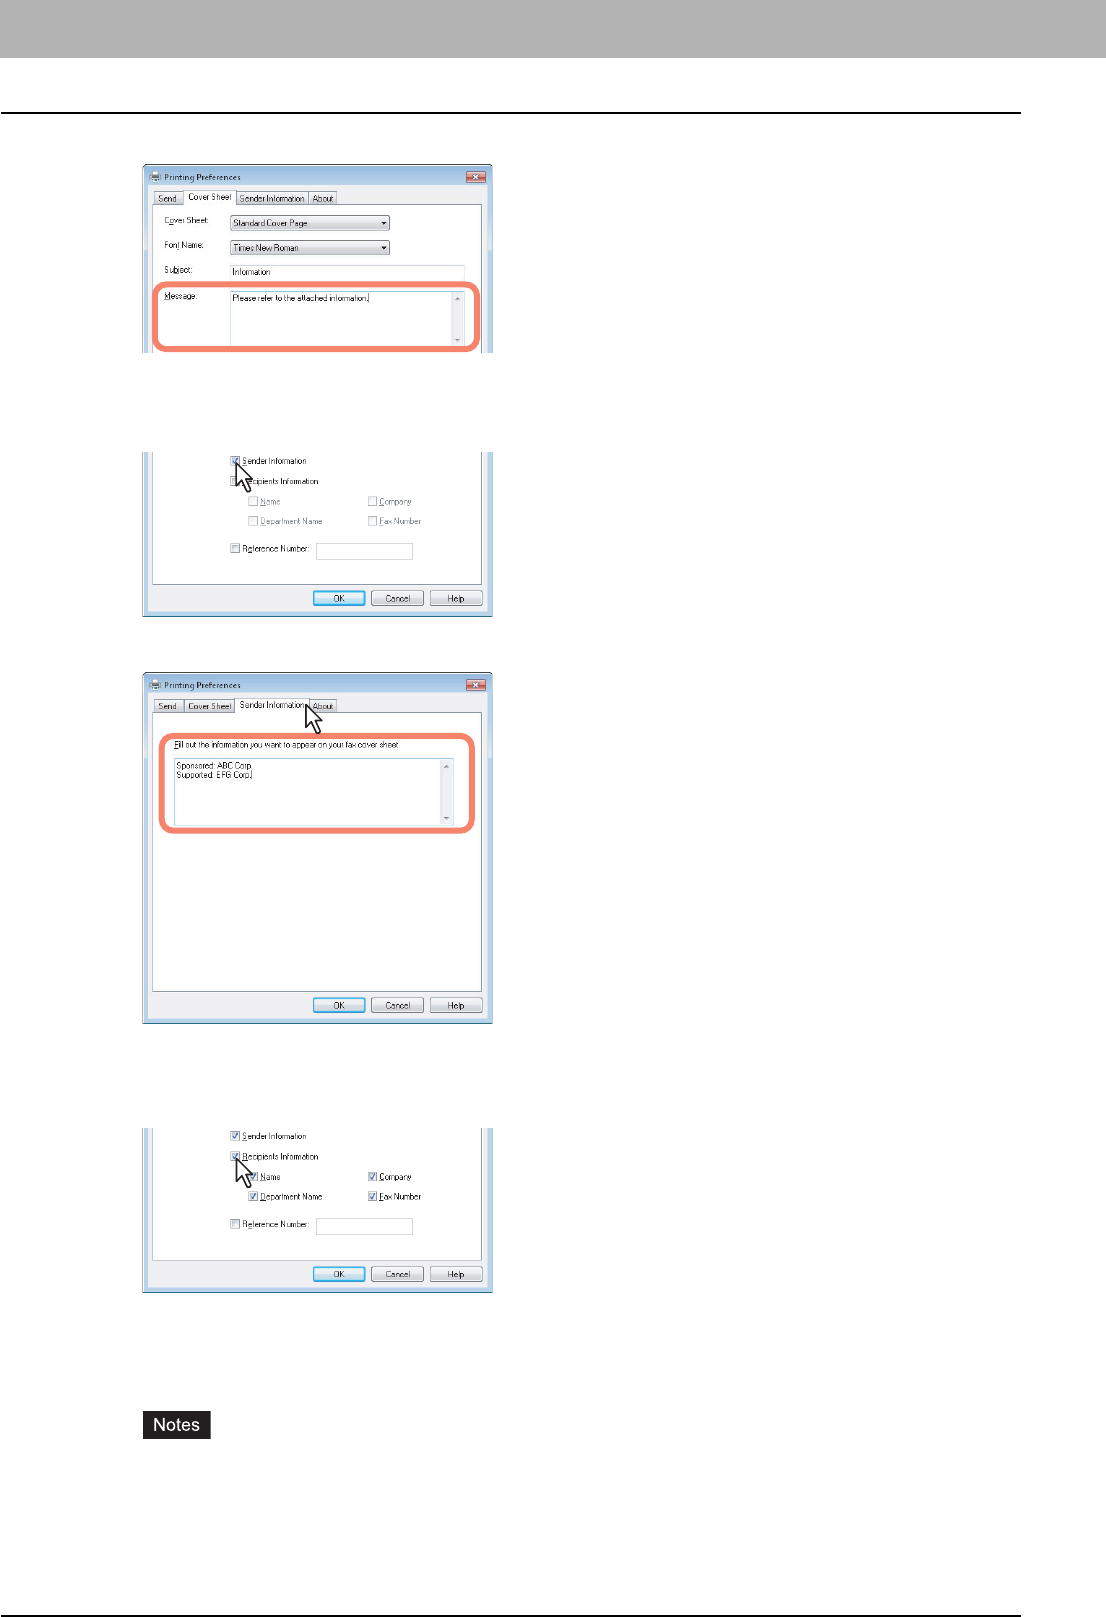
4) Message
Enter the message to be displayed on the cover sheet. You can enter up to 500 characters.
5) Sender Information
Check this to print sender information on the cover sheet. When this is enabled, specify the sender information in the
[Sender Information] tab.
P.23 “Setting up the [Sender Information] tab”
1
2
3
4
5
6
7

3.SETTING OPTIONS
Setting up the N/W-Fax Driver Options 23
3 SETTING OPTIONS
6) Recipient Information
Check this to have recipient information appear on the cover sheet. Select one or more of the following options to
determine what information will appear in the “To:” field of the cover sheet.
- Name — Check this to have the recipient name appear on the cover sheet.
- Company — Check this to have the recipient company name appear on the cover sheet.
- Department Name — Check this to have the recipient department name appear on the cover sheet.
- Fax Number — Check this to have the recipient fax number or Email address appear on the cover sheet.
7) Reference Number
Enter the reference number to identify the fax. This number will appear on the cover sheet.
Setting up the [Sender Information] tab
In the [Sender Information] tab, you can specify the sender information that appears on the cover sheet. This must be set
only when the [Sender Information] check box in the [Cover Sheet] tab is selected.
1) Text box
You can enter up to 500 characters in this text box.
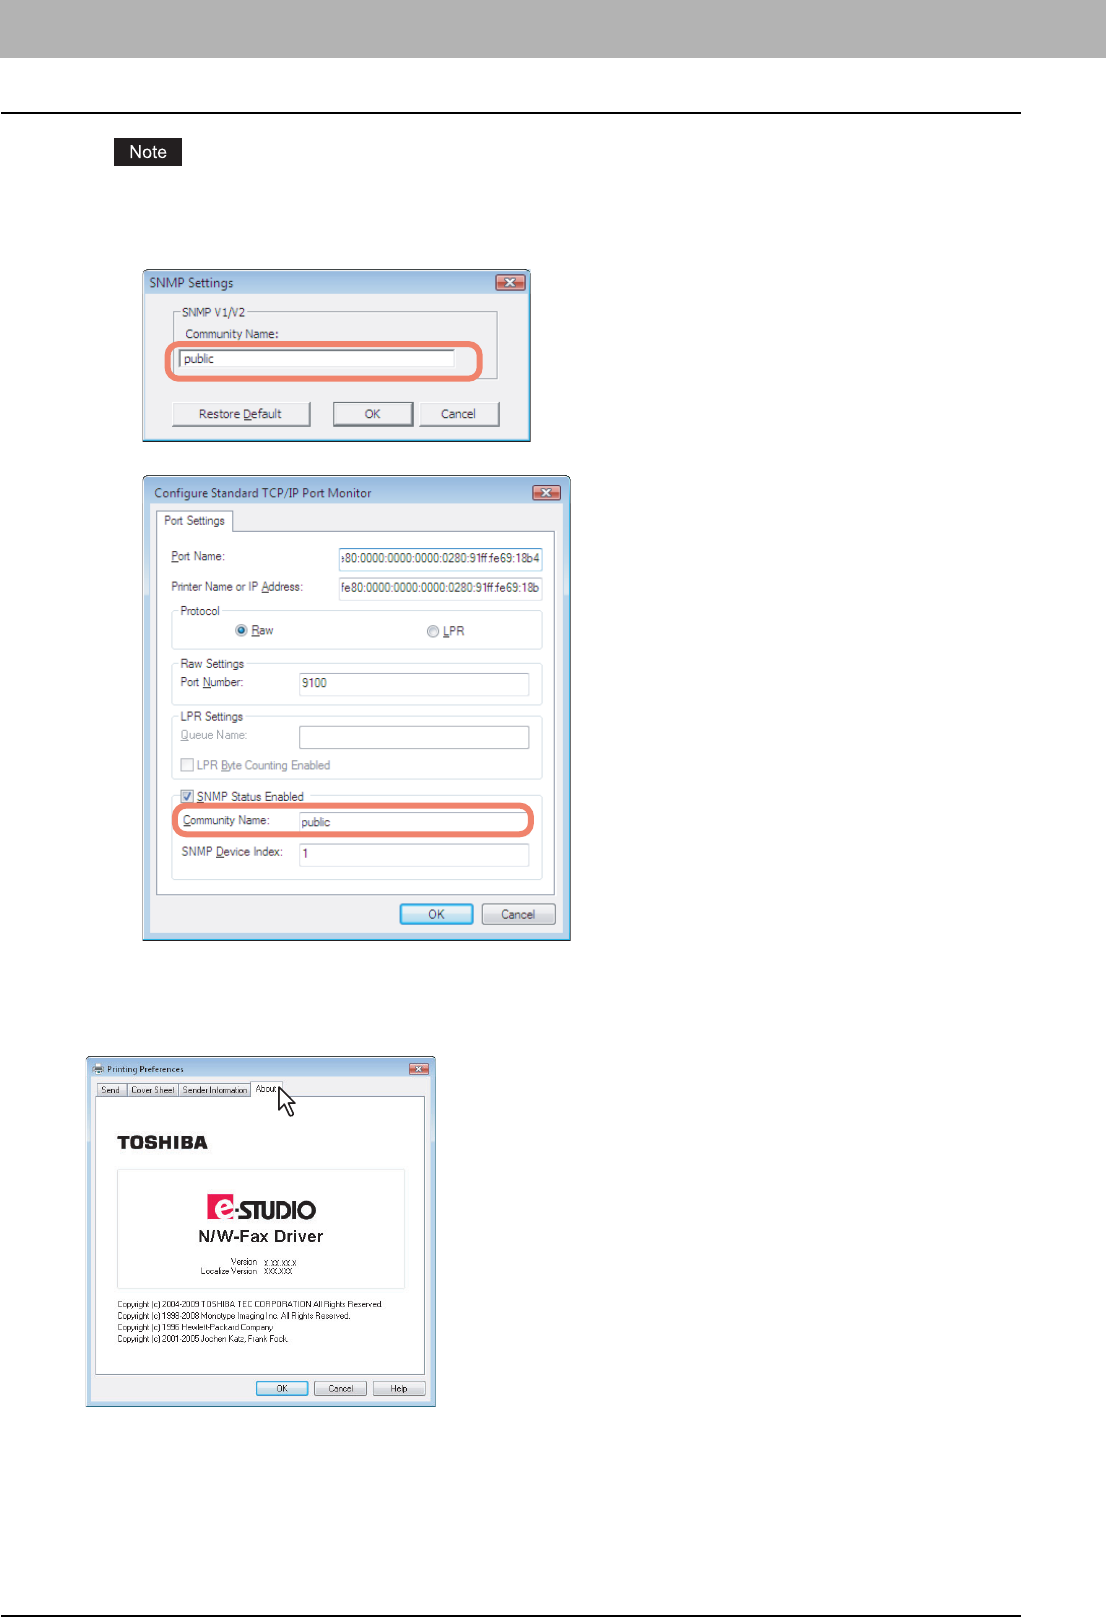
2) [SNMP Settings]
Click this button if a community name other than "public" (default) is set for the SNMP community name for your
TOSHIBA MFP.
The [SNMP Settings] dialog box appears so that you can change the SNMP community name.
1
2
3 SETTING OPTIONS
24 Setting up the N/W-Fax Driver Options
To send fax jobs normally, the SNMP community names must be the same in the following 3 settings. For help,
consult the administrator.
- Your TOSHIBA MFP
- [SNMP Settings] dialog box of the [Sender Information] tab
- TCP/IP port of the [Ports] tab in the N/W-Fax driver
Displaying the Version Information
In the [About] tab, you can display the version information for the N/W-Fax driver.
3 SETTING OPTIONS
Sending with Extended Fax Functionality 25
Sending with Extended Fax Functionality
The N/W-Fax driver allows users to perform the following features.
P.25 “Saving a fax as file”
P.26 “Delayed transmission”
P.27 “Sending with a cover sheet”
Saving a fax as file
You can save a document in the “TXFAX” folder in the “FILE_SHARE” folder in this equipment as well as sending the
document to fax numbers and Email addresses.
1
Display the [Send] tab and select the [Save as File] check box.
2
Select the file format in the [File Format] box.
3
Specify the other options to send a document and click [OK].
4
Click [OK] (or [Print]) to send a document to this equipment.
The document is saved in the “TXFAX” folder in the “FILE_SHARE” folder in this equipment.
y The saved file contains the cover sheet when the cover sheet is set.
y Since the image smoothing function does not work for the image stored in the “FILE_SHARE” folder, its
printing image quality differs from the normal fax image quality.

3 SETTING OPTIONS
26 Sending with Extended Fax Functionality
Delayed transmission
When the delayed transmission is specified, the fax is stored in the fax queue in this equipment and will be sent on the
specified date and time.
1
Display the [Send] tab and select [Send Fax Later] in the [Delayed Fax] box.
2
Click [Edit].
The [Scheduled Time] dialog box appears.
3
Select the date and time and click [OK].
y You can click the Date arrow to display a calendar then allows you to select an date.
y Enter the time to commence the fax transmission. You can use the up and down arrows to assist with setting
the time with the proper format.
The scheduled date cannot be more than one month from the current date. If the current month does not have
a date like the current date, then the date will be set at the last day of the following month. For example, if the
current date is March 31st. then the maximum date that can be selected for the scheduled fax is April 30th.
4
Specify the other options to send a document and click [OK].
5
Click [OK] (or [Print]) to send a document to this equipment.
3.SETTING OPTIONS
Sending with Extended Fax Functionality 27
3 SETTING OPTIONS
Sending with a cover sheet
You can choose to send a cover sheet with your fax transmission. The cover sheet is merged with the recipient [To] list
data to create a fax cover sheet. You can select what to include on the cover sheet such as sender or recipient
information.
When a printer driver whose name consists of 54 letters or more is specified for the default printer and an attempt is
made to send a fax with a cover sheet added from Microsoft Excel using a N/W-Fax driver with an IPP port, an XL error
may occur and fax transmission may be impossible. (This error does not occur in application software other than
Microsoft Excel.)
If this error occurs, perform one of the following and start sending a fax again.
- Use 30 letters or less for the N/W Fax driver name.
- Do not attach any cover sheet.
1
Display the [Cover Sheet] tab and select the cover sheet type in the [Cover Sheet] box.
For samples of the cover sheets, see the Appendix at the end of this guide.
P.32 “Cover Sheet Samples”
2
Select the font in the [Font Name] box.
The selected font applies to the text contents in the cover sheet.
3
Enter the subject to be displayed on the cover sheet in the [Subject] box.
You can enter up to 40 characters for the subject.
3 SETTING OPTIONS
28 Sending with Extended Fax Functionality
4
Enter the message to be displayed on the cover sheet in the [Message] box.
You can enter up to 500 characters for the message.
5
If you want the sender information to appear on the cover sheet, select the [Sender
Information] check box.
If you check this, click the [Sender Information] tab and enter the sender information in the text box. You can enter
up to 500 characters in the sender information text box.
6
If you want the recipients information to appear on the cover sheet, check the
[Recipients Information] check box and check the items required for the recipient
information.
Name — Check this to have the name of the recipient appear on the cover sheet.
Company — Check this to have the company name of the recipient appear on the cover sheet.
Department Name — Check this to have the department name of the recipient appear on the cover sheet.
Fax Number — Check this to have the fax number or Email address of the recipient appear on the cover sheet.
y Recipients information is obtained from the address book. If the recipient is added manually, this information
does not appear on the cover sheet except for the fax number or Email address.
y The recipients information for all recipients will appear on the cover sheet.
3.SETTING OPTIONS
Sending with Extended Fax Functionality 29
3 SETTING OPTIONS
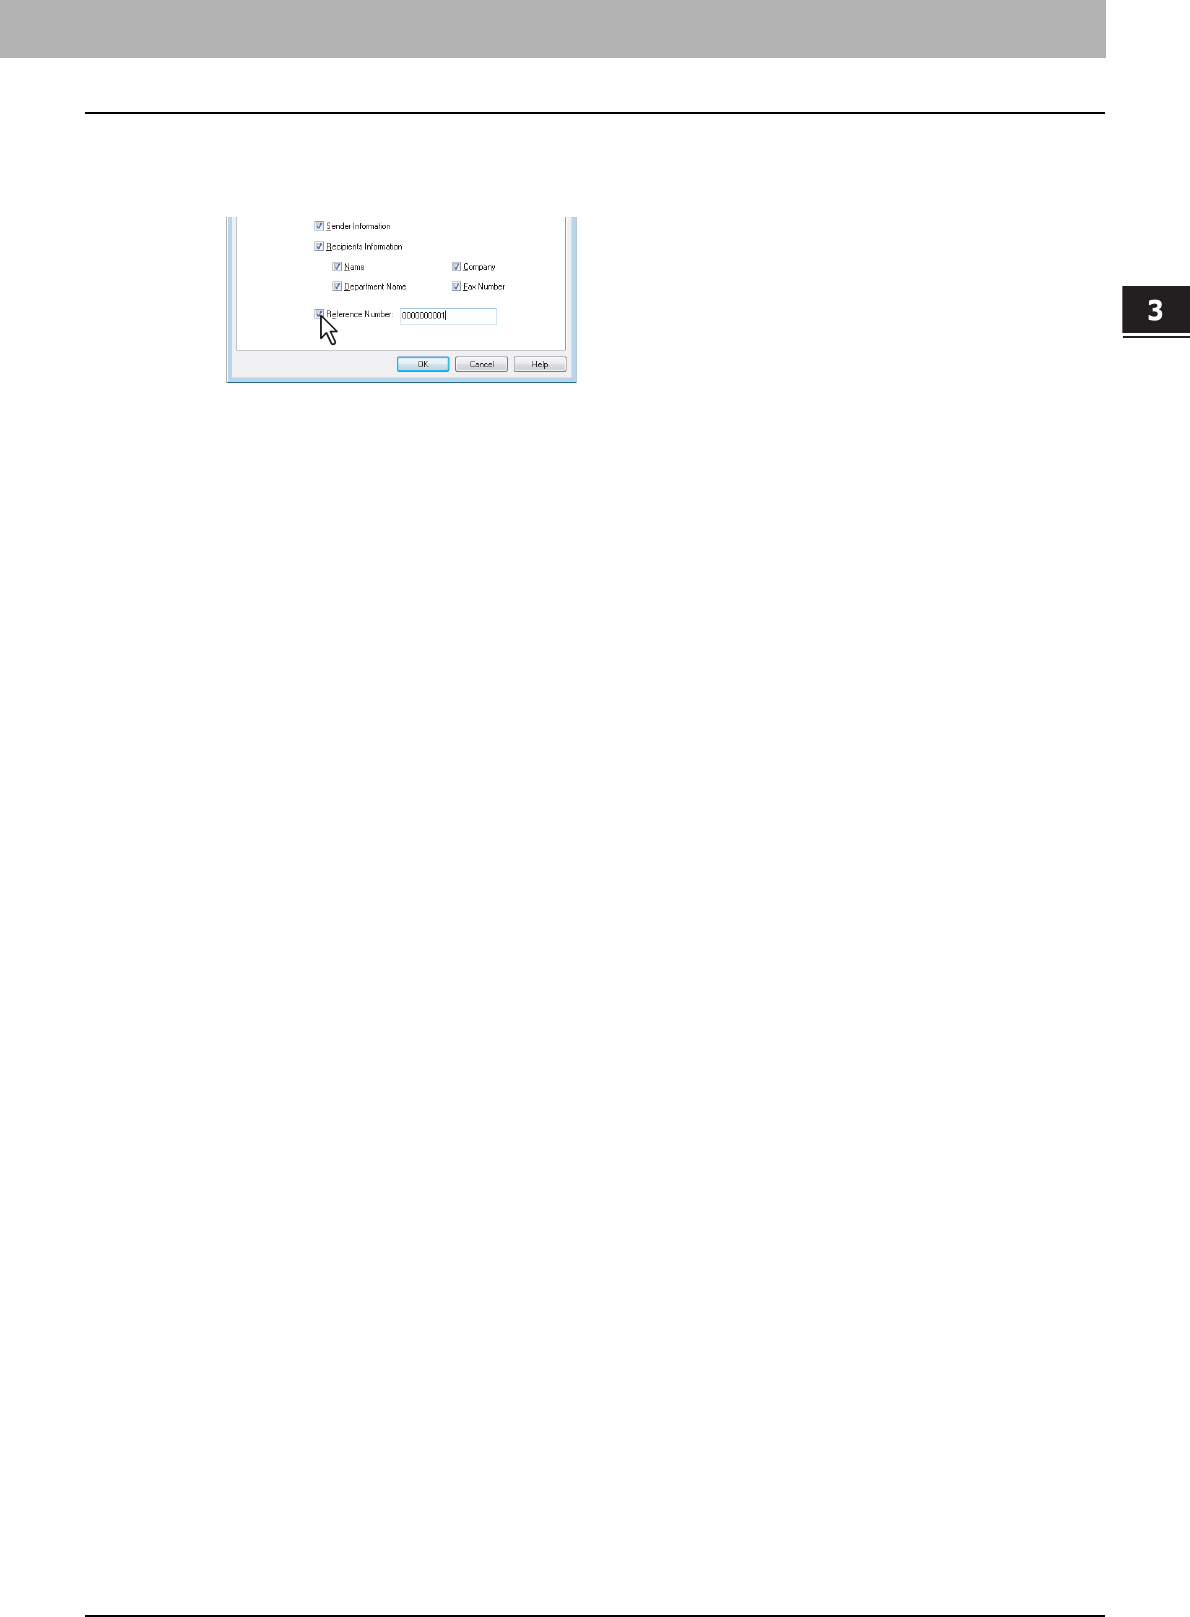
7
If you want the reference number to identify the document to appear on the cover
sheet, select the [Reference Number] check box and enter the reference number in the
text box.
You can enter up to 20 characters for the reference number.
8
Specify the other options to send a document and click [OK].
9
Click [Print] to send a document to this equipment.

4.APPENDIX
This chapter shows the cover sheet samples.
Cover Sheet Samples.............................................................................................................32
Standard Cover Page ...........................................................................................................................................32
Business Cover Page...........................................................................................................................................33
Professional Cover Page......................................................................................................................................34
4 APPENDIX
32 Cover Sheet Samples
Cover Sheet Samples
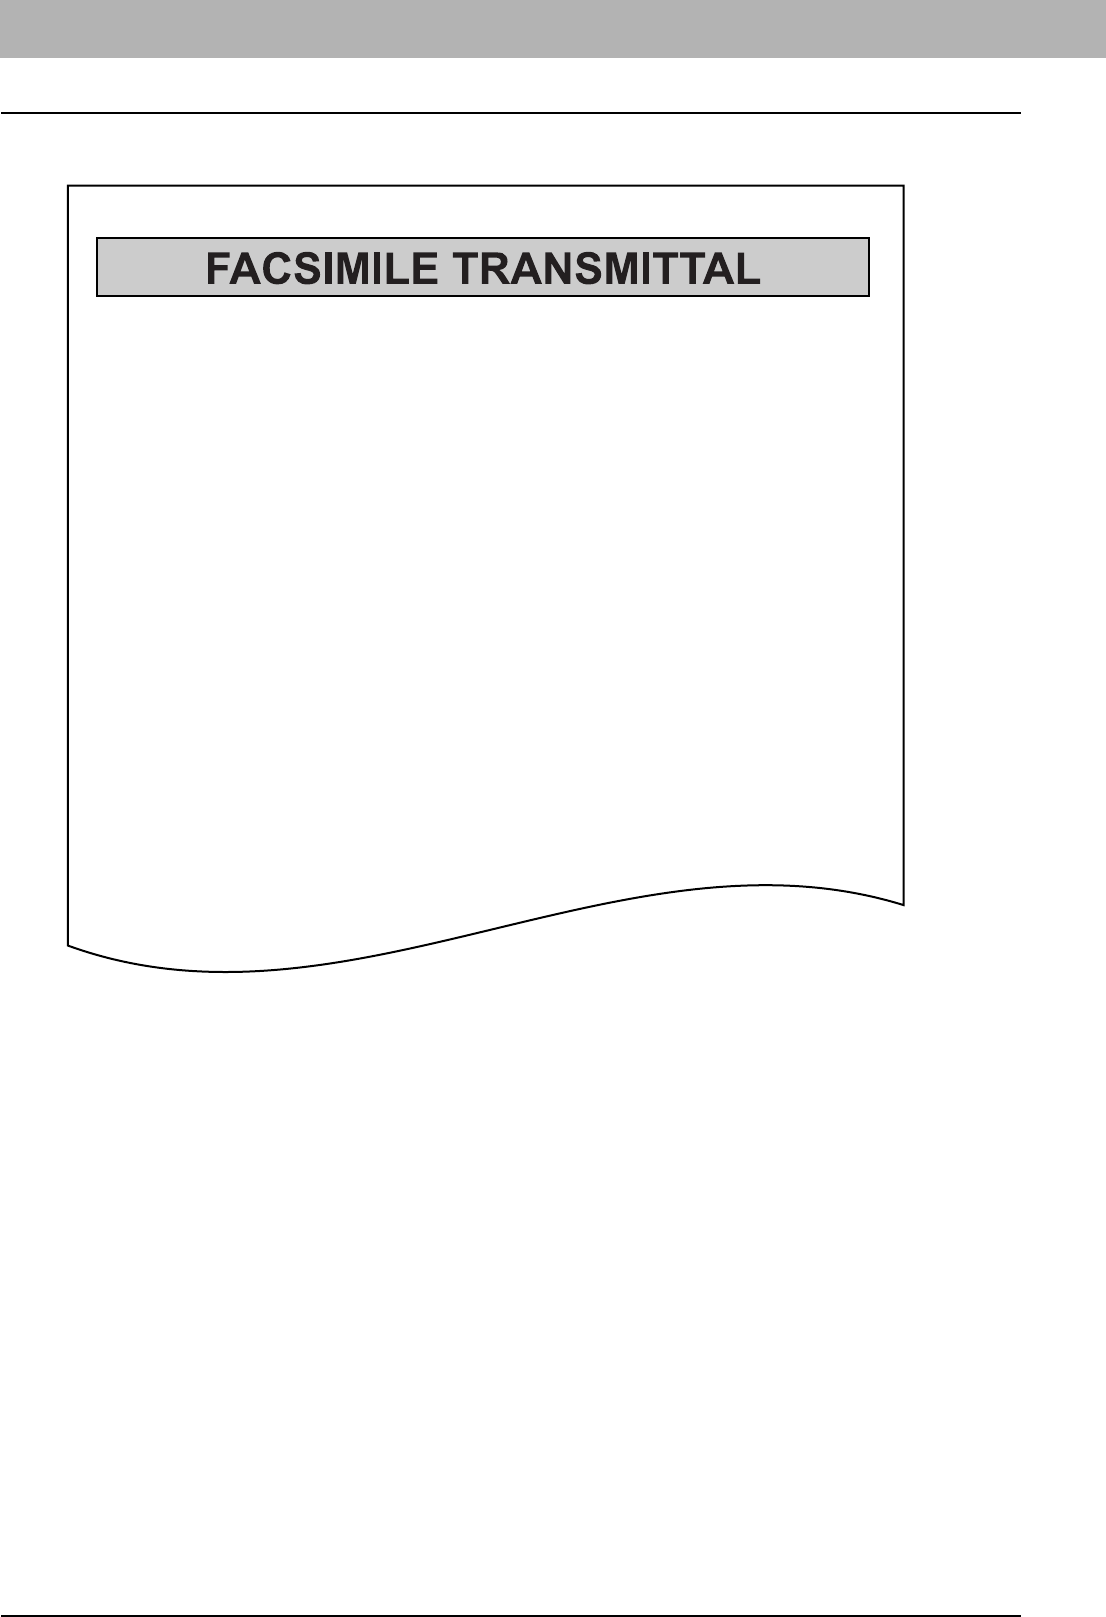
Standard Cover Page
Reference Number:
0000000000000000
To:
00000000001
From:
MFP-00C67861
Subject:
N/W-Fax Document
Message:
This is a N/W-Fax Document.
4.APPENDIX
Cover Sheet Samples 33
4 APPENDIX
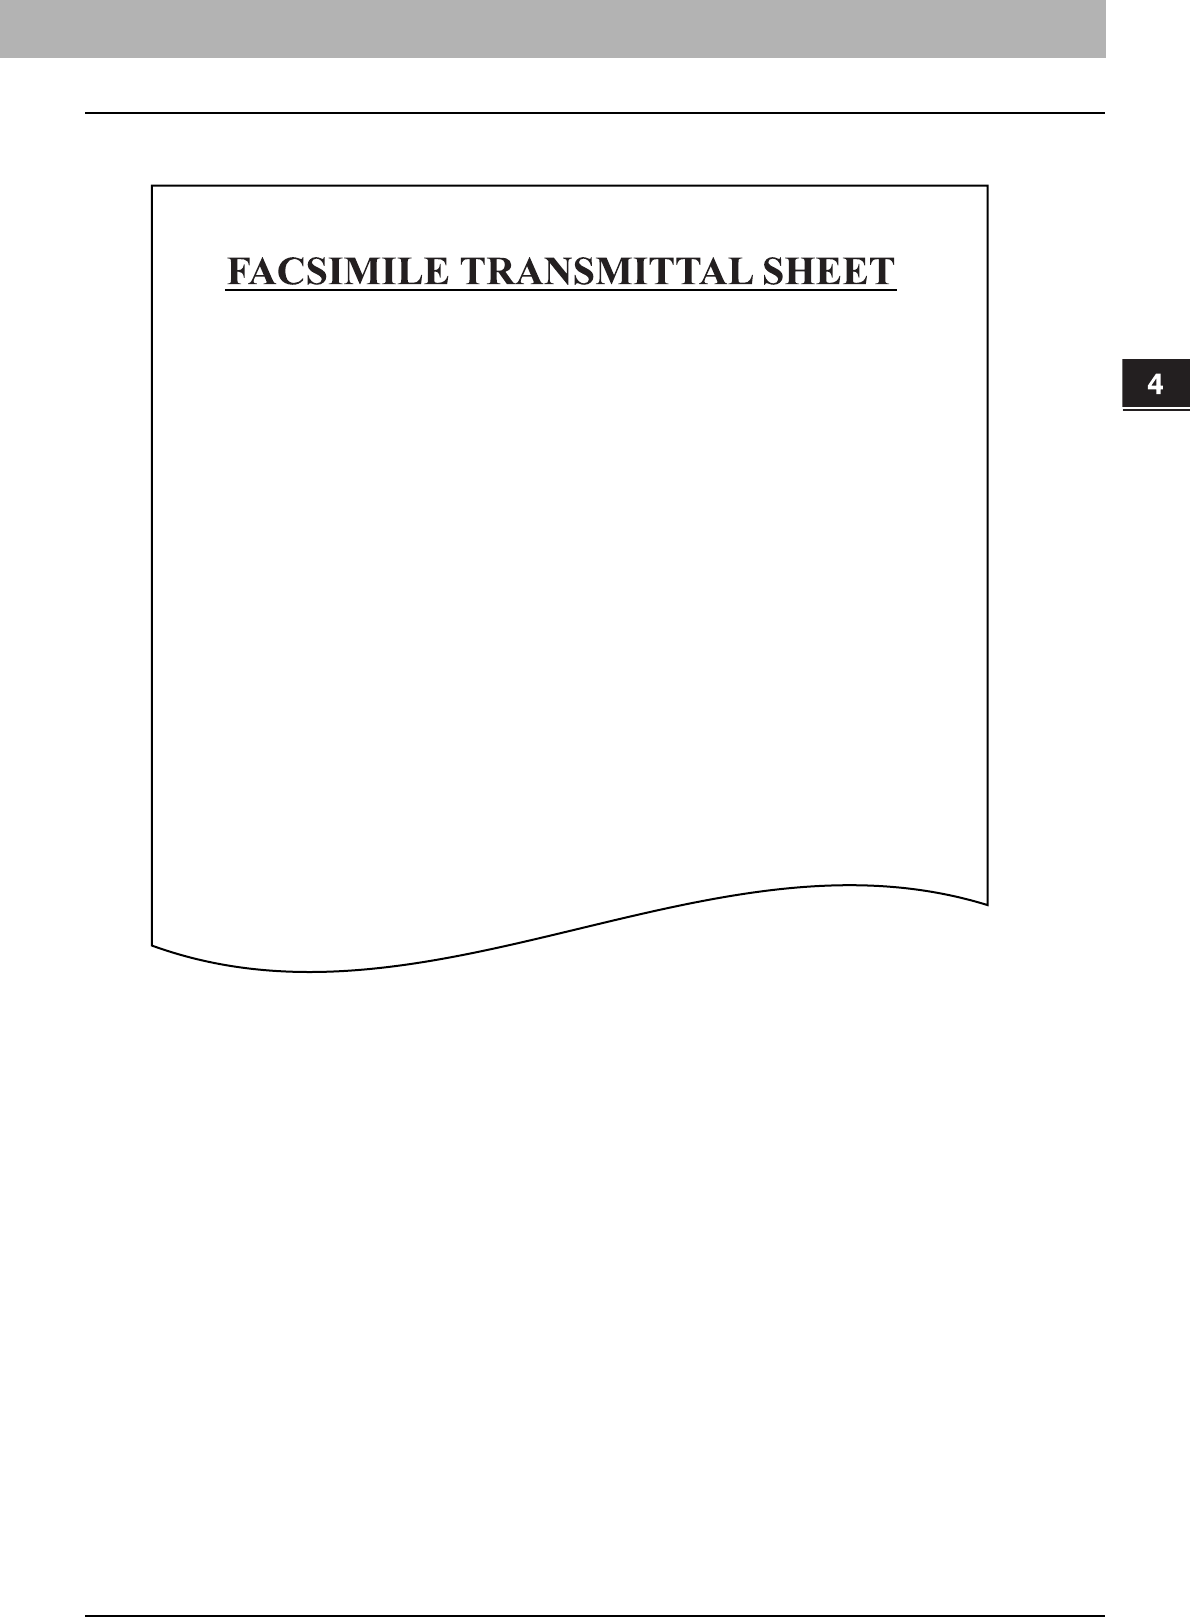
Business Cover Page
Reference Number:
0000000000000000
To:
00000000001
From:
MFP-00C67861
Subject:
N/W-Fax Document
Message:
This is a N/W-Fax Document.
4 APPENDIX
34 Cover Sheet Samples
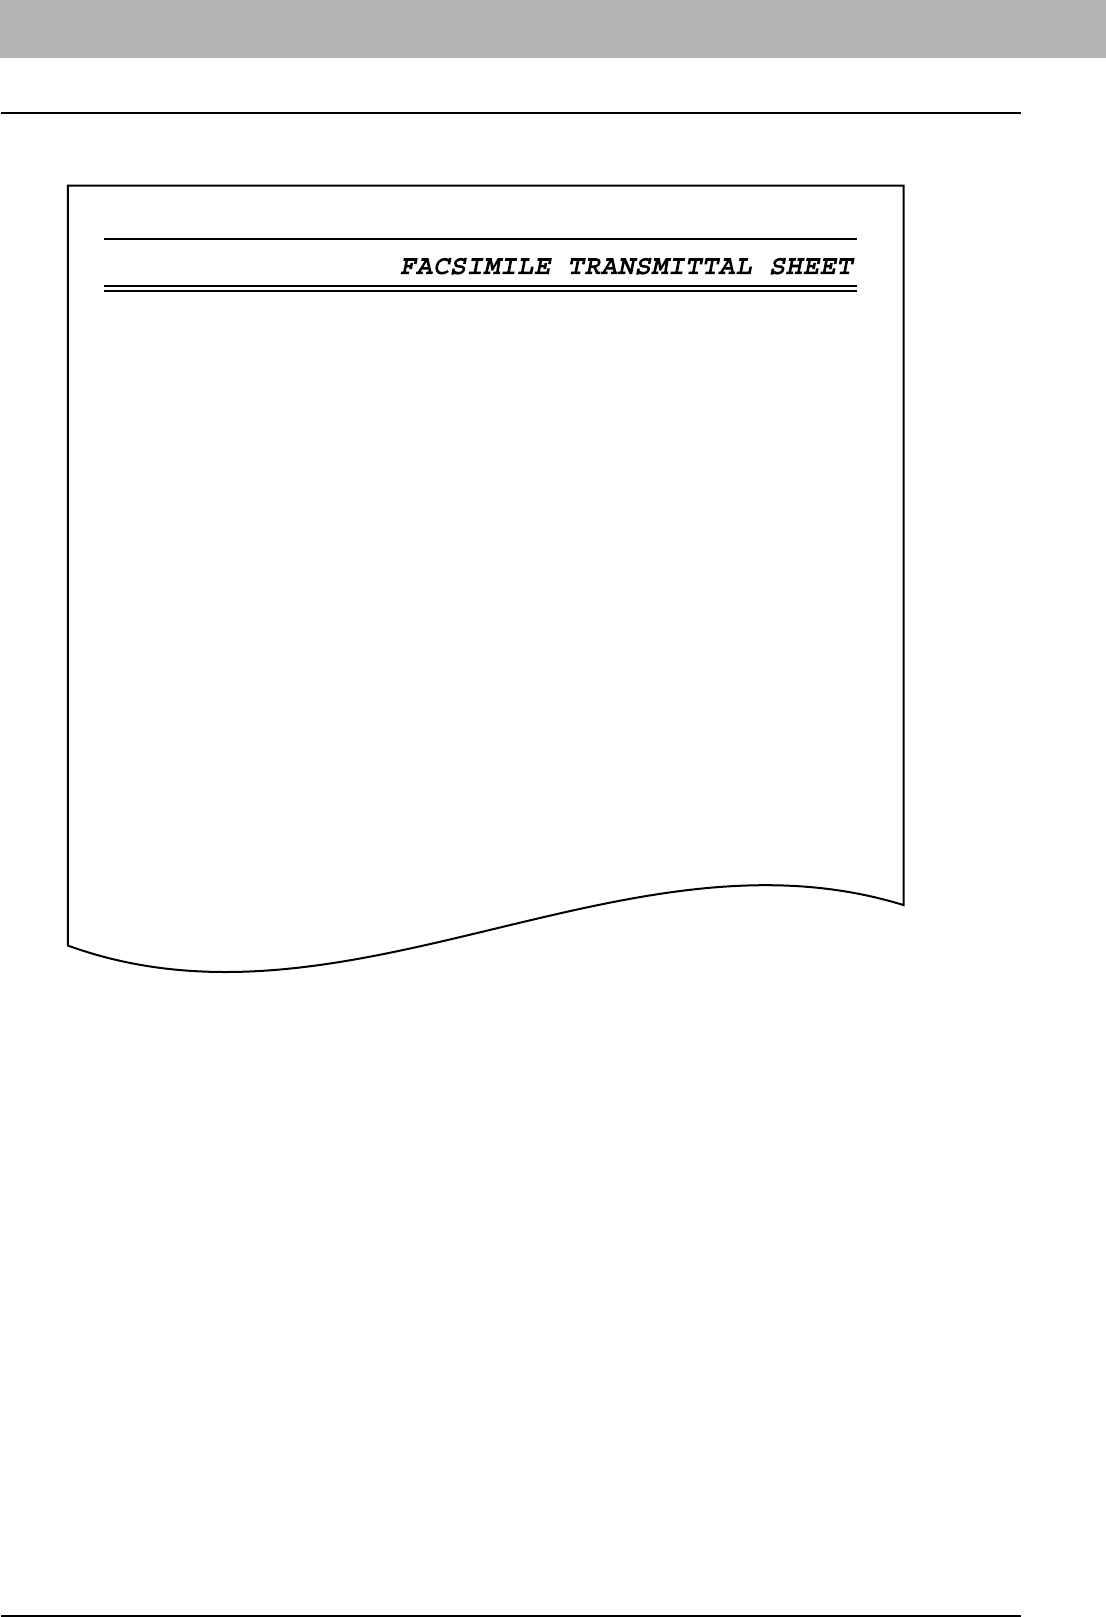
Professional Cover Page
Reference Number:
0000000000000000
To:
00000000001
From:
MFP-00C67861
Subject:
N/W-Fax Document
Message:
This is a N/W-Fax Document.

INDEX 35
INDEX
A
address book ...................................................... 11, 13
AddressBook Viewer ........................................... 11, 13
B
Basic Procedure ..........................................................8
Business Cover Page .................................................33
C
Cover Sheet ..............................................................22
[Cover Sheet] tab .......................................................22
D
Delayed Fax ..............................................................22
[Delayed Fax] box ......................................................26
Dept. Code ................................................................21
F
Features and Functions ................................................6
File Format ................................................................22
[File Format] box ........................................................25
Font Name ................................................................22
[Font Name] box ........................................................27
I
Initial Values ..............................................................20
M
Message ...................................................................22
[Message] box ...........................................................28
N
N/W-Fax Driver Options ..............................................21
[New] ................................................................. 10, 21
O
Orientation ................................................................22
P
Paper Size ................................................................21
Professional Cover Page ............................................34
PWD ........................................................................10
R
Recipient Information .................................................23
[Recipients Information] check box ...............................28
Reference Number .....................................................23
[Reference Number] check box ...................................29
[Remove] ..................................................................21
Removing recipients ...................................................17
Resolution .................................................................21
S
Save as File ..............................................................22
[Save as File] check box .............................................25
[Select From Address Book] ........................................21
[Send] tab .................................................................21
Sender Information ....................................................22
[Sender Information] check box ...................................28
[Sender Information] tab .............................................23
[SNMP Settings] ........................................................23
Specifying Recipients .................................................10
Standard Cover Page .................................................32
SUB .........................................................................10
Subject .....................................................................22
[Subject] box .............................................................27
T
To ........................................................................... 21
V
Version Information ................................................... 24

36 INDEX
FC-5520C/6520C/6530C
FC-2020C/2330C/2820C/2830C/3520C/3530C/4520C
DP-2090/2520/3000/3570/4570
DP-5550/6550/7550/8550
OME080026D0

2-17-2, HIGASHIGOTANDA, SHINAGAWA-KU, TOKYO, 141-8664, JAPAN
MULTIFUNCTIONAL DIGITAL SYSTEMS
Network Fax Guide
©2008, 2009 TOSHIBA TEC CORPORATION All rights reserved
R071220F0904-TTEC
Ver04 2009-12
